Document Upload: Ironclad to Dynamics 365
The ability to seamlessly access and retrieve contract documents from Ironclad directly within Dynamics 365 is a crucial feature for CLM. This interaction eliminates the need to switch between systems and ensures that sales teams, account managers, and executives can instantly access critical contract documentation while working with customer records. Having access to both draft and executed agreements within Dynamics 365 hot only improves efficiency but also can ensure that teams are working with the most current version of documents.
Example use cases for enabling document access and retrieval from Ironclad to Dynamics:
- Accelerate deal velocity by reducing contract review cycles by having all documents and customer data in one place
- Enhance customer experience by having full contract visibility during customer calls
- Minimization of compliance risks through consistent document access and version control
- Desire to drive better strategic decisions with comprehensive contract access
How to Implement
This diagram illustrates how a draft contract document can flow seamlessly from Ironclad and Dynamics 365. When a draft contract is created from launching a workflow from Dynamics 365, the docx file from the Ironclad workflow will be uploaded to Dynamics 365. Users will have access the docx file directly within the relevant Dynamics 365 record.
The implementation consists of 10 functional components that work together to create a comprehensive contract automation that makes a docx file in Ironclad accessible in Dynamics after a workflow is launched.
| Step | Connector | Action | Description |
|---|---|---|---|
| 1 | Dataverse/Dynamics | When a row is added, modified, or deleted | First, we'll configure the agreement creation trigger in Dynamics 365, which listens for a new row being added in the table, which represents a new order form being created. |
| 2 | Ironclad | Create a Workflow Asynchronously | Second, we'll implement the workflow launch function that takes the agreement details from Dynamics 365 and programmatically initiates the corresponding MSA workflow in Ironclad, ensuring all relevant data is mapped correctly to launch the workflow in Ironclad. |
| 3 | Dataverse/Dynamics | Update a row | When the workflow is launched, this field will pass data to the Ironclad Workflow field in the agreement. |
| 4 | Dataverse/Dynamics | Get a row by ID | This action gets the agreement data that was updated in Dynamics. |
| 5 | Dataverse/Dynamics | Add a new row | Adds a row to the Note table for the note payload. |
| 6 | Ironclad | Retrieve a Workflow | Using the workflow ID returned from the webhook trigger event, we’ll call the Retrive a Workflow endpoint. |
| 7 | Dataverse/Dynamics | Add a new row | Using the Dataverse connector Update a row, the Workflow ID attribute, and the Workflow Name will be retrieved from the output of the Retrieve a Workflow Step. These properties will be used to create a new row in the Workflows table. |
| 8 | Dataverse/Dynamics | Add a new row | We will also need to add a new row in the Workflow Documents table for the document key, name, unique key, and workflow. |
| 9 | Ironclad | Retrieve a Workflow Document | This step will retrieve the document file from the workflow. |
| 10 | Dataverse/Dynamics | Upload a file or an image | The file will be be uploaded to the Workflow Documents Table |
Detailed Steps in Power Automate
For this example we will add onto the Design Pattern steps that we created for Launching an Ironclad Workflow Directly from Dynamics as well as Updating Contract Status from Ironclad to Dynamics.
Step 1 (trigger setup) and Step 2 (asynchronous workflow launch) are identical to those outline in the “Launching and Ironclad Workflow Directly from Dynamics” section above. Please refer to that section for detailed instructions.
Update a row
Updating Agreement Fields: There are first that can be updated by the agreement. This step demonstrates how those fields can be updated after the launch of a workflow.
- Table name: The Agreements table should be selected.
- Row ID: The Row ID in this instance will be the agreement ID which may not be visible through dynamic content. You may need to create the following expression to get the correct data from the trigger payload: triggerOutputs()?[‘body/cre6f_agreementid’
- Ironclad Workflow: Expand Advance Options where you’ll see all of the fields that can be updated. For this example we’ll update ‘Ironclad Workflow’ which a web URL, https://demo.ironcladapp.com/c/
Get a row by ID
Get agreement ID from Update a row step: It will be important to make sure we know where to put workflow data back into Dynamics. This step accomplishes this by getting the Agreement ID from the Agreements Table.
- Row ID: Choose Agreement from dynamic table drop down from the Update a row step.
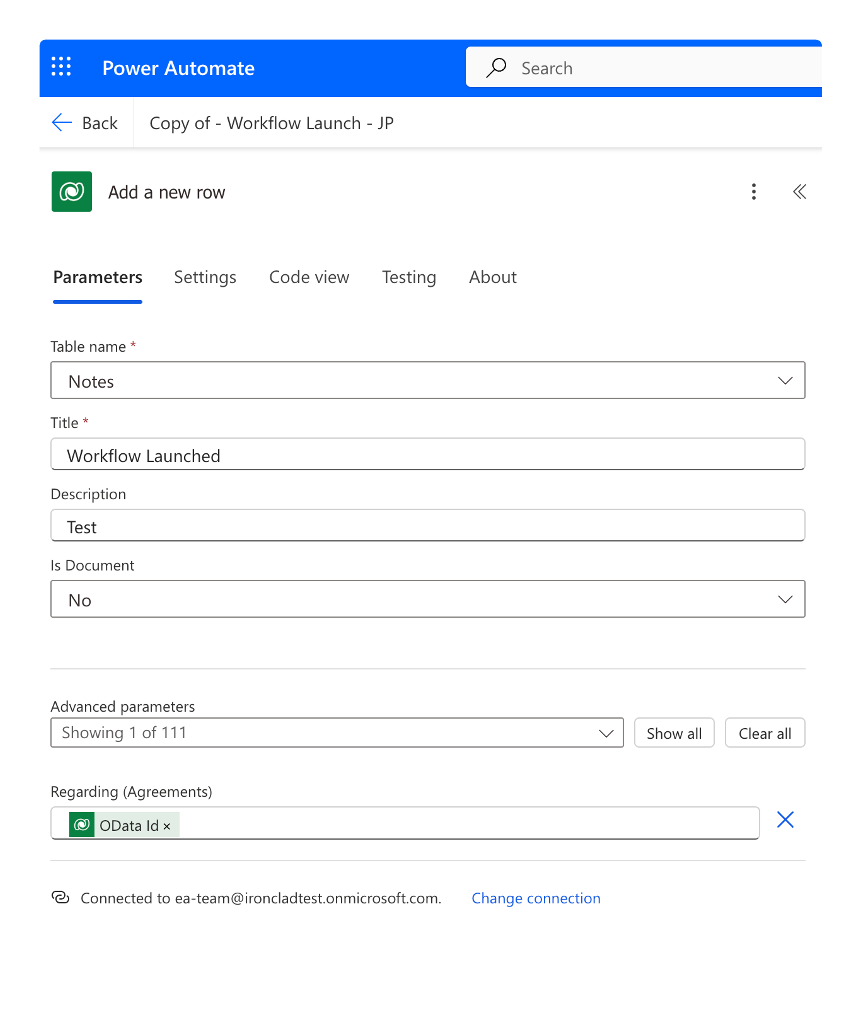
Add a new row
Add a Note: This step enables the ability to add a note to the Notes Table, such as Workflow Launched.
-
Table name: Select Notes
-
Title: You can type whatever message you want in this field, or you can add a property. For this example we’ll add the text “Workflow Launched”
-
Description: This is also an open text field. For this example we’ll enter “Test”
-
Is Document: We’re not attaching a document in this field so we’ll select No
-
Regarding (Agreements): It’s critical to align the notes data with the agreement. This is accomplished by using the OData Id. Select Advanced parameters and enter OData Id from the Get a Row step.
Retrieve a Workflow (Ironclad Connector)
Retrieve Workflow Properties: The Retrieve a Workflow action calls the Retrieve a Workflow endpoint in Ironclad’s API. The single path parameter required is the workflow ID. The workflow ID is returned in the payload of the trigger from the Retrieve the Status of an Async Workflow Step..
- Custom Value Expression for Workflow ID: In order to retrieve the workflow ID, a custom value expression needs to be entered in the Power Automate Step. Using the Event Data Trigger Payload in the Dynamic content tab, an expression will have to be entered as follows: outputs(‘Retrieve_the_Status_of_an_Async_Workflow_Create_Job_1’)?[‘body’][‘workflow’][‘id’].
Once the expression has been entered, please Add to fully configure the Retrieve a Workflow step.
Add a new row (Dataverse/Dynamics Connector)
We will need to add two add a row steps to add rows to both the Workflow and Workflow Documents Table.
Add a New Row to the Workflows Table: The payload from the Retrieve Workflow step will be used to populate the required field in the Workflows table to ensure that the correct workflow data is being retrieved from Ironclad.
- Table name: Select the Workflows table.
- Ironclad ID: The Ironclad ID needs to be mapped to the Workflow ID which can be obtained from the previous step.
- Name: The name field should be mapped to the Workflow Title property.
Add a New Row to the Workflow Documents Table: When you start to configure this step you will notice that Power Automate will automatically add an Apply to each step before this step. The reason why this is added, is because there could be more than one in the workflow. The ‘Select an output from previous steps’ parameter should be set to Workflow Document Array. The payload from the Retrieve Workflow step will be used to populate the required field in the Workflows table to ensure that the correct workflow document data is being retrieved from Ironclad.
- Table name: Select the Workflows Documents table.
- Key: The Workflow Document Version property should be mapped to Key.
- Name: The name in this case needs to be the Workflow Document Version File Name property.
- Unique Key: A unique key value will need to be created. In this example we will use the Workflow ID property concatenated with the Workflow Document System Name.
- Workflow (Workflows): The OData id value can be used as a unique identifier to link to the Workflows table. This value is pulled from the Add a new row step for the workflow table.
Retrieve a Workflow Document (Ironclad Connector)
Retrieve Document from Ironclad: When you start to configure this step you will notice that Power Automate will automatically add another Apply to each step. This is also done because there could be multiple documents in the workflow. The Select an output from previous steps parameter should be set to the Workflow Document Versions property.
- Workflow: Map the workflow to the Workflow ID field from the Retrieve a Workflow step.
- Document Key: Workflow Document Version Key should be selected which is also from the Retrieve a Workflow Step.
Upload a file or image (Dataverse/Dynamics Connector)
Upload docx File to Dynamics: Now we’re ready to upload the file to the Workflow Documents table which will make the file accessible in Dynamics.
- Content name: Workflow Document Version Filename from the Retrieve a Workflow step.
- Table name: Workflow Documents
- Row ID: The Row ID can be obtained from the Add a New Row Step that was used for the Workflow Documents Table. The property is called Workflow Document. You may need to use the expression function to find it
- Column name: File
- Document: Document from the Retrieve a Workflow Document step.
The flow should now be saved and tested. The complete flow should look as follows:
When running the test, the Power Automate Flow will stand-by for the ‘When a row is added, modified or deleted’ trigger to fire. In Dynamics 365, create a new agreement, and complete the following fields in the Order Form:
- Name: Dynamics 20
- Agreement Value: $100,000
- Agreement Start Date: 12/18/2024
- Counterparty Signer Name: Use the counterparty’s signer name
- Counterparty Signer Email: Use the counterparty’s email address
All other fields should be blank.
Once the Order Form has been Saved the Power Automate flow will be initiated. The executed flow in Ironclad will now have all of the metadata properties that were in the order form in Dynamics.
Launched Workflow in Ironclad
Updated Agreement and Notes in Dynamics 365 from Ironclad
Workflow Tab Updated in Dynamics 365 from Ironclad
Workflow Document Form Updated in Dynamics from Ironclad
Draft Agreement docx File Uploaded to Dynamics from Ironclad
Updated 8 months ago