Sync Jira Data to Ironclad (Automation Rule)
Goal
Sync Jira data to an Ironclad workflow by updating the workflow's (1) approval status and (2) metadata during the review step.
Overview
This solution pattern provides a method for pushing Jira approvals and data to Ironclad. These actions must occur during Ironclad’s review step when contract approvals and metadata can be updated. If you attempt to make these updates when the workflow is not in the review stage, the Ironclad API calls will return with an error.
This solution pattern is built around the use case of a Finance team reviewing pricing details for a vendor agreement in Jira. The Finance team fills in a Total Contract Value Jira field and registers their approval by transitioning the issue from Finance Review to Legal Review. Their approval will be sent to Ironclad along with the Total Contract Value.
Prerequisite: The Launch Ironclad Workflow from Jira (Automation Rule) solution pattern must be completed before you attempt to configure the solution described in this section. That solution pattern stored key Jira information (Jira Issue ID) in the Ironclad workflow and key Ironclad workflow data (Ironclad Workflow ID) in the Jira issue.
Details
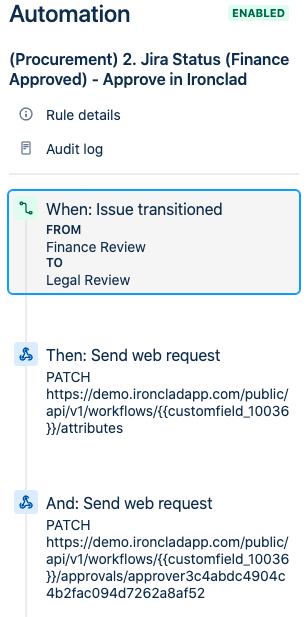
The following figure shows the components in the Jira automation rule:
- Pushing metadata from Jira to Ironclad by sending a request to Ironclad's Update Workflow Metadata endpoint.
- Pushing an approval from Jira to Ironclad by sending a request to Ironclad’s Update Approval on a Workflow endpoint.
We'll now walk through the steps to configure this rule and make the necessary configuration changes in Jira and Ironclad.
Configure Ironclad workflow
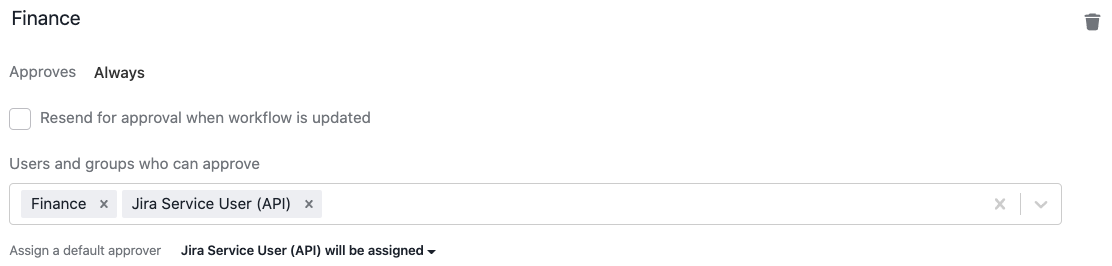
- In Ironclad, create an approver that represents the Finance approver.
- Default approver: Select the Ironclad service account used in the setup for Launch Ironclad Workflow from Jira (Automation Rule) as the default user.
- An approval can only be updated via public API if the request targets the user currently assigned as the approver; here we are using the same Ironclad service account in order to provide a consistent target for the Jira automation rule, but you may need to manage more complex approver rules with your workflow.
- Adding additional human approvers is recommended as a backup; the backup approvers can re-assign the task to themselves and manually provide approvals if an unexpected issue occurs.
- Resend for approval: Uncheck the Resend for approval when workflow is updated option if the approval is a one-time event. By default, approvals are resent whenever the document or metadata changes. Unchecking this option avoids the need to seek re-approval for one-time approvals. For approvals that are not one-time checks, many teams opt to use ad-hoc approvals and manual intervention for flexibility.
- Default approver: Select the Ironclad service account used in the setup for Launch Ironclad Workflow from Jira (Automation Rule) as the default user.
Configure Jira Issue
- In Jira, identify fields and/or statuses that will be used to trigger the update in Ironclad and supply Ironclad with metadata.
- This solution pattern uses a status transition from
Finance ReviewtoLegal Reviewto trigger the update. - This solution pattern uses a Jira number field called Total Contract Value (USD) that is passed to Ironclad as metadata for the workflow.
Jira Automation - Configure Trigger
- In Jira, create a new automation rule and configure the trigger.
- Click Create Rule and select Issue Transitioned as the trigger. Your trigger may differ depending on your company's business process and conditions. This example will use a transition from a
Finance Reviewstatus to aLegal Reviewstatus as the relevant trigger. - Name the rule (e.g.,
2. Finance Review Completed - Update Ironclad Data).
- Click Create Rule and select Issue Transitioned as the trigger. Your trigger may differ depending on your company's business process and conditions. This example will use a transition from a
Jira Automation - Update Ironclad Workflow Metadata
This section will cover sending an update request from Jira to the Ironclad Update Workflow Metadata endpoint.
- Before proceeding, retrieve the Jira custom field ID that you used to store the Ironclad Workflow Id in the Launch Ironclad Workflow from Jira (Automation Rule) guide.
- See Jira's guide on locating field IDs for a how-to on retrieving these IDs.
- Recall also that each Jira Automation that uses Ironclad APIs must first make a call to generate a token for the other calls in that Automation. You may refer to Jira's guide on Authenticating OAuth 2.0 for outgoing web requests in Jira Automation rules, or to the configuration of the Workflow Launch Step in the Launch Ironclad Workflow from Jira (Automation Rule) guide.
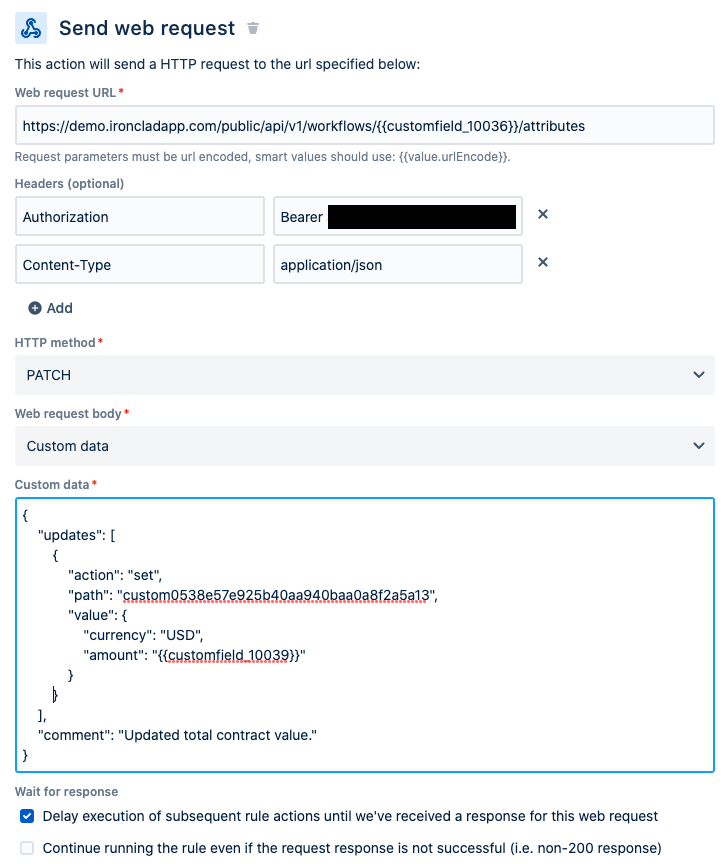
- In Jira, add a Send Web Request component to the automation rule.
- For URL, enter
https://[YOUR_IRONCLAD_DOMAIN]/public/api/v1/workflows/[WORKFLOW_ID]/attributesto call the endpoint.- Replace [YOUR_IRONCLAD_DOMAIN] with the domain where you are making the comment (e.g.,
preview.ironcladapp.com, demo.ironcladapp.com, na1.ironcladapp.com). - Replace [WORKFLOW_ID] with the custom field ID you created in Jira to store the Ironclad Workflow Id.
- Replace [YOUR_IRONCLAD_DOMAIN] with the domain where you are making the comment (e.g.,
- For Headers, add
AuthorizationandContent-Typeheaders.- For
Authorization, the value should beBearer {{webhookResponse.body.access_token}}
- For
- For HTTP Method, select PATCH.
- For Web request body, select Custom data and populate the JSON using the following information:
- Add an
updatesarray property. Map the Ironclad fields you wish to update to the relevant Jira fields. This example includes updates to a monetary amount field in Ironclad. See Update Workflow Metadata for a detailed guide on types of updates and formatting. - Add a
commentproperty summarizing the update. The comment will be posted in the workflow's activity feed and attributed to the original Workflow Owner.
- Add an
- Check the Delay execution of subsequent rule actions. . . checkbox and click Save.
- For URL, enter
Jira Automation - Update Ironclad Workflow Approval
This section will cover sending a web request to the Update Approval on a Workflow endpoint.
- Recall that each Jira Automation that uses Ironclad APIs must first make a call to generate a token for the other calls in that Automation. You may refer to Jira's guide on Authenticating OAuth 2.0 for outgoing web requests in Jira Automation rules, or to the configuration of the Workflow Launch Step in the Launch Ironclad Workflow from Jira (Automation Rule) guide.
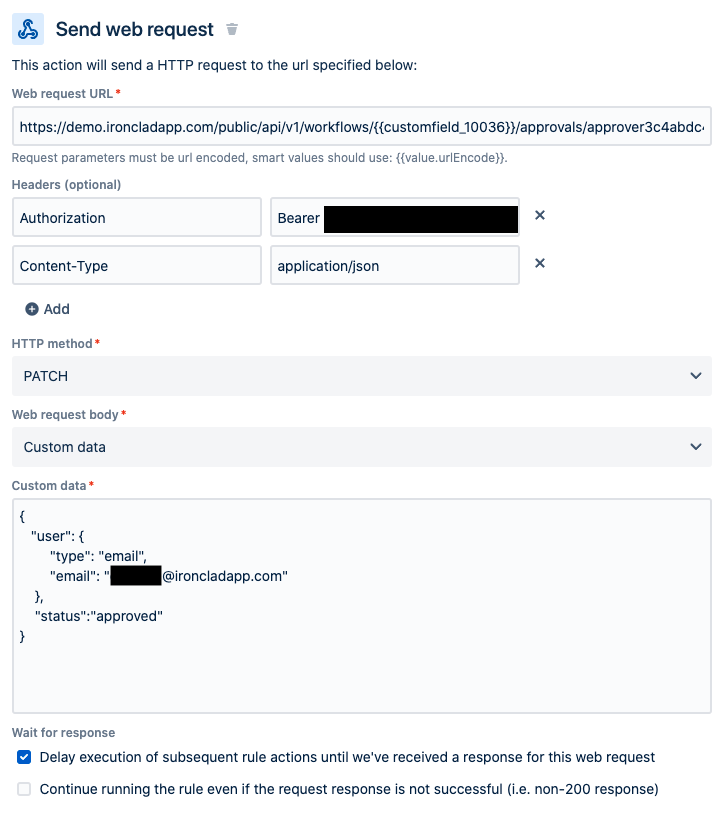
- In Jira, add a Send Web Request component to the automation rule.
- For URL, enter
https://[YOUR_IRONCLAD_DOMAIN]/public/api/v1/workflows/[WORKFLOW_ID]/approvals/[APPROVER_ROLE_ID]to call the endpoint.- Replace [YOUR_IRONCLAD_DOMAIN] with the domain where you are making the comment (e.g.,
preview.ironcladapp.com, demo.ironcladapp.com, na1.ironcladapp.com). - Replace _[WORKFLOW_ID]_with the custom field ID you created in Jira to store the Ironclad Workflow Id.
- Replace [APPROVER_ROLE_ID] with the unique ID of the Finance approver role in Ironclad. Approver IDs can be located in Ironclad by starting a test workflow and, while the workflow is in the review step, sending a request to the Retrieve a Workflow endpoint using the workflow's ID.
- Replace [YOUR_IRONCLAD_DOMAIN] with the domain where you are making the comment (e.g.,
- For Headers, add
AuthorizationandContent-Typeheaders. - For HTTP Method, select PATCH.
- For Web request body, select Custom data and populate the JSON using the following information:
- Add a
userobject to designate the user who is approving for the approver role.- Add
"type"as the first key with"email"as the value. - Add
"email"as the second key with the user's Ironclad email as the value. - Reminder: The user must be a valid Ironclad user account and must be currently assigned to the approver role; if the approval is reassigned to a different user, the request will fail. Creating a user account that represents the system (e.g.,
jira@my_company.com) is one method for increasing reliability.
- Add
- Add a
"status"property with the value"approved"to toggle the approval frompendingtoapproved.
- Add a
- Check the Delay execution of subsequent rule actions. . . checkbox and click Save.
- For URL, enter
- Publish your Jira automation. Congratulations, you have an automation rule that can sync Jira approvals and data to Ironclad workflows!
Updated about 1 month ago