Launch Ironclad Workflow from Jira (Automation Rule)
Goal
Allow users to submit an Ironclad workflow in Jira and associate the Ironclad workflow with the Jira issue.
Overview
This solution pattern (1) enables Jira users to launch Ironclad workflows and (2) associates the new Ironclad workflow with the Jira issue. Workflows are associated with Jira issues by updating the issue with the workflow’s URL and ID and by posting comments in Jira's and Ironclad's respective activity feeds.
 Start Ironclad Workflow (13).png")
API Request Flow
Details
The following figure shows the components in the Jira automation rule:
- Starting an Ironclad workflow using the Create a Workflow Synchronously endpoint. See the Launch a Workflow guide for a comprehensive walkthrough of the endpoint, including complex data payloads and limitations.
- Update the Jira issue with the workflow’s information. The Ironclad workflow ID is required for all other solution patterns that interact with the workflow.
- Posting a comment in the Jira issue to confirm successful launch for user awareness.
- Posting a comment in the Ironclad workflow’s activity feed with a link to the Jira issue for user awareness.
We'll now walk through the steps to configure this rule and make the necessary configuration changes in Jira and Ironclad.

Jira Automation Rule Overview
Configure Ironclad Workflow Fields
-
In Ironclad, prepare a workflow that includes a Jira Issue ID text field in the launch form; this field will be used to store the Jira issue’s unique id when the workflow is launched. You can also add any other fields that you wish to populate with Jira information. For simplicity, we strongly recommend starting with the minimum number of fields (e.g., Jira Issue ID and Counterparty Name fields) to verify that the integration is working properly and adding additional fields afterwards.
-
In Ironclad, review the launch form and identify any required fields whose data cannot be supplied by Jira.
- Workflows created via API are automatically submitted; users do not fill in the launch form. As a result, any required fields on the launch form must be included in the API request.
- Convert any required fields whose information cannot be supplied to (1) optional fields or (2) internal form fields.
- Note that internal user dropdowns are not supported in the Launch API at this time. Consider either (1) configuring any internal signer fields to use a group with a default user and updating the signer during the sign step when necessary or (2) moving the field to an internal form. See the Launch a Workflow guide for a comprehensive walkthrough of the endpoint, including complex data payloads and limitations.
- In Ironclad, publish the workflow after completing the preceding steps.
Configure Jira Issue Fields
- In Jira, modify your issue to include the following text fields.
- Vendor Name
- Contract Requestor Email
- Ironclad Workflow ID
- Ironclad Workflow URL
Contract Requestor Email will be required to launch the Ironclad workflow and the remaining fields will be used to store Ironclad data.
- In Jira, create an automation rule to populate Contract Requestor Email using the reporter's information.
- Click the Gear icon (
 ) > System Settings > Automation Rules.
 - Click Create Rule and select Issue Created as the trigger.
- Name the rule
Add Contract Requestor Email. - Add an Edit Issue action. Select Contract Requestor Email as the Jira field to update and enter
{{issue.reporter.emailAddress}}as the value. - Enable and test the rule by creating a new issue to verify that Contract Requestor Email is populated.
- Name the rule
- Click the Gear icon (
Contract Requestor EmailPlease consider your company’s policy on allowing access to user email information. Jira limits availability of user information in its API. Creating a custom Jira field to populate it with the user’s email enables access to the information.
Jira Automation - Configure Trigger
We are now ready to create the automation rule that will launch the Ironclad workflow.
- In Jira, create a new automation rule and configure the trigger.
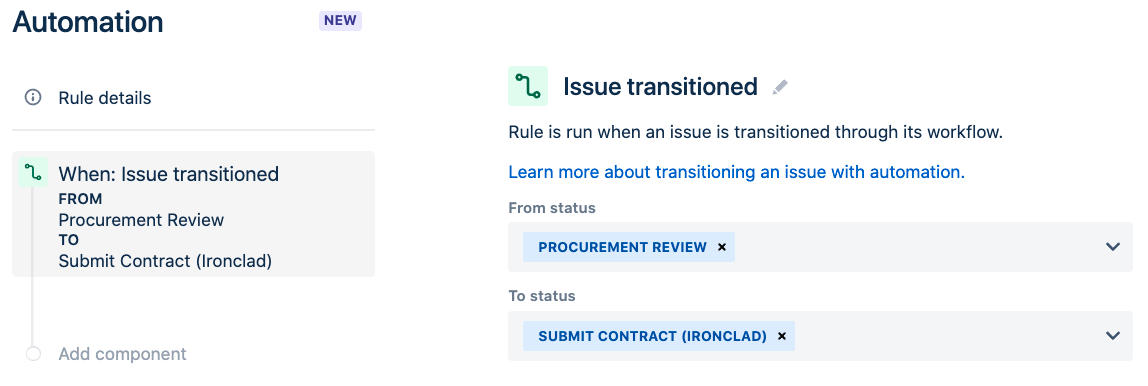
- Click Create Rule and select Issue Transitioned as the trigger. Note: Your trigger may differ depending on your company's business process and conditions. This example will use a transition from a
procurement reviewstatus to asubmit contractstatus as the relevant trigger. - Name the rule (e.g.,
1. Launch Ironclad Workflow).
- Click Create Rule and select Issue Transitioned as the trigger. Note: Your trigger may differ depending on your company's business process and conditions. This example will use a transition from a
Jira Automation - Configure Workflow Launch
This section will cover how to create the following web request component to launch an Ironclad workflow.
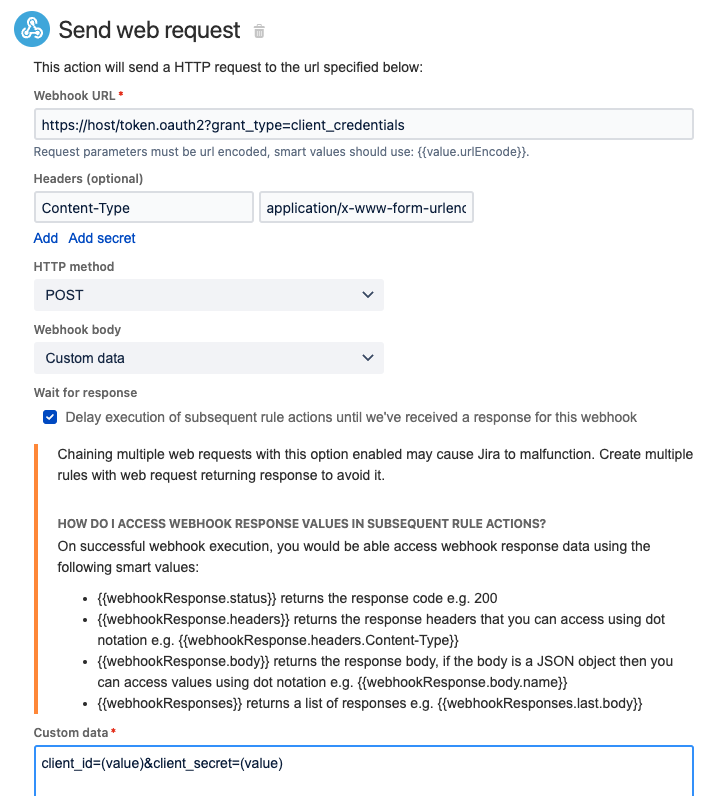
- In Jira, authentication with OAuth 2.0 requires two specific outgoing web requests. The first request will generate a token that is used in the second request to obtain the credentials needed for subsequent web requests. More information on this process can be found in Jira's documentation, Authenticating OAuth 2.0 for outgoing web requests in Jira Automation rules. The first step will be to add a Send Web Request component to the automation rule.
-
For URL, enter
https://[YOUR_IRONCLAD_DOMAIN]/oauth/tokento call the endpoint. Replace[YOUR_IRONCLAD_DOMAIN]with the domain where you are creating the workflow (e.g.,preview.ironcladapp.com, demo.ironcladapp.com, na1.ironcladapp.com). -
For Headers, add a
Content-Typeheader:- Add
Content-Typeas the key. Addapplication/x-www-form-urlencodedas the value.
- Add
-
For HTTP Method, select POST.
-
In Jira, set the Web request body to Custom data, and create the request body as follows:
grant_type=client_credentials&client_id=[CLIENT_ID_HERE]&client_secret=[CLIENT_SECRET_HERE]&scope=[SCOPE_HERE]- Replace the
[CLIENT_ID_HERE]with your generated OAuth 2.0 Client App ID - Replace the
[CLIENT_SECRET_HERE]with your generated OAuth 2.0 Client App secret - Replace the
[SCOPE-HERE]with the relevant scopes for this flow, space-separated - in this case,public.workflows.createWorkflows public.workflows.readWorkflows public.workflows.updateWorkflows
-
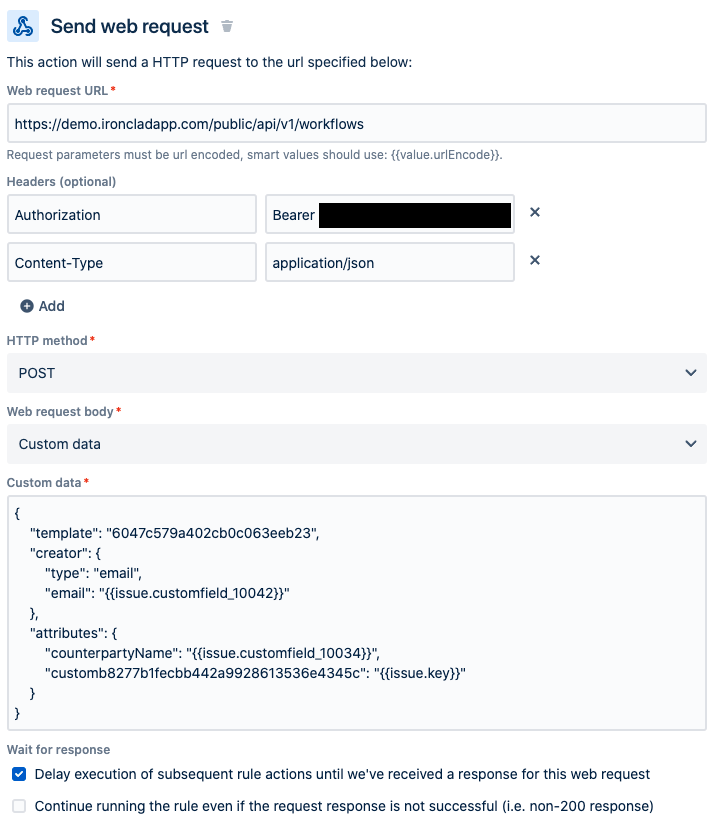
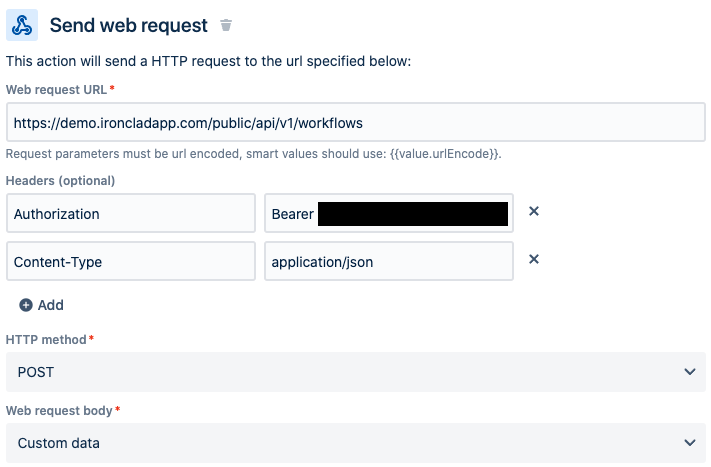
- Second, add another Send Web Request component to the automation rule. The component will send a request to the Create a Workflow Synchronously endpoint to start a workflow.
- For URL, enter
https://[YOUR_IRONCLAD_DOMAIN]/public/api/v1/workflowsto call the endpoint. Replace[YOUR_IRONCLAD_DOMAIN]with the domain where you are creating the workflow (e.g.,preview.ironcladapp.com, demo.ironcladapp.com, na1.ironcladapp.com). - For Headers, add
AuthorizationandContent-Typeheaders.- Add
Authorizationas the first key. AddBearer {{webhookResponse.body.access_token}}as the value. This references the token that was just returned by the previous call to Ironclad. - Add
Content-Typeas the second key. Addapplication/jsonas the value.
- Add
- For HTTP Method, select POST.
- For URL, enter
- In Jira, customize the Web request body. Select Custom body and create the JSON request body using the following steps:
- Add template as the first parameter. Retrieve the template ID of your workflow using the steps outlined in Getting Started - Unique Ids (Workflows) and add it as the value.
- Specify the workflow creator the workflow is being launched on behalf of. In this example, the Jira issue creator is assumed to be the user who should be associated with the Ironclad workflow.
- Add a creator object with the following attributes:
- Add
"type"as a key and"email"as its value. - Add
"email"as a key with the Jira custom field ID for the Contract Requestor Email field. See Jira's guide on locating field IDs for a how-to on retrieving these IDs.
- Add
- Note: The creator must (1) have an Ironclad user account and (2) have the Start Workflow permission in Ironclad for the workflow you are attempting to launch on their behalf. The creator takes on the Owner role in Ironclad and receives visibility into the workflow.
- Add a creator object with the following attributes:
- For attributes, use the IDs associated with Ironclad attributes as keys and Jira fields as values.
- Retrieve the Ironclad attribute IDs using the Retrieve a Workflow Schema endpoint and the workflow's template ID. Add all required fields to the attributes object. In the example workflow, counterparty name and the Jira issue ID are transferred.
- Map the appropriate Jira field IDs to each Ironclad attribute.

Workflow Attribute Field TypesEach Ironclad field has an associated type. Data sent to those fields must comply with the type's expected format.
See Launch a Workflow for examples.
-
In Jira, finalize and save the web request component.
- Check the Delay execution of subsequent rule actions. . . checkbox. This will ensure that the response to the web request is received before executing the components that follow. We do this because the components that follow require the response data from Ironclad to proceed.
- Click Save.
-
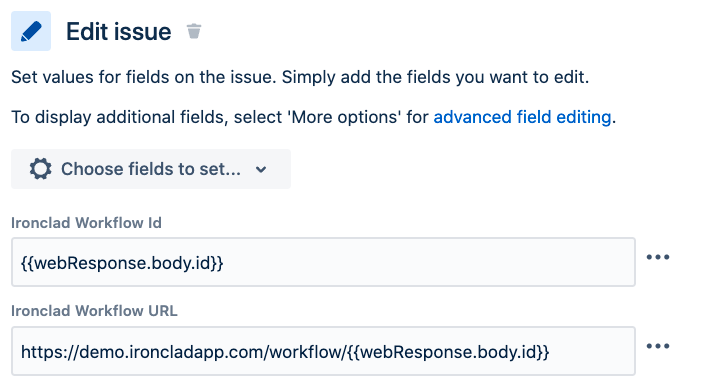
In Jira, add an Edit issue component. This component will parse Ironclad's server response from the previous step and save key Ironclad IDs to the Jira issue.
- Add Ironclad Workflow Id and Ironclad Workflow URL as the Jira issue fields to edit.
- Use the Ironclad response from the previous step to populate the Jira fields. Use
{{webResponse.body.id}}to extract the ID of the Ironclad workflow that was just launched. This ID is needed for interacting with the workflow in later steps. Please see Jira's guides for information and troubleshooting related to extracting Jira data.
Jira Automation - Configure Comments
This section will cover the creation of comments in both Jira's and Ironclad's respective active feeds so users are aware that background system actions have occurred.
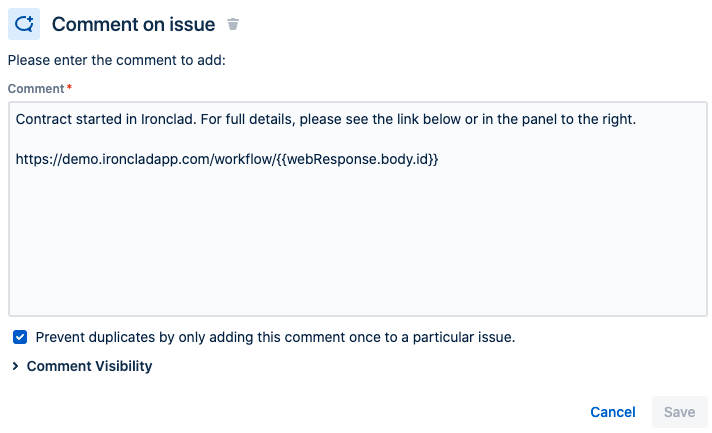
- In Jira, add a Comment on issue component. Add your preferred message and include a link to the Ironclad Workflow.
- The URL for the Ironclad workflow will use the following convention:
https://[YOUR_IRONCLAD_DOMAIN]/workflow/{{webResponse.body.id}}. - The
{{webResponse.body.id}}field is Jira's method for extracting the Ironclad workflow ID in the response received by Jira. Please see Jira's guides for information and troubleshooting related to Jira data.
- The URL for the Ironclad workflow will use the following convention:
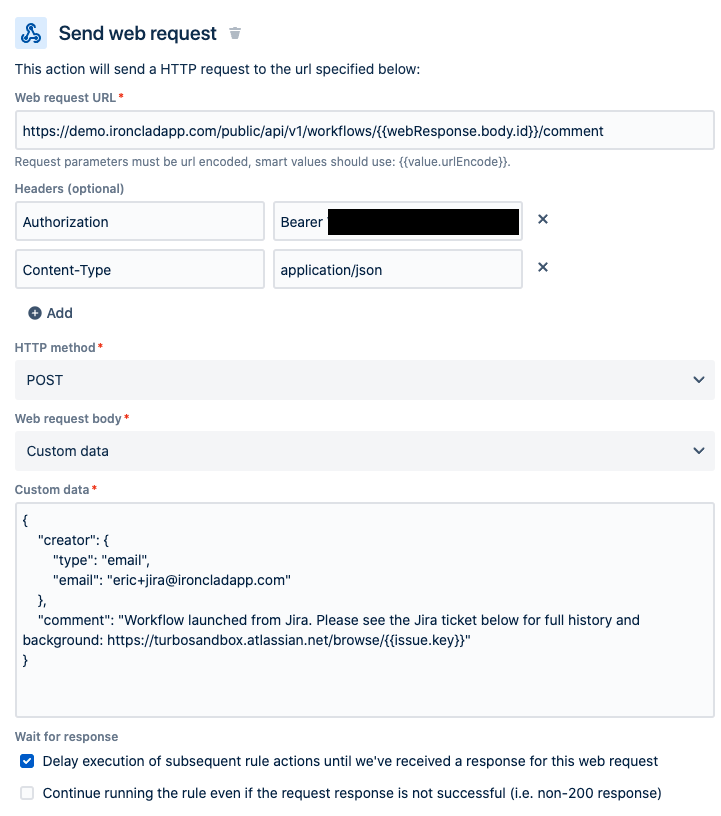
- In Jira, add a Send Web Request component. The request will target the Create a Comment on a Workflow endpoint to add an activity feed comment to the Ironclad workflow.
- For URL, enter
https://[YOUR_IRONCLAD_DOMAIN]/public/api/v1/workflows/{{webResponse.body.id}}/commentto call the endpoint.- Replace [YOUR_IRONCLAD_DOMAIN] with the domain where you are making the comment (e.g.,
preview.ironcladapp.com, demo.ironcladapp.com, na1.ironcladapp.com). - The
{{webResponse.body.id}}URL parameter is used to target the workflow that was just generated.
- Replace [YOUR_IRONCLAD_DOMAIN] with the domain where you are making the comment (e.g.,
- Add a creator with a valid Ironclad user's email. The creator will be attributed as the commenter so consider using a generic system user in Ironclad.
- Include the same authorization and content-type headers from step 7.
- For URL, enter
- Publish your Jira automation. Congratulations, you have an automation rule that lets Jira business users start Ironclad workflows!
Updated about 1 month ago