Hubspot Integration (via Tray.io)
Please note:Ironclad now uses the OAuth 2.0 Authorization Framework to authenticate API requests. As of November 22nd, 2024, our previous bearer token method of authentication has been deprecated. We are currently in the process of updating this guide with details on how to implement with OAuth 2.0. In the meantime, please refer to our article Migrating to OAuth 2.0.
Overview
This guide demonstrates the principle steps involved in creating a custom integration between Ironclad and Hubspot, using Tray.io as the integration middleware.
Please note that the approach shown here is only meant to demonstrate an example solution for building this integration, but it is a custom integration and not an out-of-the-box supported connector. To view a list of out-of-the-box connectors that Ironclad supports, check out our Help Center.
We use Tray.io in this guide as a representative middleware software to demonstrate what an integration between Hubspot and Ironclad might look like. If you need to leverage an alternative integration path, our public APIs can be consumed from any system or middleware that can directly leverage a RESTful API through our supported authentication modes, and systems can subscribe to Ironclad events if they can expose endpoints that support our outbound event authentication modes.
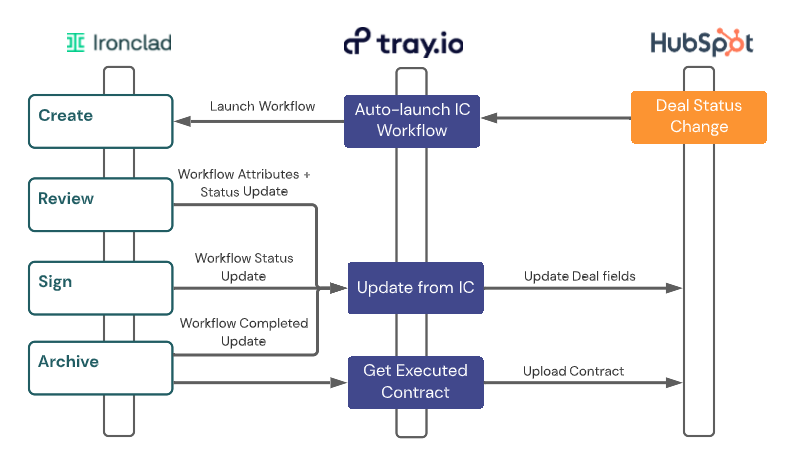
The figure below shows the flow that we will build in this guide, calling out the stages in which information will be passed between the two systems.
 Note: This guide and any software contained in it should be used at your own risk by individuals qualified to evaluate its effectiveness. IT IS PROVIDED “AS IS”, WITHOUT WARRANTY OF ANY KIND, EXPRESS OR IMPLIED, INCLUDING BUT NOT LIMITED TO THE WARRANTIES OF MERCHANTABILITY, FITNESS FOR A PARTICULAR PURPOSE AND NONINFRINGEMENT. IN NO EVENT SHALL IRONCLAD BE LIABLE FOR ANY CLAIM, DAMAGES OR OTHER LIABILITY, WHETHER IN AN ACTION OF CONTRACT, TORT OR OTHERWISE, ARISING FROM, OUT OF OR IN CONNECTION WITH YOUR USE OF THIS GUIDE OR ANY SOFTWARE IT CONTAINS.
Your use of the Ironclad API must comply with Ironclad’s API Terms of Use (available at https://legal.ironcladapp.com/api-terms-of-use) and the terms of the Enterprise Services Agreement (or equivalent) entered into between you and Ironclad.
Background
Ironclad Background
- API Access: Your Ironclad environment will need to have API access enabled, since the Tray.io connector makes use of the Ironclad public APIs to enable the integration.
- Ironclad Account: Several of the solution patterns require specifying an Ironclad user for actions (e.g., who is approving, who is commenting, etc.). Creating a generic Ironclad user account that your integration can use to register actions is recommended for consistency and simplicity.
- Reference Documentation: Please see Ironclad’s API Reference documentation for the most up-to-date details on our endpoints. For information on building workflows in Ironclad, please see Ironclad Academy for guided training and Ironclad Support Center for product articles.
Tray.io and Hubspot Background
- Visit Tray.io’s Knowledge Base for introductory resources as well as their Documentation for specific connector information.
- This guide makes use of Tray.io’s Ironclad and Hubspot connectors, if you would like to read more about their full functionality.
Basic Setup
Ironclad Setup
Ensure you have the workflow that you would like to launch from Hubspot configured within Ironclad. The fields that we focus on throughout this guide include standard Ironclad fields (Agreement Date, Counterparty Name, Workflow Owner) as well as a “Hubspot Deal ID” custom field that will allow us to reference the original Hubspot objects we are launching from. Here is what the custom field looks like in the launch form in Ironclad’s Workflow Designer:

Since the process of submitting a workflow will be automated, there will be no user intervention or review of the launch form prior to submission. Therefore, ensure that all required fields within the workflow can be populated by Hubspot. If they are not available in Hubspot, convert them to 1) optional fields to be updated within the Review step or 2) make them a part of an internal form field to be sent to an internal user for additional intake.
In order to configure the Tray.io Ironclad authentication, you will also need to create an API key from your Ironclad instance. Tokens can be generated in Ironclad under Name] > Com > Company Settings > API > Access Tokens. Be sure to make note of the API token value.
Hubspot Setup
Within Hubspot, we are assuming that the Hubspot CRM platform is in use. We will be utilizing the Deal object as the central object in which workflows will get launched from, as well as contain information pertinent to the in-flight workflow.
Navigate to Settings > Objects > Deals > Manage Deal Properties. Create the following custom properties:
| Group | Label | Field Type |
| Deal Information | Ironclad Workflow ID | Single-line text |
| Deal Information | Ironclad Workflow Link | Single-line text |
| Deal Information | Ironclad Workflow Status | Single-line text |
In order to configure the Tray.io Hubspot authentication, you will also need to create an API key from your Hubspot instance. Tokens can be generated in Hubspot under Settings > Integrations > Private Apps. Create a private app and provide a name. Within the Scopes tab, provide the app write and read access to crm.objects.deal and crm.schemas.deals. Be sure to make note of the API token value.
A final step in the “Update Hubspot Workflow Completed” flow is to send the executed contract back to Hubspot. Because Hubspot does not allow you to have File Upload fields on a Deal object, this integration uploads the contract to the Hubspot File Manager. We recommend creating a separate folder called “Ironclad Contracts” for these uploads.
Tray.io Setup
Authentication
Thanks to the built-in Hubspot and Ironclad connectors provided by Tray.io, we can set up authentication for both platforms to be used throughout the following workflows. On your Tray.io home page, navigate to the Authentications tab and select “Create new authentication” for each of the authentication entries described below.
Ironclad Authentication
Provide a name for your authentication accordingly and select Ironclad as the service to authenticate to. On the next screen, enter the API key from the Ironclad API Settings page that was generated during the Ironclad Setup section. For the subdomain, ensure that you are mapping to the Ironclad instance you are integrating with.
| Subdomain Value | Ironclad Server |
| <no value> | na1.ironcladapp.com (production) |
| “demo” | demo.ironcladapp.com |
| “preview” | preview.ironcladapp.com |
Hubspot Authentication
Name your authentication accordingly and select Hubspot as the service to authenticate to. Ensure you are using the Hubspot OAuth Authentication. On the next screen, enter the API (or Developer API) key that was generated during the Hubspot Setup section. Set up the relevant permission scopes. For this guide, you will need the following:
Authentication Profile Scopes
- Crm.objects.companies.read
- Crm.objects.contacts.read
- Crm.objects.deals.read
- Crm.schemas.deals.read
- Crm.objects.deals.write
- Extra permission scopes: “files”
- This permission is necessary if looking to send completed contracts to Hubspot
Project Configuration
Creating projects within Tray.io allows you to group your flows as well as create project-level configuration variables that can be referenced.
Create a project in Tray.io from your home page by selecting the Projects section in the left navigation and click “Add Project”. Name the project. For all the flows created, ensure they are added to this Project.
For our example solution, we will be using these project config variables:
| Config Variable Name | Purpose |
| ironclad_template_id | ID of the workflow template that will be used to launch workflows. See the Ironclad Developer Hub for details on getting the template ID for the workflow template you want to use. |
Launch an Ironclad Workflow from Hubspot
This section will guide the user through the process of setting up an Ironclad Workflow Launch, triggered by a Deal being moved to a specific stage within Hubspot. Additionally, once launched, information corresponding to the Ironclad workflow (workflow ID, workflow status, etc) will be sent back and associated with the Hubspot Deal.
First, determine what HubSpot event should trigger a contract to be sent out. The list of possible triggering events are confined by the list of webhooks that are available within the Hubspot Tray.io connector. Some examples include:
- Deal creation
- Deal field updating
- Deal Stage change
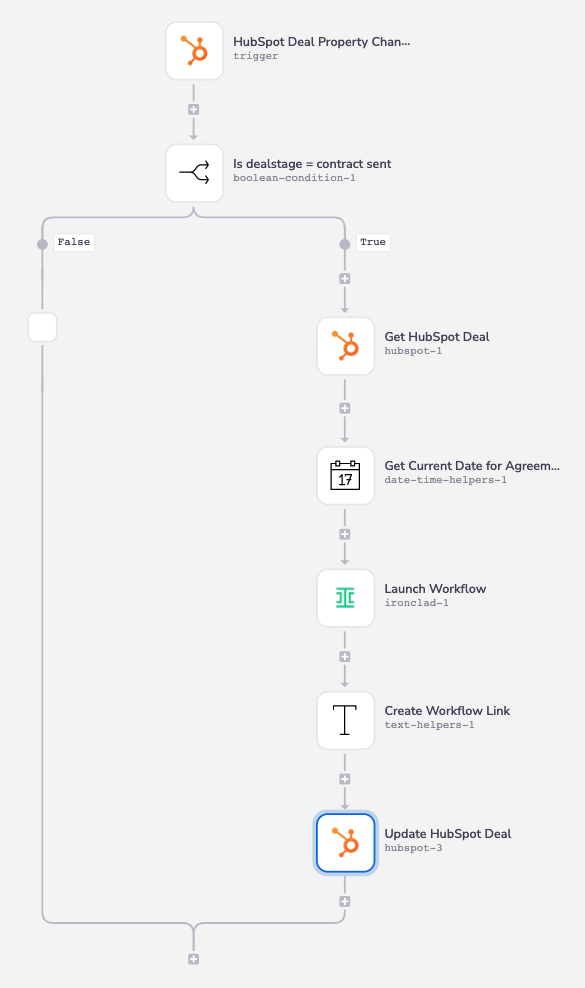
For this example, we will be triggering a workflow when a Deal is moved to the “Contract Sent” stage. This will also pull the mapped information into the Ironclad Workflow.
Trigger the Tray.io flow
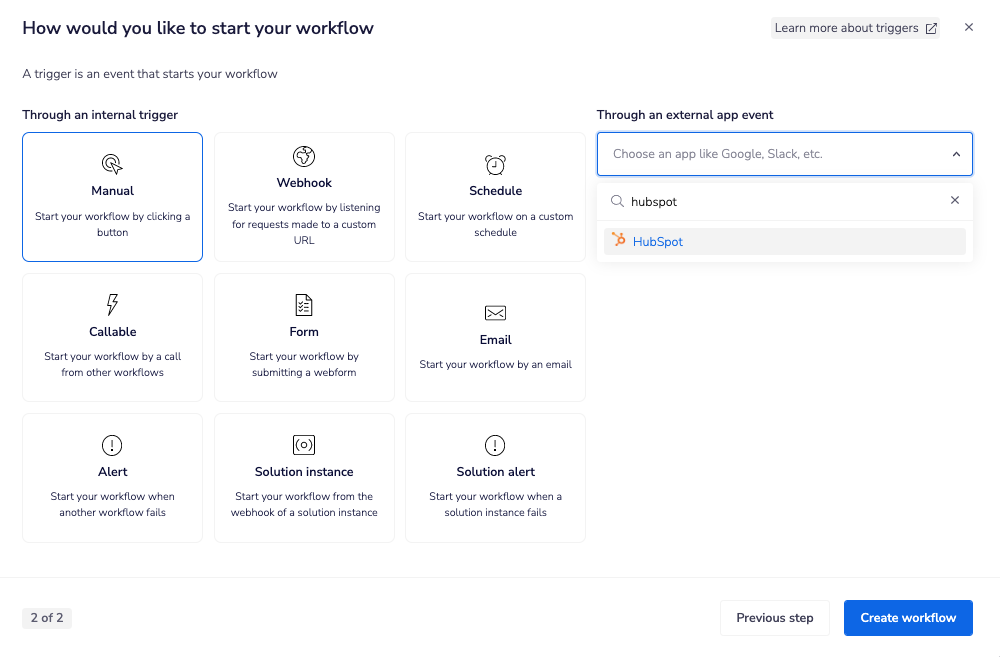
Create a new Tray.io flow. Select Hubspot from the “external app” dropdown..
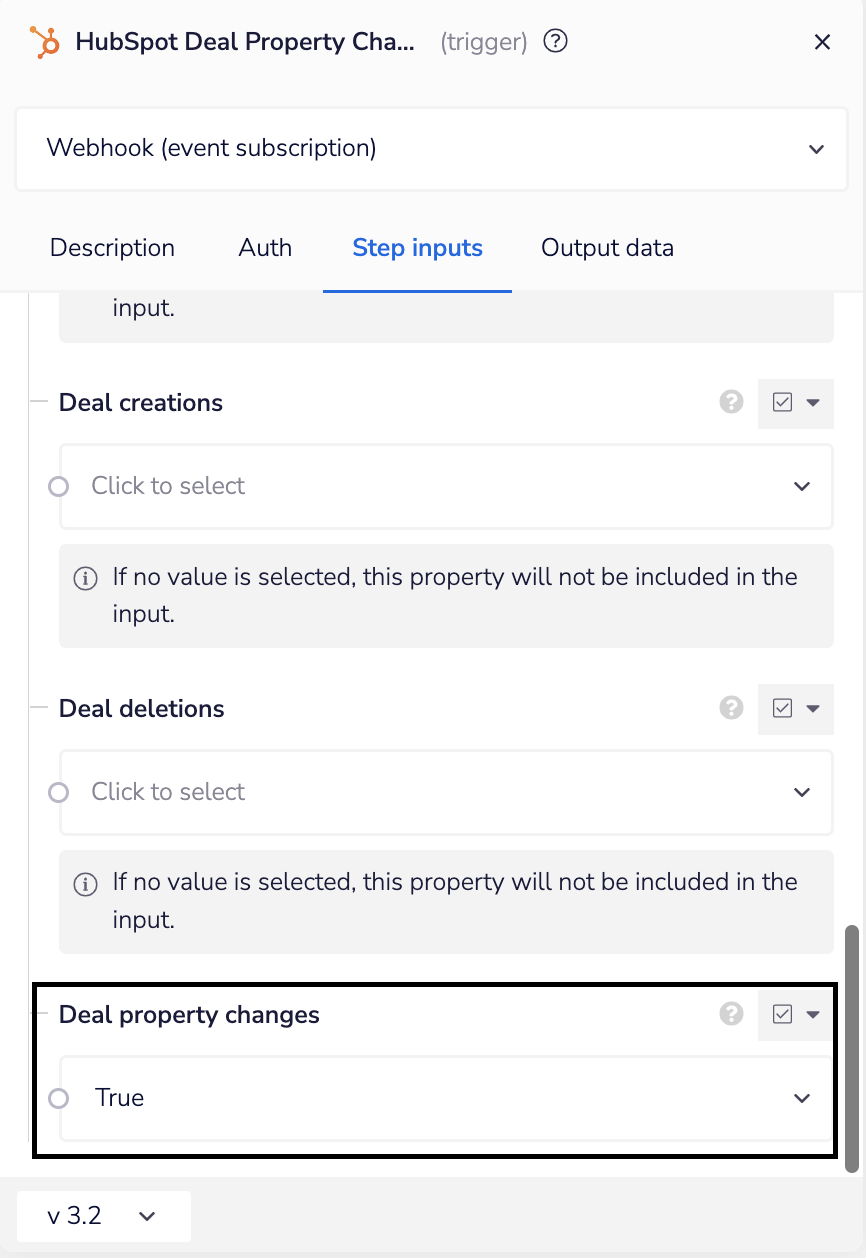
Set the Hubspot trigger to “Webhook (event subscription)”. For this example, to be notified of a Deal stage change, we use the “Deal Field Updated” webhook.. Set the “Deal Property changes” step input to True.
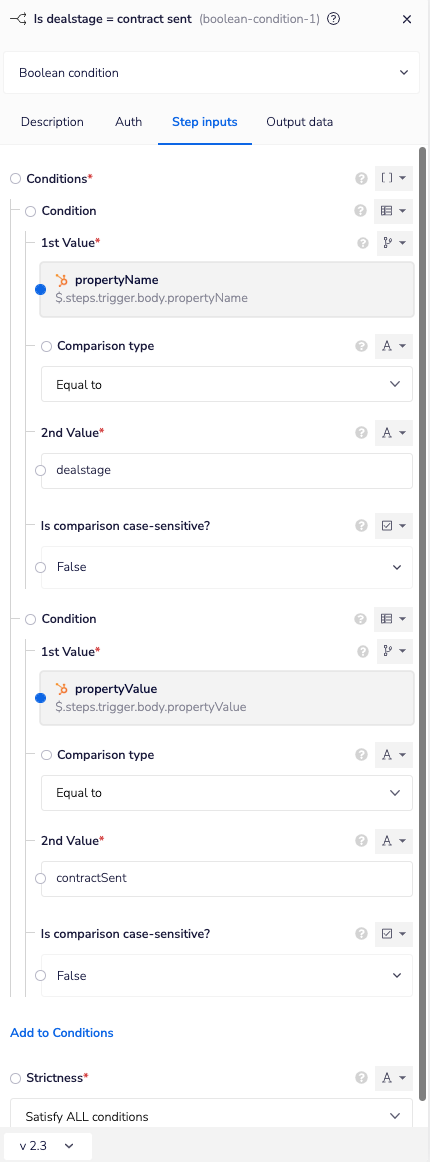
Add a boolean-condition connector that only progresses the workflow if the Hubspot Deal Property that has been updated is equal to dealstage and if the value of that property is contractSent (or whichever stage we want this workflow to be launched at). Since this flow will be triggered on every update to any deal field, this condition will help filter through to only the relevant updates.
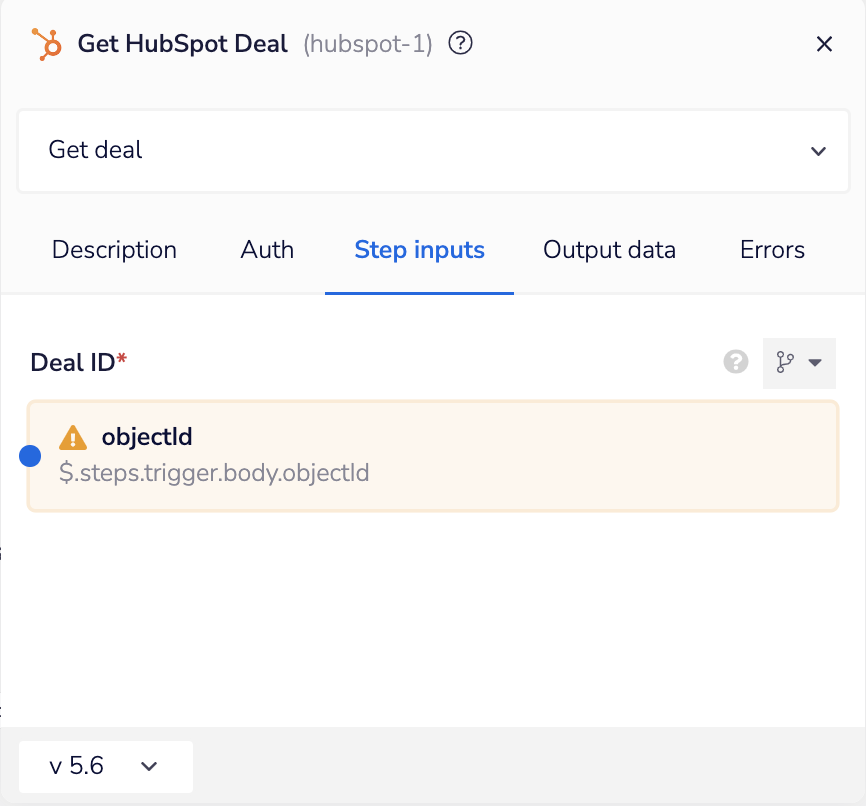
Add a Hubspot connector of type “Get Deal”. Set the Deal ID Step Input to the Deal ID that was received in the initial webhook. Once the previous step has confirmed that the conditions are correct to launch a workflow, this will get the relevant Hubspot Deal information.
Launch the Workflow
Now that we have the correct conditions to launch a workflow and the relevant workflow information from Hubspot, we can utilize the Ironclad API to submit the launch form.
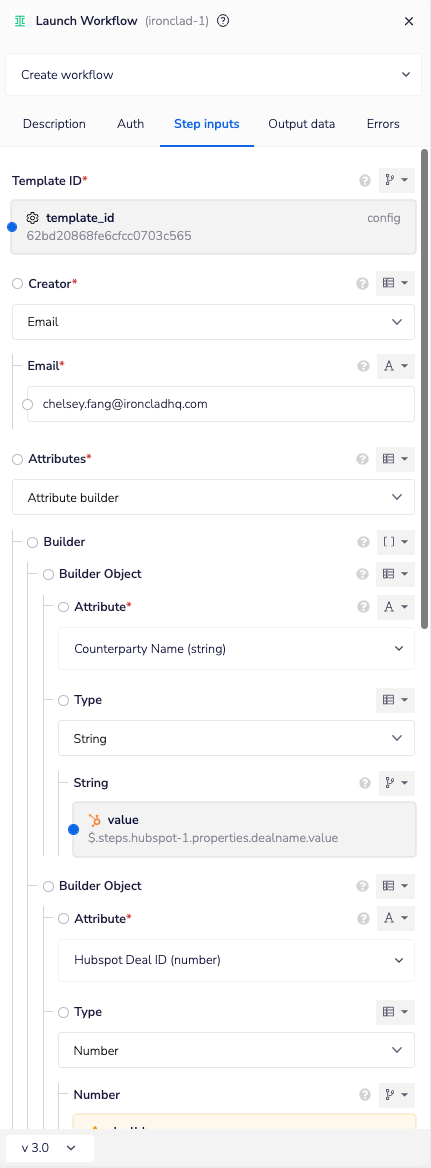
Add an Ironclad connector of type “Create Workflow”. Add the Ironclad authentication that you set up previously in the Auth tab. Fill in the relevant fields in the Step inputs tab:
- Template ID
- Use the project level variable “ironclad_template_id” to reference the correct workflow that you will be launching
- Creator
2. Set the creator type to Email and determine the email of the user to be designated as “Workflow Owner”. - Attributes
3. Using the Template ID that was inputted, Tray.io will automatically pull in the attributes that can be populated on the Launch form through the “Builder Object”. Ensure that those required fields are mapped to information from the “Get Deal” API response.
Update the Hubspot Deal
Now that we have an Ironclad Workflow launched, we can update the relevant Hubspot deal.
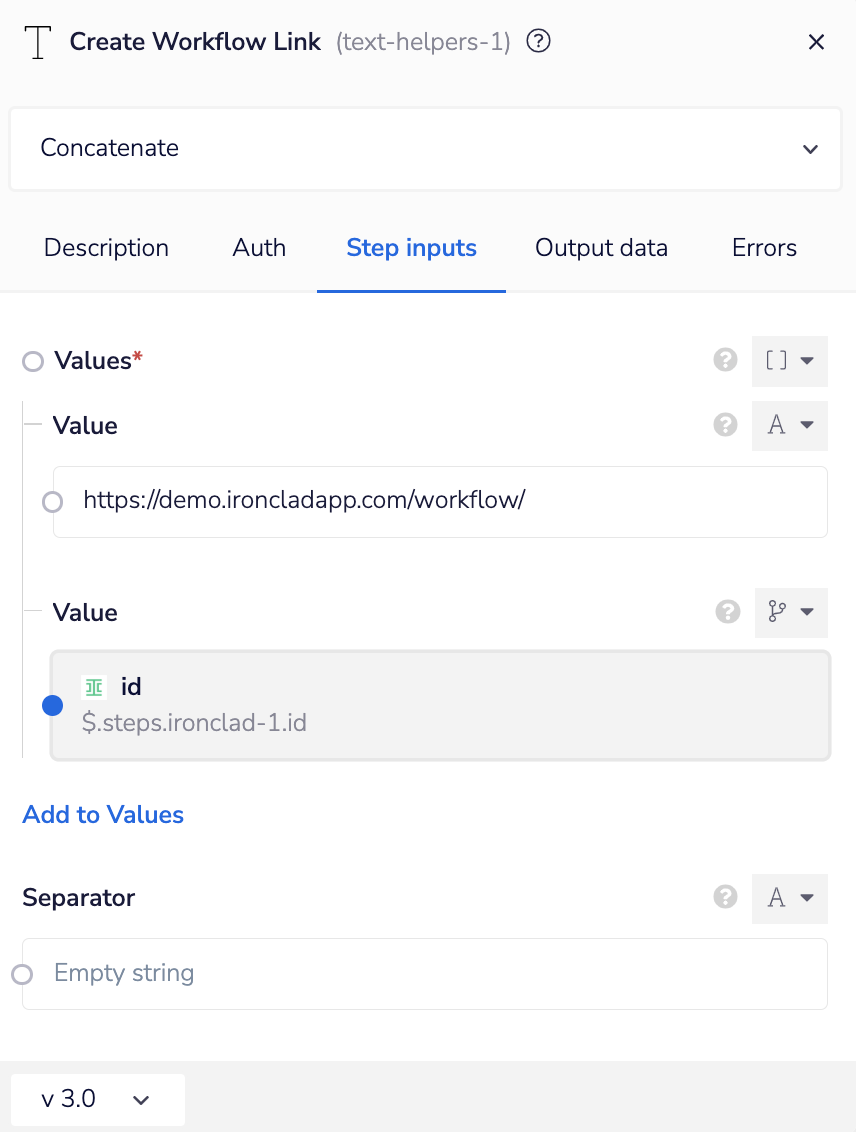
Add a Text-Helper connector of type “Concatenate” to create the workflow link that will be sent back to Hubspot. Concatenate the Ironclad base URL + “/workflow/” and the Ironclad Workflow ID from the response of the Ironclad connector that launched the workflow.
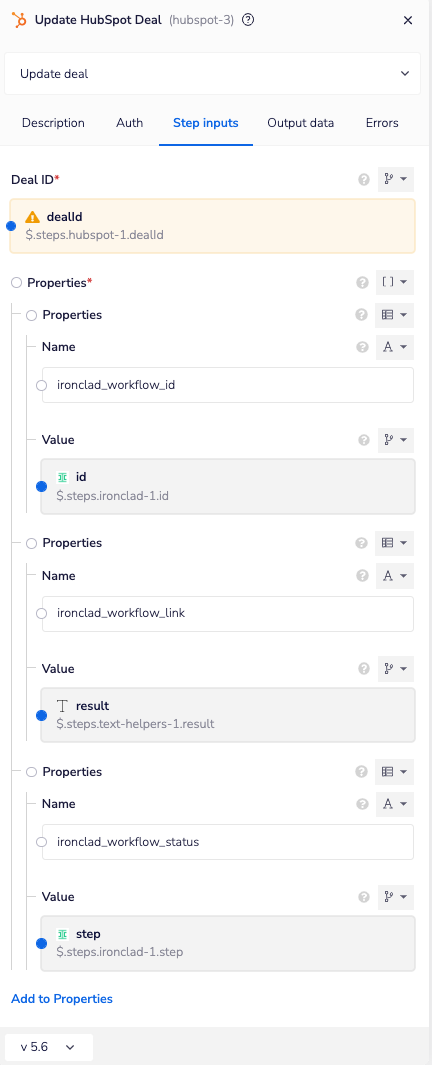
Add a Hubspot connector of type Update Deal. Set the Deal ID to the same Hubspot Deal ID jsonpath used in the Get Deal connector. In the Properties section, map the following fields.
| Hubspot Field (must be the API field name) | Value |
| ironclad_workflow_id | Ironclad Workflow ID from “Launch Workflow” connector |
| ironclad_workflow_link | Link generated within the Text-Helper connector |
| ironclad_workflow_status | “Step” field from “Launch Workflow” connector |
Final Tray.io flow
Here is the final Tray.io flow.
Update Hubspot - Workflow Sent for Signature
Update the Hubspot Workflow Status field on the Hubspot Deal when the workflow is Sent for Signature, to give reps insight into the status of a workflow.
Trigger the Tray.io flow
Create a new Tray.io flow. Select “Webhook” as the trigger for the workflow. Select the three dots next to the Webhook connector and copy the public URL.
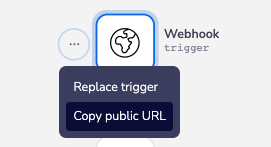
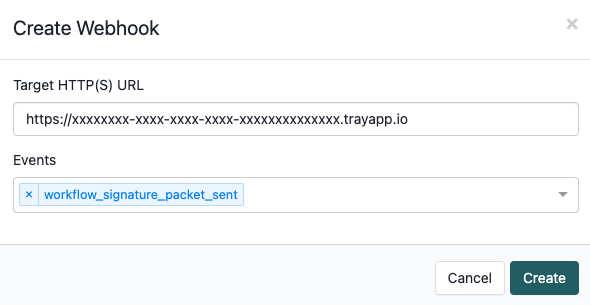
Navigate to Ironclad > [your name] > Company Settings > API > Webhooks. Create a new webhook pointing to the public URL from Step 1, with a webhook type of “workflow_signature_packet_sent”.
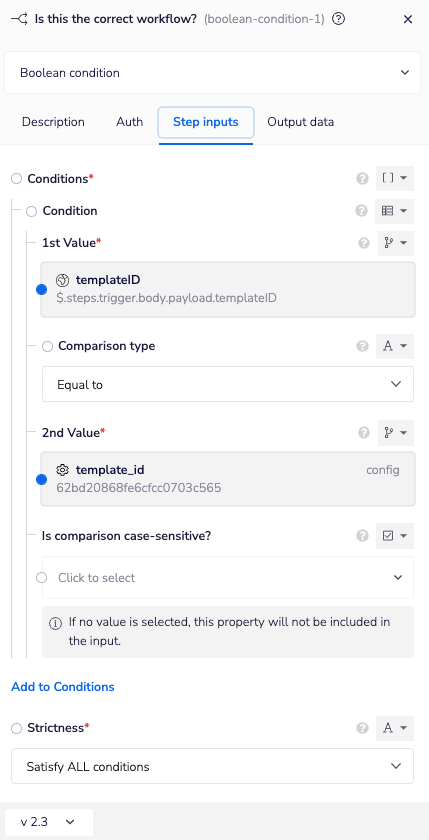
Navigate back to Tray.io and add a boolean-condition connector to ensure that the workflow triggering the webhook is relevant to the integration (matching on template_id).
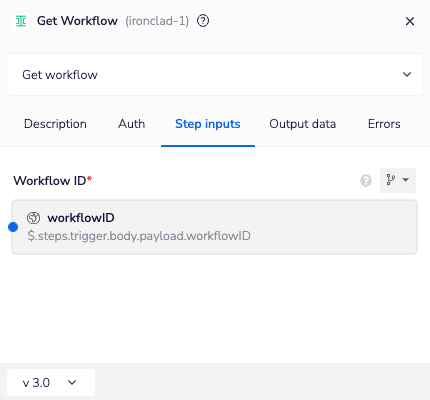
Off the “True” path on the boolean-condition connector, add an Ironclad connector of type “Get Workflow”. This is to retrieve the relevant Deal ID that is associated with the workflow. Reference the workflow ID in the webhook payload.
Update Hubspot
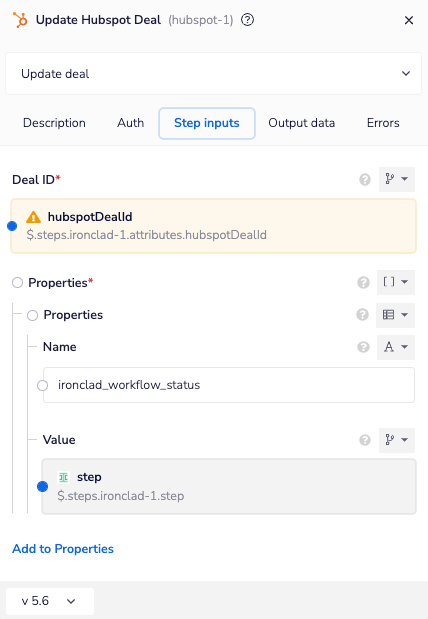
Add a Hubspot connector of type “Update Deal”. Set the Deal ID to the result of the text-helper and update the ironclad_workflow_status field to the “Step” field from the Ironclad Connector (should be “Sign”).
Final Tray.io flow
Here is the final Tray.io flow.
Update Hubspot - Workflow Complete
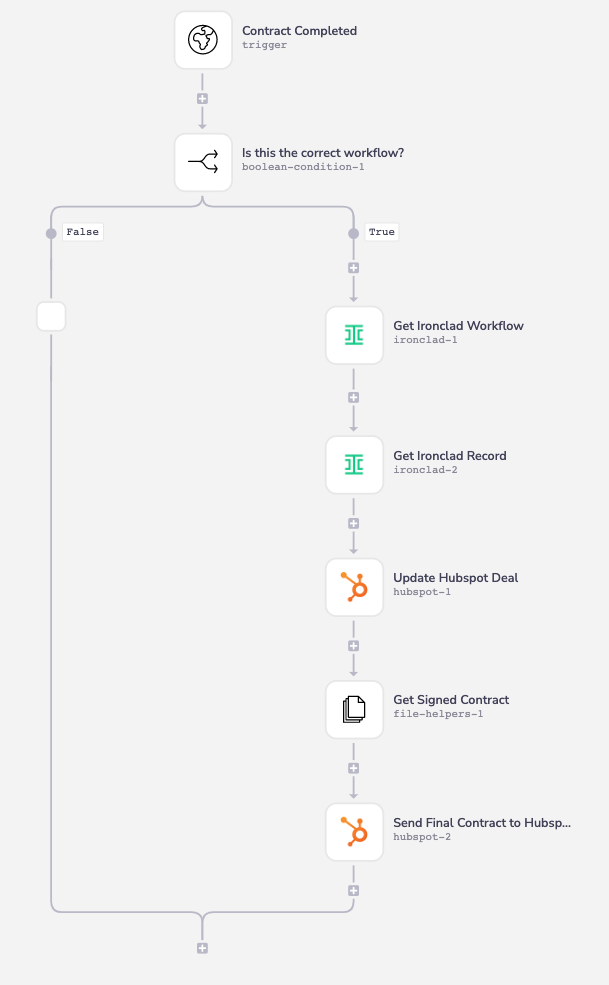
Update the Hubspot Workflow Status field on the Hubspot Deal when the workflow is Completed, to give reps insight into the status of a workflow. This method utilizes the “workflow completed” webhook within Ironclad to trigger a Tray.io flow that will retrieve the corresponding information and send that to Hubspot. Additionally, we send the completed contract to Hubspot.
Trigger the Tray.io flow
Create a new Tray.io flow. Select “Webhook” as the trigger for the workflow. Select the three dots next to the Webhook connector and copy the public URL.
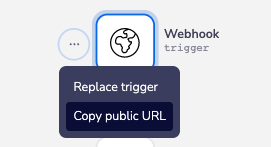
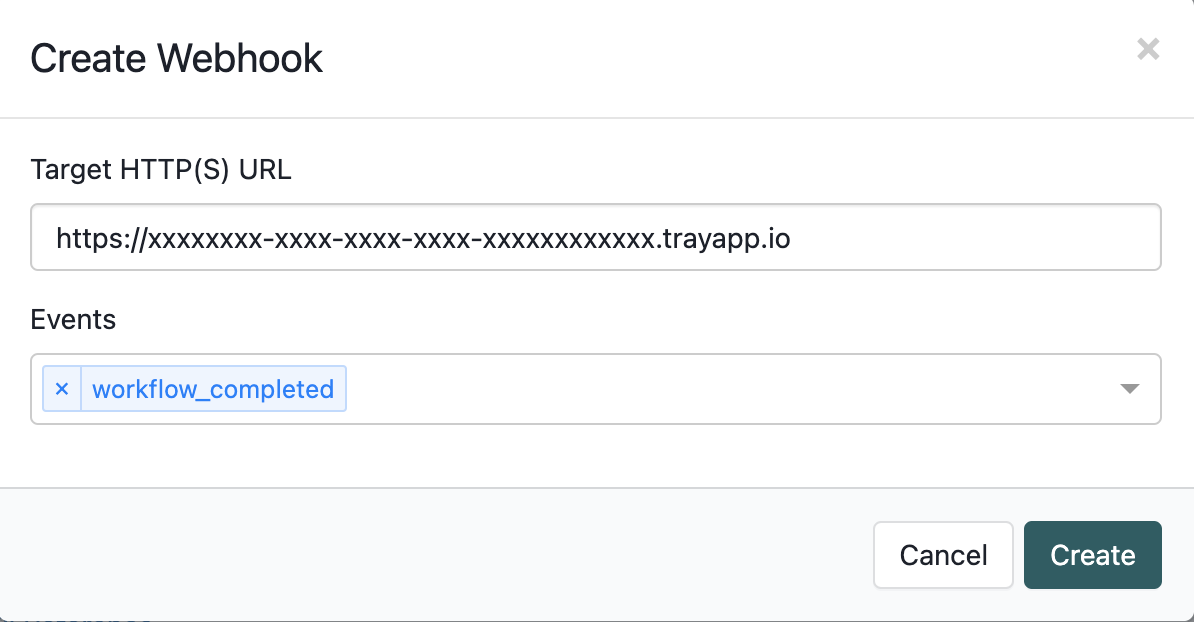
Navigate to Ironclad > [your name] > Company Settings > API > Webhooks. Create a new webhook pointing to the public URL from Step 1, with a webhook type of “workflow_completed”.
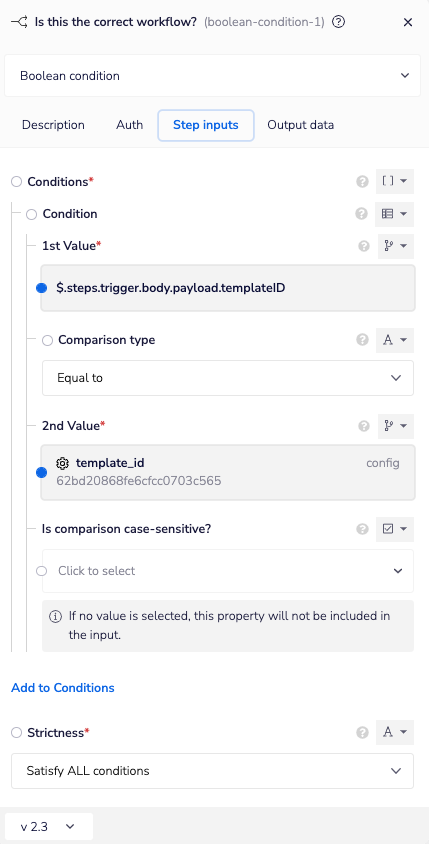
Navigate back to Tray.io and add a boolean-condition connector to ensure that the workflow triggering the webhook is relevant to the integration (matching on template_id).
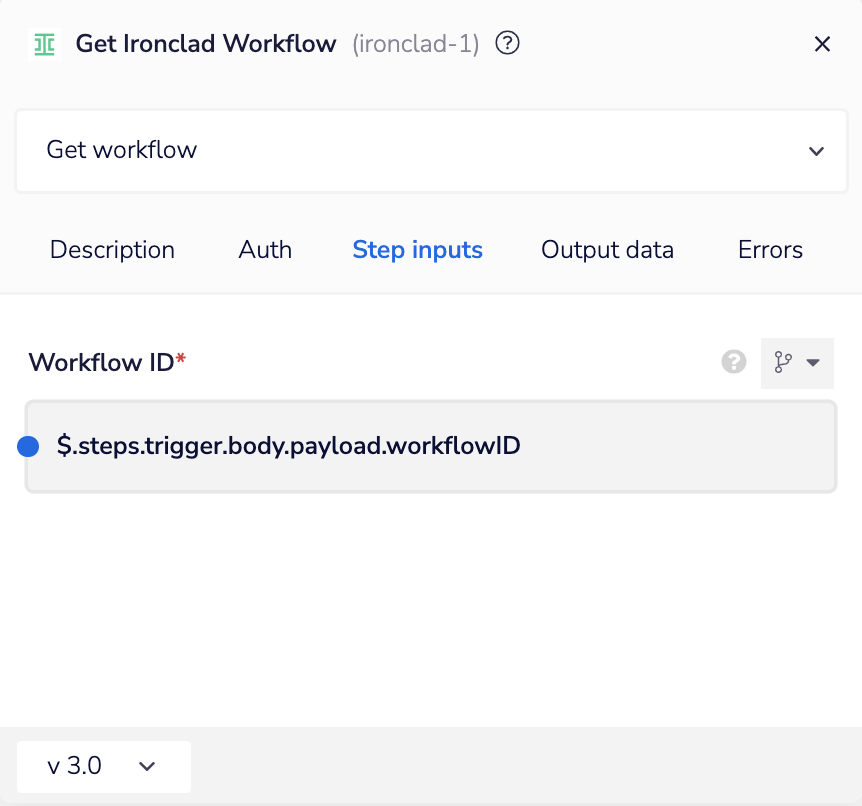
Get Ironclad Workflow and Record Information
Off the “True” path on the boolean-condition connector, add an Ironclad connector of type “Get Workflow”. Reference the workflow ID in the webhook payload.
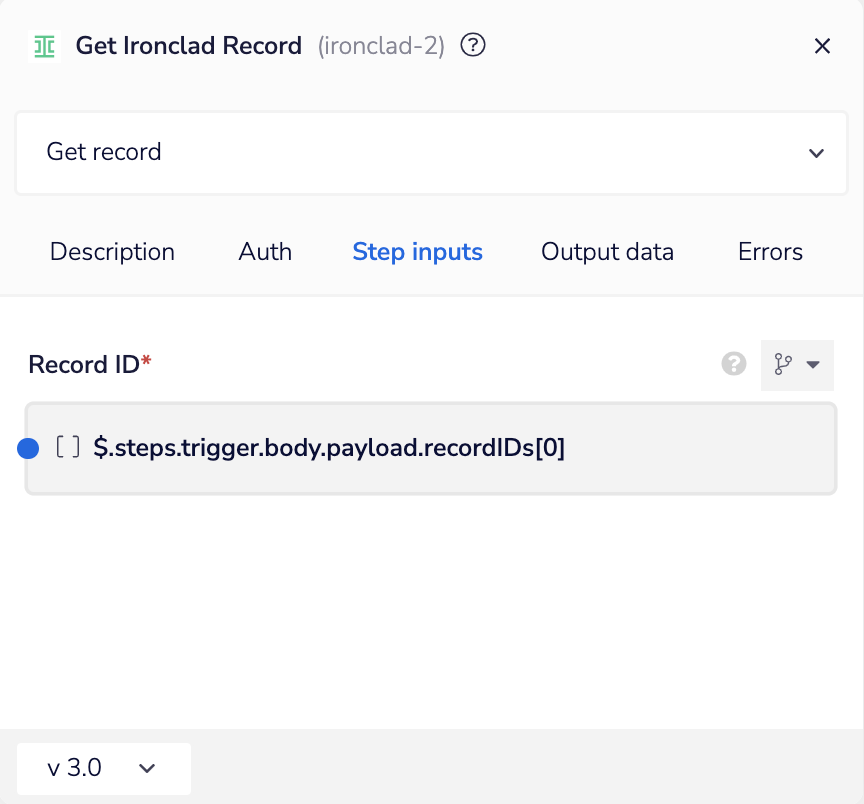
Next we use another Ironclad connector of type “Get Record” to get the details of the new Ironclad repository record that was generated when the workflow completed. Reference the record ID in the webhook payload.
Update Hubspot
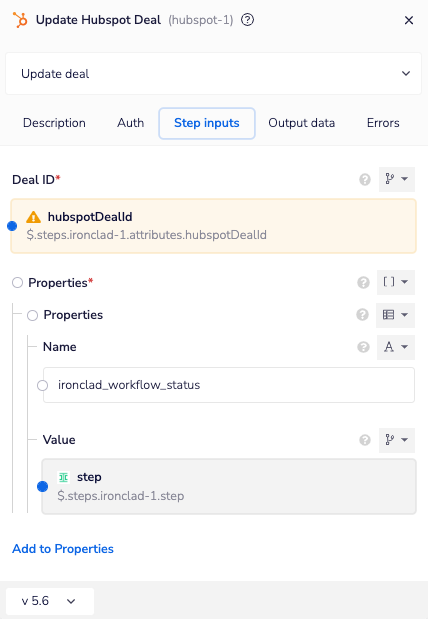
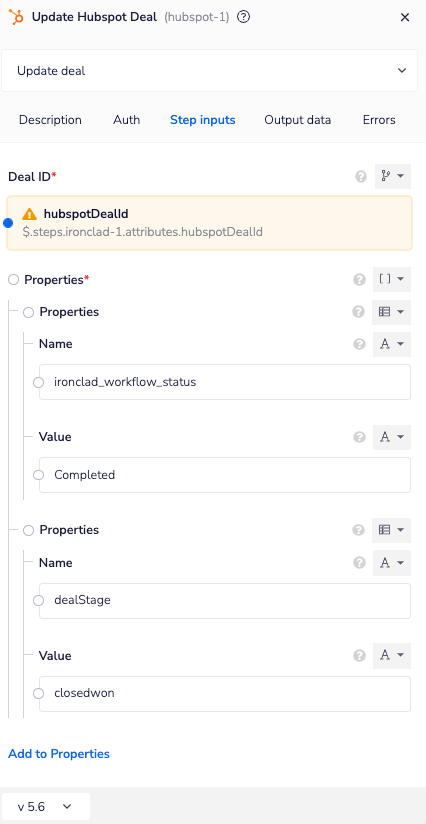
Add a Hubspot connector of type “Update deal”. For the Deal ID parameter in the Step inputs tab, target the Hubspot Deal ID field within the workflow, returned in the previous Ironclad connector response. Map back any fields that you want updated within Hubspot. The following screenshot updates the “Ironclad Workflow Status” field to “Completed” and the “Deal Stage” to “Closed Won”.
Sending the Executed Contract to Hubspot
Now we have to get the final contract document from Ironclad and convert it to the format expected. We use a series of file helper steps to do this.
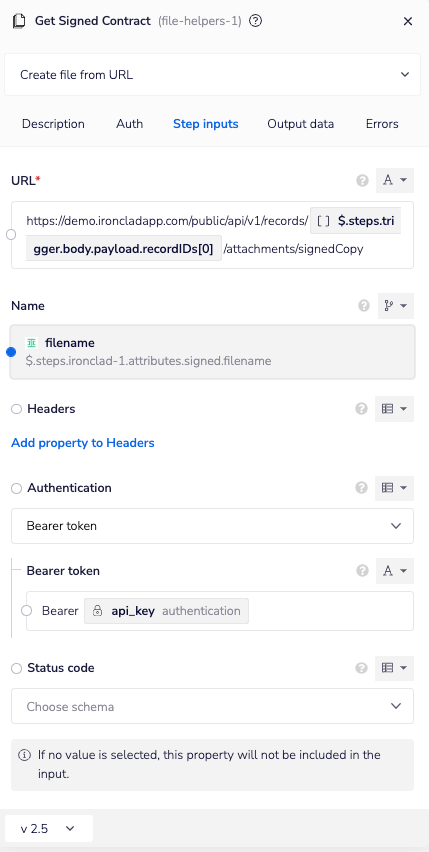
First, we add a file helper step with the action set to “Create file from URL”. This will download the final contract document using the document URL that is part of the record details we retrieved in the previous step. Ironclad requires that you authenticate when downloading contract documents from its document URLs, so we set the authenticator on the step to use the Ironclad authenticator we configured in Tray.io Setup, and add a “Bearer” authorization header to the step inputs using the API key from the authenticator. We have to do this extra setup of the header field because we are using a file helper step instead of an Ironclad connector step here, and the authorization header will not automatically be added to the request header by the file helper.
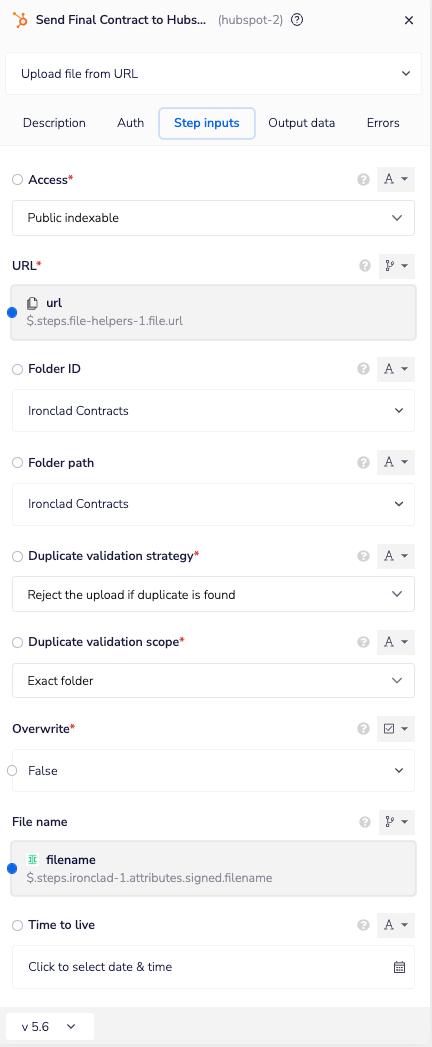
Add a Hubspot Connector of type “Upload file from URL”. Set the Access to the file - set to “Public indexable” in this example. For the URL, reference the file-helper connector within the previous step. Choose either the relevant Folder ID or Folder path that create in the Hubspot Setup section. Set the File name to the signed copy filename from the Ironclad connector.
Final Tray.io flow
Here is the final Tray.io flow.
Updated 5 months ago
