NetSuite Integration (via Tray.io)
Please note:Ironclad now uses the OAuth 2.0 Authorization Framework to authenticate API requests. As of November 22nd, 2024, our previous bearer token method of authentication has been deprecated. We are currently in the process of updating this guide with details on how to implement with OAuth 2.0. In the meantime, please refer to our article Migrating to OAuth 2.0.
Overview
This guide provides a framework for an integration between Ironclad and NetSuite, utilizing Tray.io as a middleware tool. The use case here is a typical procurement use case where purchase requests are initiated in NetSuite, triggering a contract review and signature process in Ironclad. When the contract is executed in Ironclad, details will be written back to NetSuite for recordkeeping and subsequent activities (e.g., converting the purchase request to a purchase order). Vendor onboarding and other procurement activities are outside the scope of this solution guide, but the capabilities demonstrated here are transferable.
Please note that the approach shown here is only meant to demonstrate an example solution for building this integration, but it is a custom integration and not an out-of-the-box supported connector. To view a list of out-of-the-box connectors that Ironclad supports, check out our Help Center.
We use Tray.io in this guide as a representative middleware software to demonstrate what an integration between NetSuite and Ironclad might look like. If you need to leverage an alternative integration path, our public APIs can be consumed from any system or middleware that can directly leverage a RESTful API through our supported authentication modes, and systems can subscribe to Ironclad events if they can expose endpoints that support our outbound event authentication modes.
The runtime interactions that we will show between Ironclad, Tray.io and NetSuite are summarized in the figure below.
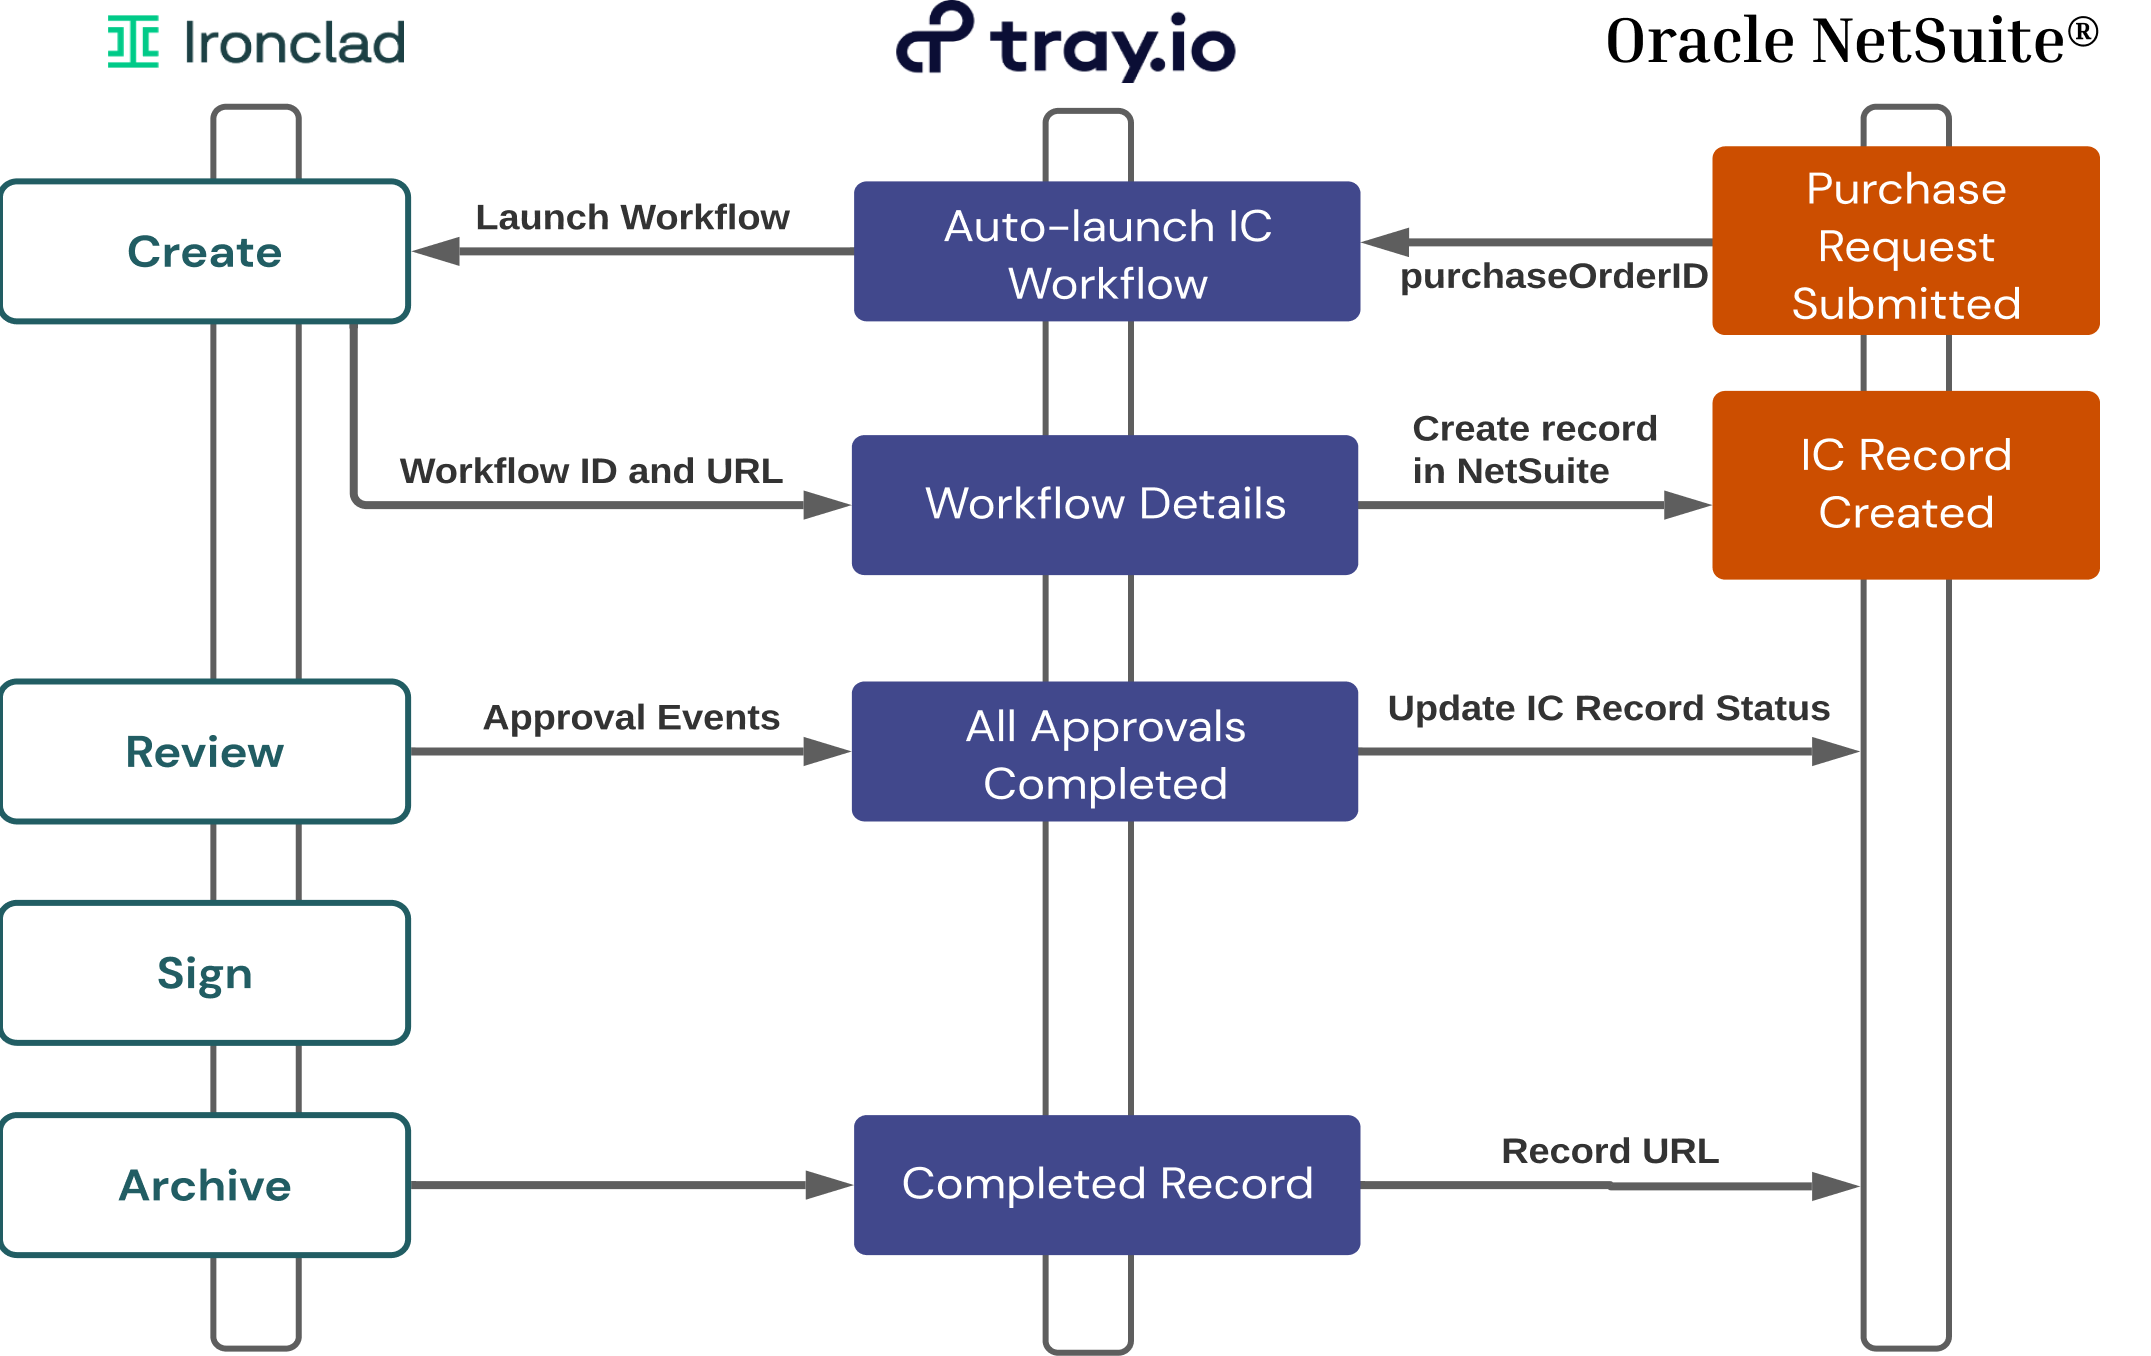
For a demo of the end product of this solution guide, please see the video below.
Note: This guide and any software contained in it should be used at your own risk by individuals qualified to evaluate its effectiveness. IT IS PROVIDED “AS IS”, WITHOUT WARRANTY OF ANY KIND, EXPRESS OR IMPLIED, INCLUDING BUT NOT LIMITED TO THE WARRANTIES OF MERCHANTABILITY, FITNESS FOR A PARTICULAR PURPOSE AND NONINFRINGEMENT. IN NO EVENT SHALL IRONCLAD BE LIABLE FOR ANY CLAIM, DAMAGES OR OTHER LIABILITY, WHETHER IN AN ACTION OF CONTRACT, TORT OR OTHERWISE, ARISING FROM, OUT OF OR IN CONNECTION WITH YOUR USE OF THIS GUIDE OR ANY SOFTWARE IT CONTAINS. Your use of the Ironclad API must comply with Ironclad’s API Terms of Use (available at https://legal.ironcladapp.com/api-terms-of-use) and the terms of the Enterprise Services Agreement (or equivalent) entered into between you and Ironclad.Background
Ironclad
- API Access: Your Ironclad environment will need to have API access enabled, since the Tray.io connector makes use of the Ironclad public APIs to enable the integration.
- Ironclad Account: The solution pattern requires business users to have user accounts in Ironclad in order to launch contracting workflows.
- Reference Documentation: Please see API Reference Docs documentation for the most up-to-date details on our endpoints. For information on building workflows in Ironclad, please see Ironclad Academy for guided training and Ironclad Support Center for product articles.
Tray.io
- This guide makes use of Tray.io’s native Ironclad and NetSuite connectors, which allows for quick and easy setup with (almost) no code.
- Visit Tray.io’s Knowledge Base for introductory resources as well as their Documentation for specific connector information.
NOTE: Ironclad, Tray.io, and NetSuite each have the concept of “workflows”.
- Ironclad: A workflow defines a contracting process for a particular type of agreement
- Tray.io: A workflow is a flow of actions that are taken in various integration scenarios (triggered by events, or run periodically on a schedule).
- NetSuite (SuiteFlow): A workflow is the definition of a custom business process for a standard or custom record in NetSuite. Business processes can include transaction approval, lead nurturing, and record management.
Whenever possible we will refer to Ironclad workflows as “workflows”, Tray.io workflows as “flows”, and NetSuite workflows as “SuiteFlows” for clarity.
NetSuite
We assume that you are familiar with the basics of NetSuite concepts, such as lists (vendors), transactions (purchase requests/orders), SuiteFlows, and user/roles. Our guide assumes that (1) the NetSuite vendors list and purchase order transactions are in use and (2) a purchase order SuiteFlow has been or can be created. You will need an Integration with Token-Based Authentication enabled and a Role defined in NetSuite that has appropriate privileges to create and update the vendor, purchase order, and employee records.
Note: This guide covers purchase requests/orders; NetSuite purchase requests have a one-to-one relationship with purchase orders. NetSuite’s requisitions, which can include a one-to-many relationship with purchase orders, is outside the scope of this guide; the principles in this guide may help you with your solution. Please see NetSuite’s requisitions vs. purchase requests guide for a comparison of their features.
Basic Setup
There are a few details you’ll need to configure in Ironclad, Tray.io and NetSuite before configuring the actual integration flows in Tray.io.
NetSuite Setup
As mentioned in the Background section, we assume the “Vendor” record and “Purchase Order” record are in use.
We will create a new NetSuite record type to hold data for Ironclad workflows. As an alternative, you could add custom fields directly to existing record types. However, this guide’s approach allows you to (1) associate multiple Ironclad workflows with a single NetSuite record and (2) customize a standalone record type while minimizing changes to related NetSuite objects. We will then create a purchase request/order SuiteFlow that will allow users to submit purchase requests and launch the vendor agreement workflow in Ironclad.
Create Ironclad Contract Record Type
Create a new record type to store information about Ironclad workflows by navigating to Customization > Lists, Records, & Fields > Record Types > New. Name the record type Ironclad Contract. Enter _ironclad_contract as the ID.
Under "Access Type" and "Permissions", customize access to the record type to meet your internal policies. At a minimum, the NetSuite integration role you are using in your Tray.io account must have Full access. We recommend broadening access for accessibility. Click Save once complete to create the record type.
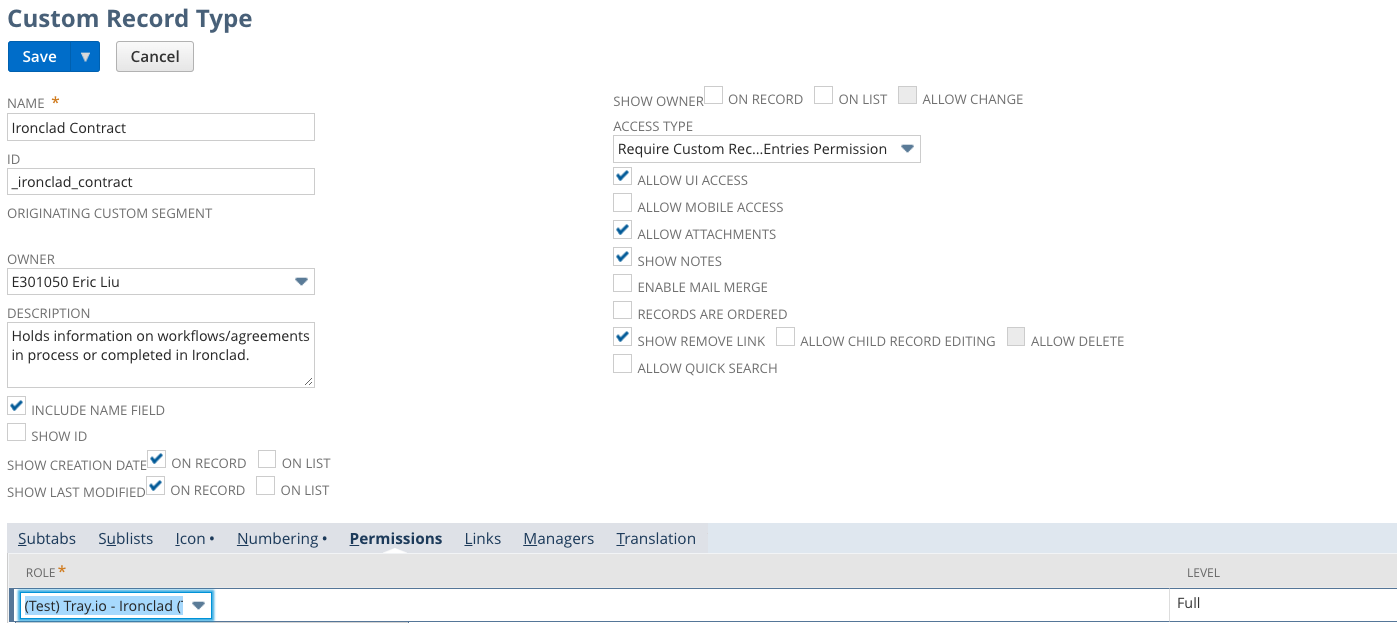
Open the record type that you created. Add the fields in the table below to your record type by navigating to the "Fields" subtab and clicking "New Field".
You may choose a different naming convention for your fields and IDs (see NetSuite’s guide), but the suggestions below will be used for the rest of the guide. We recommend restricting field editability to your integration role if you prefer to prevent users from changing data.
| Field | ID | Type | Notes |
|---|---|---|---|
| Vendor | _vendor | List/Record (Vendor) | Check the Record is parent checkbox option. Stores a reference to a NetSuite vendor record. |
| Purchase Request/Order | _purchase_request | List/Record (Transaction) | Check the Record is parent checkbox option. Stores a reference to a NetSuite purchase request/order record. |
| Workflow ID | _ironclad_workflow_id | Free-Form Text | Stores the unique id of the Ironclad workflow so it can be used for any interactions with the active workflow. |
| Workflow URL | _ironclad_workflow_url | Hyperlink | Stores the URL of the Ironclad workflow so users can easily access the active workflow. |
| Step | _ironclad_step | Free-Form Text | Stores a high-level summary of which step the workflow is in: (1) Review (Pending Submission / Approval), (2) Sign (Pending Signature), (3) Complete. |
| Signature Date | _ironclad_signature_date | Date | Stores the date the agreement is fully signed. |
| Record ID | _ironclad_record_id | Free-Form Text | Stores the unique id of the Ironclad record so it can be used for any interactions with the executed record. |
| Record URL | _ironclad_record_url | Hyperlink | Stores the URL of the Ironclad record so users can easily access the final executed PDF. |
Your final record type’s fields should look like the screenshot below:

Create a NetSuite Purchase Order SuiteFlow
We will create a SuiteFlow for approving purchase requests/orders submitted by employees. This SuiteFlow will be used to (1) launch a Vendor Agreement workflow in Ironclad when a purchase request is submitted in NetSuite and (2) support an approval process for the purchase request/order within NetSuite. If you already have a purchase request/order SuiteFlow available, you may skim this section to check that your SuiteFlow aligns with the general principles discussed here.
Enable the purchase requests and purchase orders features if you have not done so already. Purchase requests automatically convert to purchase orders when fully approved and can also be set to not require approval; at times we will use the terms interchangeably because the distinction is influenced by employee profile and your own approval setup (outside the scope of this guide).
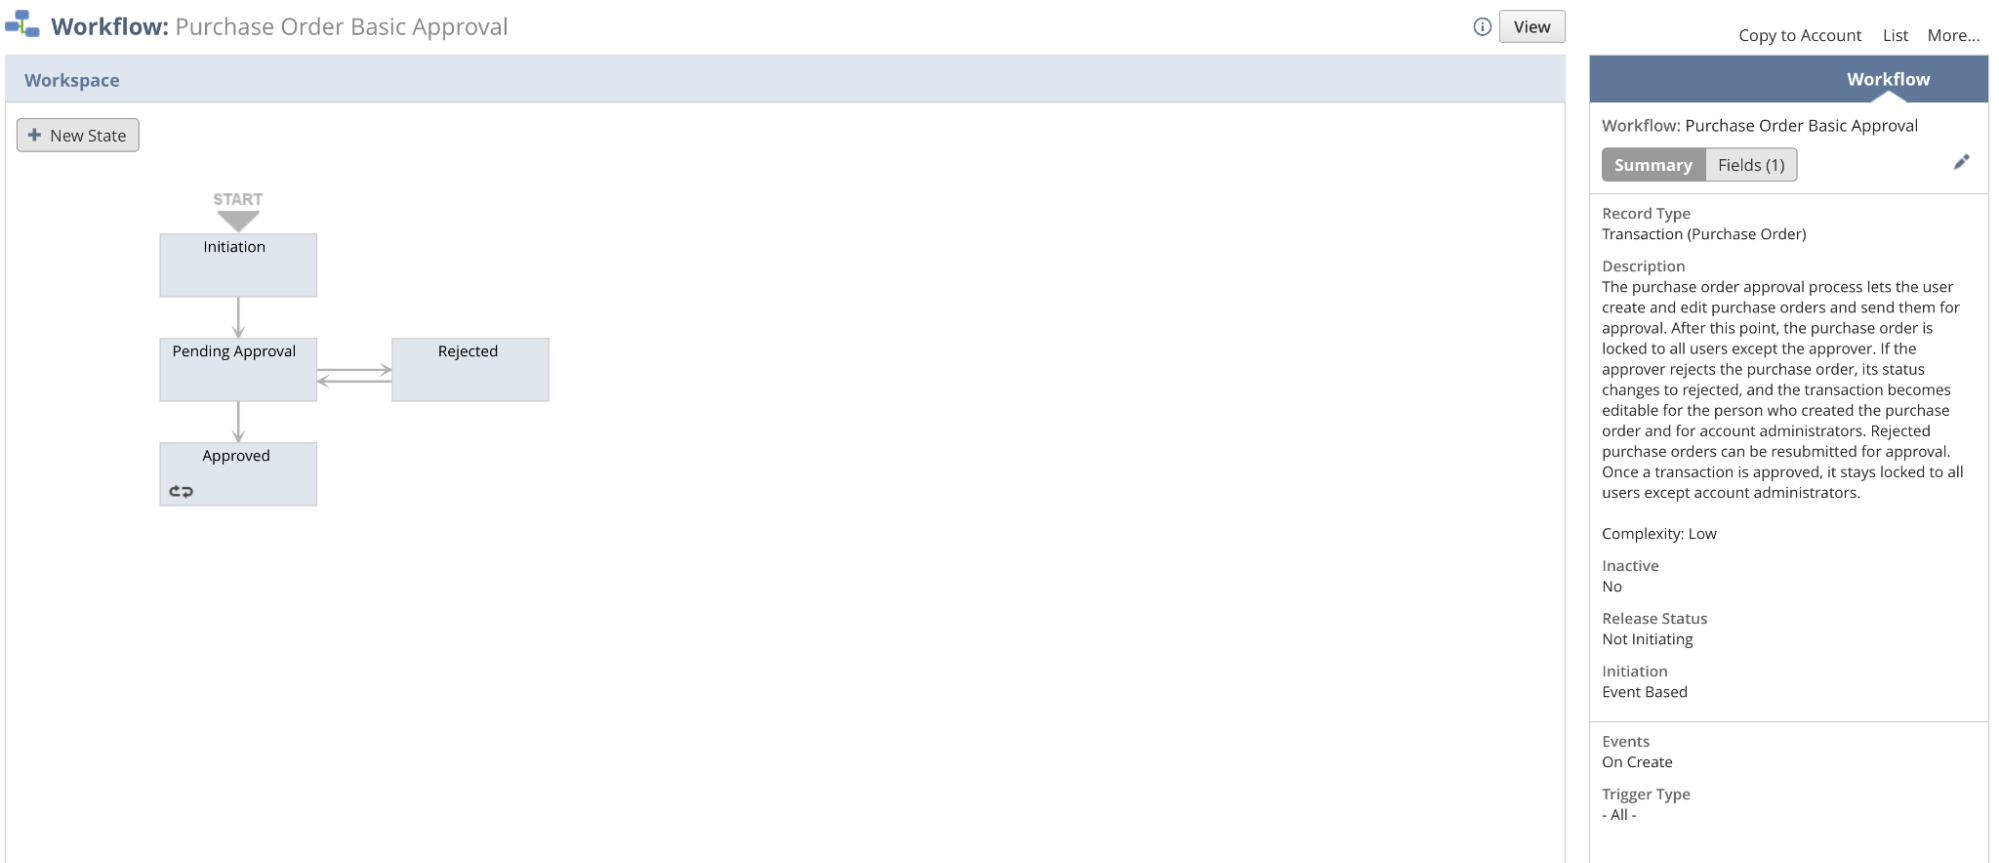
We will now use NetSuite’s basic purchase order approval workflow as a quick start. Create a new SuiteFlow with the template under Customization > Workflow > Workflows > New > From Template. Select the “Purchase Order Basic Approval” template.
If the SuiteFlow has been successfully created, you should see the below workflow (NetSuite’s template as of August 31, 2022). We will revisit this SuiteFlow after building out our integration components. For additional guidance on customizing SuiteFlows, see NetSuite's SuiteFlows guide.
Ironclad Setup
You’ll need an appropriate contract workflow defined in Ironclad. Our example uses a vendor agreement workflow to hold information sent by NetSuite and begin the contract review process. We will create a “counterparty paper” workflow that allows users to upload the vendor’s agreement for review and signature. This approach accommodates the wide variety of agreements that procurement and legal teams may encounter (e.g., independent contractor agreements vs. software agreements). If your company has its own template for vendor agreements, you may choose to build a workflow that generates that template and follows the principles below.
We will create a workflow with (1) a launch form to hold key data fields that will be sent by NetSuite and (2) an internal form that will be emailed to a business user prompting them to upload the agreement for review and provide additional details that may not be in NetSuite. If NetSuite has all the data required to launch the workflow, you may choose to omit the internal form and keep all the fields on the launch form.
Form Design ConsiderationsThe approach in this guide is recommended because it (1) allows NetSuite to send the minimal set of data required to start a workflow, (2) allows the Ironclad workflow designer to prompt users to answer contracting-specific questions, and (3) is more maintainable if the workflow is updated in the future. Required fields on the launch form must be supplied when launching a workflow; moving questions to the internal form allows you to add and remove questions from the internal form without forcing an integration update to the launch payload.
Create Launch Form
Create a counterparty paper workflow and add the below fields to the launch form. The last row contains a formula which will exist independent of the launch form.
| Attribute | Attribute ID | Type | Notes |
|---|---|---|---|
| Counterparty Name (included by default) | counterpartyName | Text | This will store the vendor name. |
| NetSuite Vendor ID | netSuiteVendorID | Text | This will store the vendor ID from NetSuite so (1) Ironclad users know the unique NetSuite vendor associated with their contract and (2) the integration can sync contracting details back to the correct vendor in NetSuite. |
| NetSuite Purchase Order ID | netSuitePurchaseOrderID | Text | This will store the purchase order ID from NetSuite so (1) Ironclad users know the unique NetSuite purchase order associated with their contract and (2) the integration can sync contracting details back to the correct vendor in NetSuite. |
| NetSuite Purchase Order Number | netSuitePurchaseOrderNumber | Text | This will store the NetSuite purchase order number of the record that triggered the workflow launch. |
| Signing Date (formula) | signingDate | Date (formula) | This will automatically store the date the Sign step is completed; it uses the Signing Date value available in Workflow Designer’s formula feature and will not appear on the launch form directly. See the below screenshot and add formula guide for additional details. |
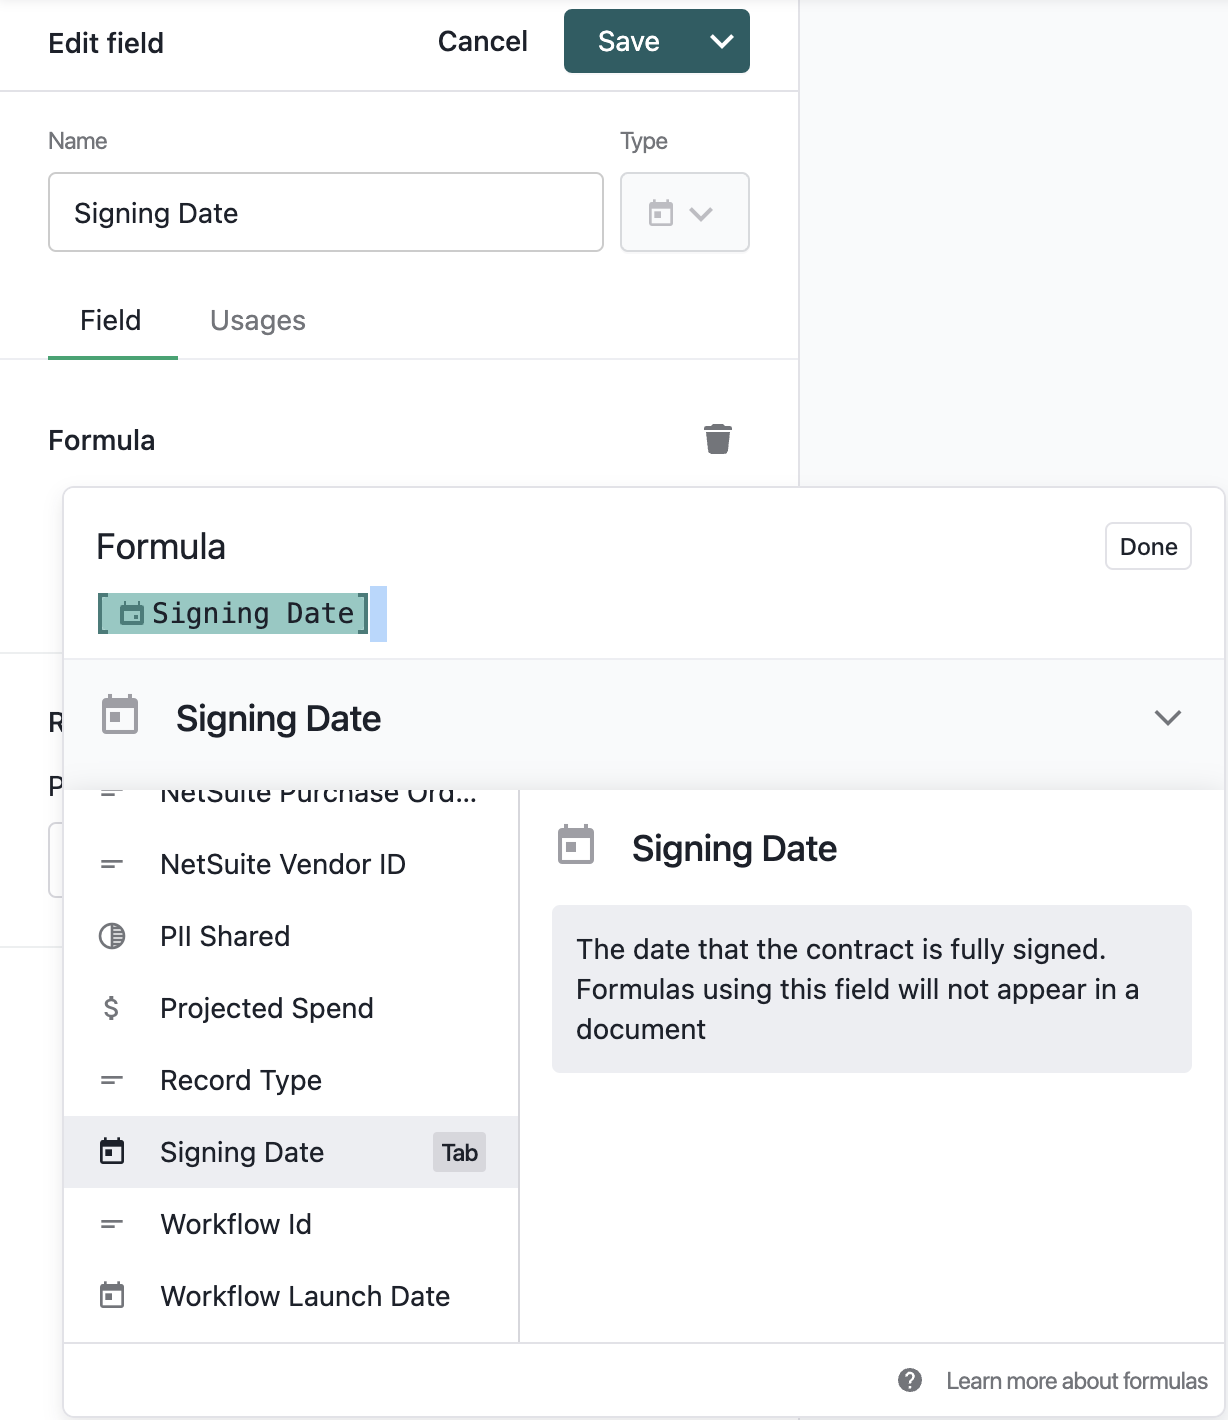
The completed launch form should be similar to the screenshot below. There will be an extra Upload Agreement Document file upload field, which we will move it to an internal form in the next step.
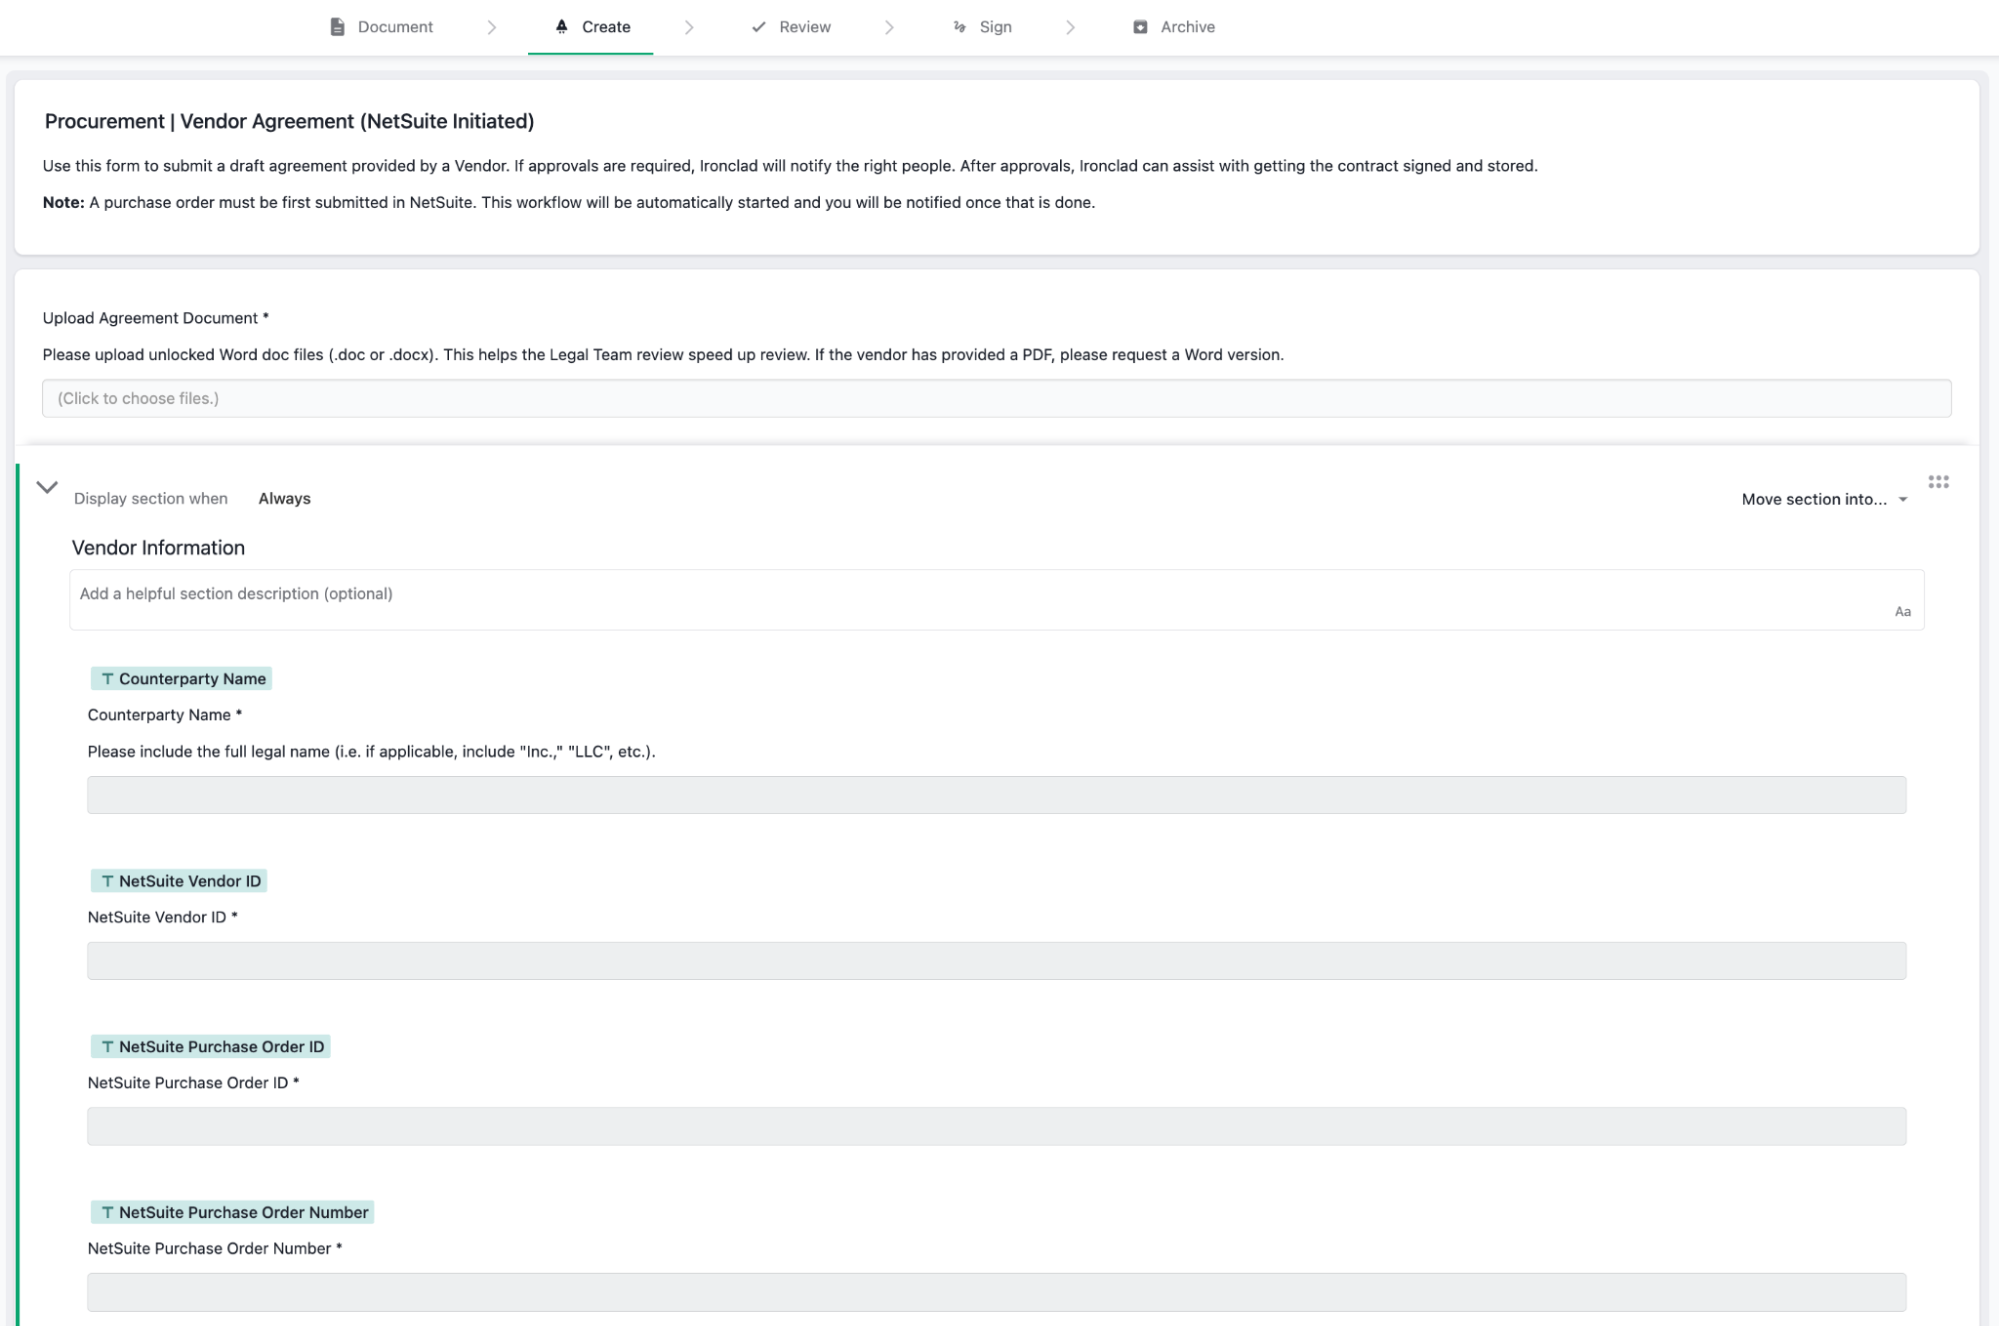
Create Internal Form
Add an internal form to the workflow under Create > Additional Forms. This form will hold any fields that will be populated by a business user after the set of fields in the initial launch form are set by NetSuite.
Set the "internal form recipient" to the Workflow Owner. Move the Upload Agreement Document file upload field and any fields on the launch form not listed in the previous table to the internal form. Add any additional questions you want to prompt the user to answer to the internal form. In our example, we duplicated the launch form questions so users could see the information sent by NetSuite and also added signer information questions. The completed internal form should look like the below.
Note: The NetSuite integration must supply data for all required fields on the Ironclad launch form to successfully launch the workflow. Any fields that will not receive data from NetSuite must be moved to the internal form.
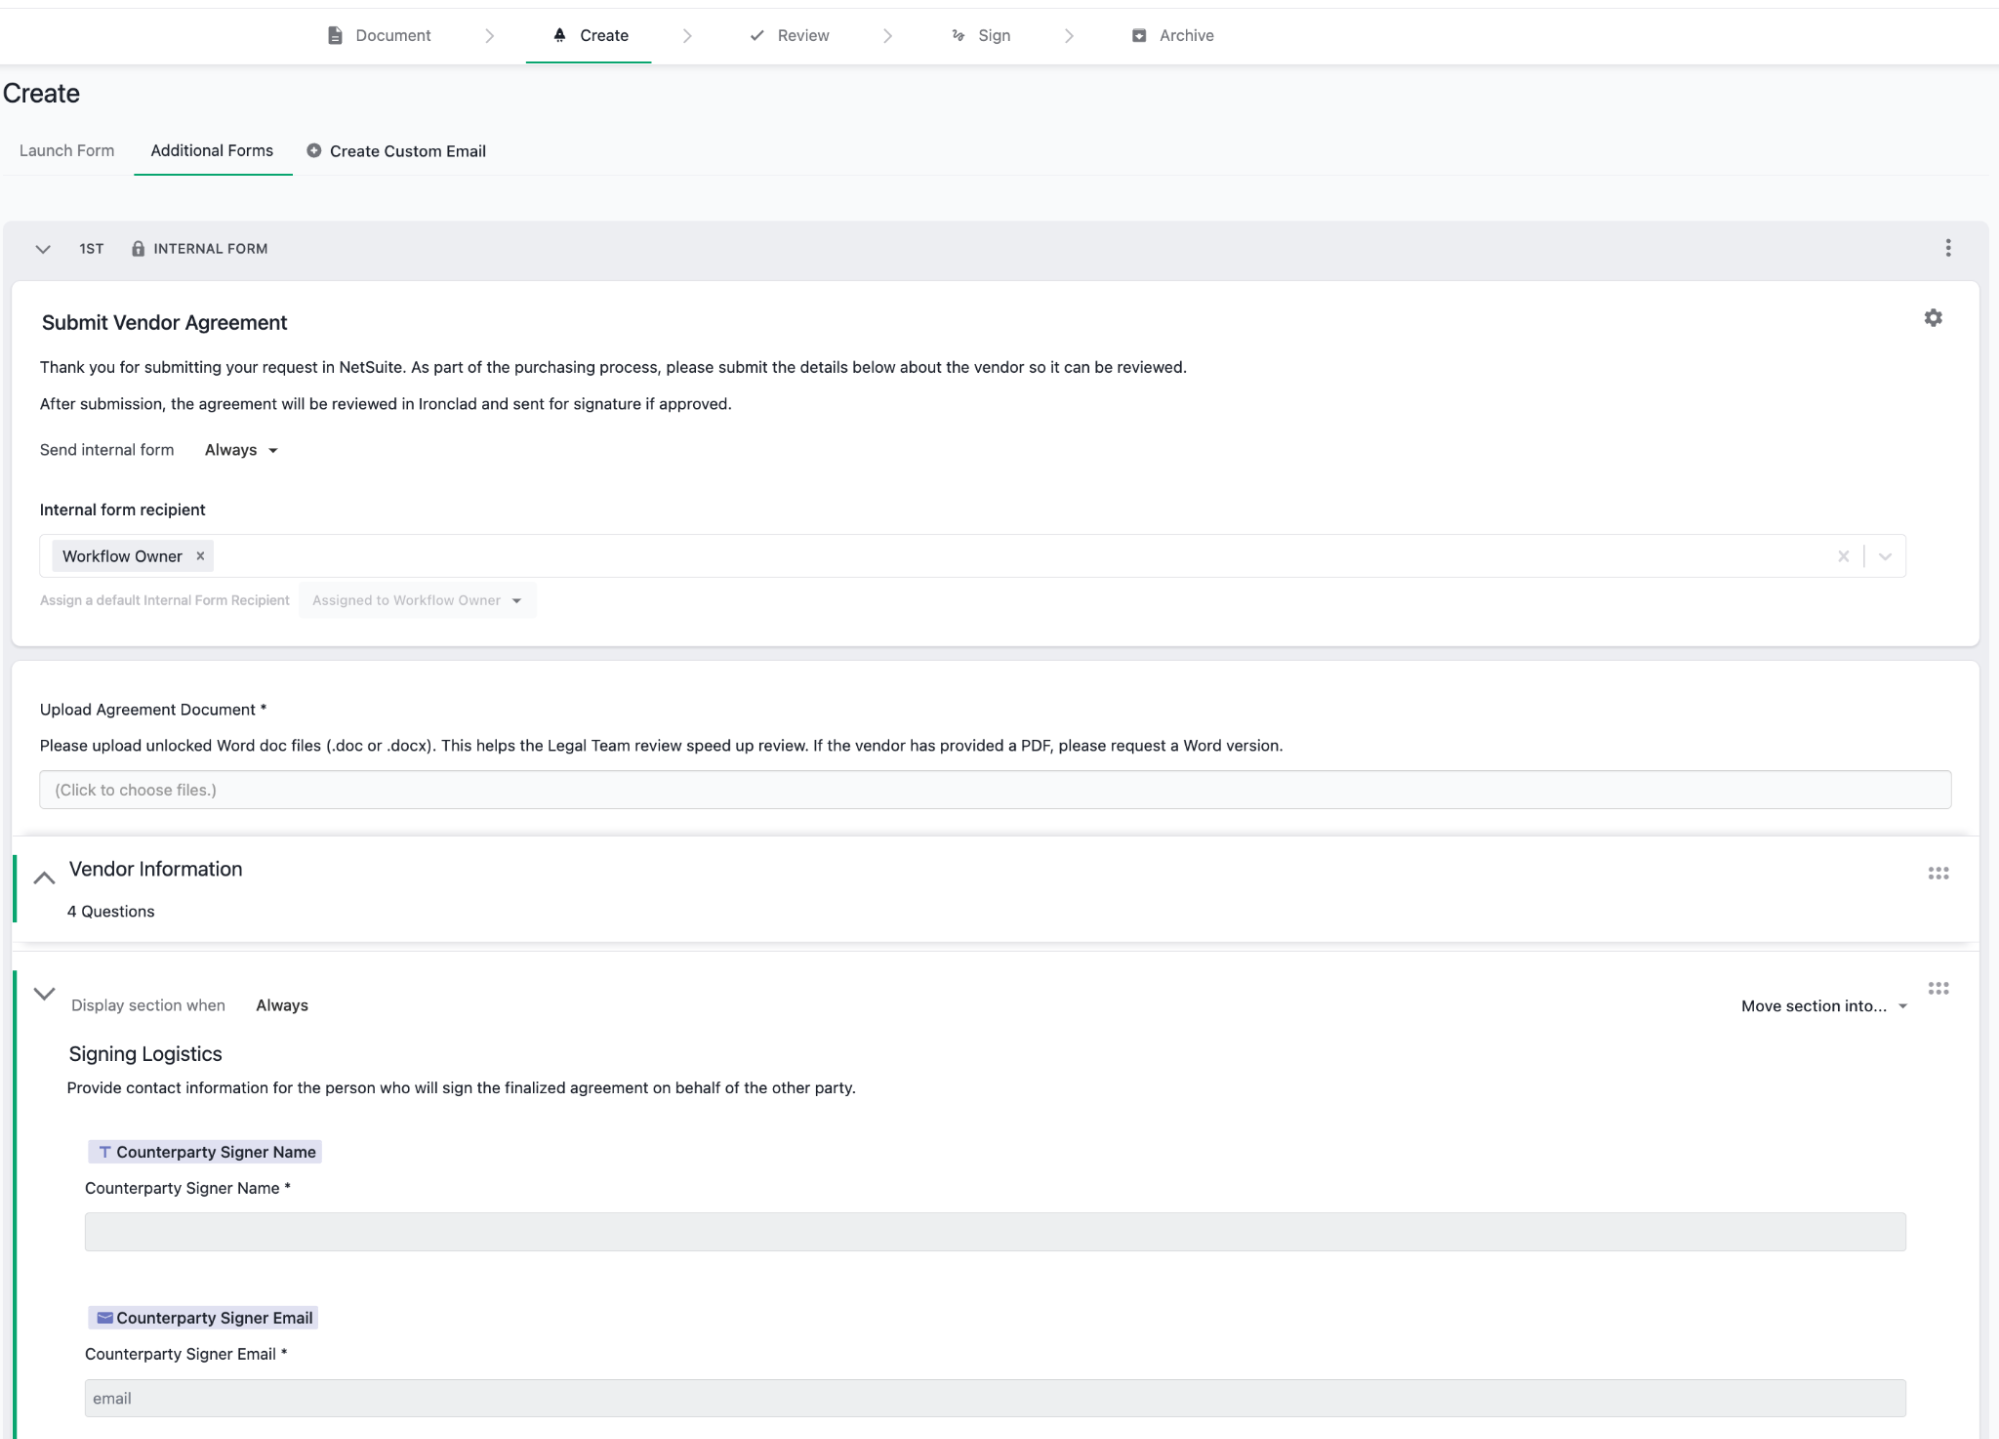
Set Record Type
Under the "Archive" tab, set the record type to Vendor Agreement. We will use this workflow to intake all forms of vendor agreements (e.g., independent contractor agreements, MSAs, etc.) so a generic record type is used. You may choose an alternative name or opt to use a dynamic record type with multiple options if NetSuite can send a matching record type when it launches the workflow (the dynamic record type question can only be used on the launch form).

Finalize and Publish
Add any desired approvers or customizations to the workflow with the exception that additional required fields should only be added to the internal form; it is straightforward to launch a workflow with additional fields, but such changes would extend your setup beyond this guide’s path. Press publish when complete.
In order to configure the Tray.io Ironclad authentication, you will also need to create an API key from your Ironclad instance. Tokens can be generated in Ironclad under Name] > Com> Company Settings > API > Access Tokens. Be sure to make note of the API token value.
Tray.io Setup
Authentication Entries
Thanks to the built-in NetSuite and Ironclad connectors and authenticators in Tray.io, we can set up authentication for both platforms to be used throughout the Tray.io flows we describe in the rest of this guide. For each of the authentication entries described next, navigate to the Authentications tab in Tray.io and select "Create new authentication".
Ironclad Authentication
Provide a name for your authentication entry and select Ironclad as the service. On the next screen, enter the API key that you saved when you created the key from the Ironclad API Settings page.
For the subdomain, ensure that you specify the environment that matches the Ironclad instance where you created the API key, e.g.:
| Environment Value | Ironclad Server |
|---|---|
| <blank value> | na1.ironcladapp.com (production) |
| “demo” | demo.ironcladapp.com |
| “preview” | preview.ironcladapp.com |
NetSuite Authentication
Provide a name for your authentication entry and select NetSuite as the service. NetSuite’s authentication requires a NetSuite integration role and access token. Please see Tray.io's NetSuite authentication guide for details on setup.
Be sure that the NetSuite role you use to configure the authentication has sufficient privileges to create, update or delete records in the records required for your Tray.io flow actions. A suggested list of minimum role permissions is provided below.
| Category | Permission | Level | Purpose |
|---|---|---|---|
| Transaction | Find Transaction | View | Supports searches for purchase order records. |
| Transaction | Purchase Order | Edit | Supports modification of purchase order records. |
| Reports | SuiteAnalytics Workbook | Edit | Supports searches for NetSuite records. |
| Reports | Transaction Detail | View | Supports searches for purchase order records. |
| Lists | Perform Search | View | Supports searches for vendor records. |
| Lists | Vendors | Full | Supports creation and modification of vendor records. |
| Lists | Employees | View | Supports retrieval of employee information (e.g., email). |
| Lists | Employee Record | View | Supports retrieval of employee information (e.g., email). |
| Custom Record | Ironclad Contract | Full | Support creation and modification of ironclad contract records. |
| Setup | Log in using Access Tokens | Full | Supports integration through Tray.io. |
| Setup | REST Web Services | Full | Supports integration through Tray.io. |
Project Setup
It is often useful to create a project in Tray.io to contain the various flows required for your use case. This allows you to easily find the related flows, but it also allows you to create project-level configuration variables that can be used in your flow actions, to make them more manageable as details or environments change.
Create a project in Tray.io from your home page by selecting the Projects section in the left navigation and click "Add Project". Name the project whatever you’d like. We’ll create the flows described below within this project.
For our example solution, we will be using two project config variables:
| Config variable name | Purpose |
|---|---|
ironclad_template_id | ID of the workflow template that will be used to launch workflows when new purchase requests/orders are created in NetSuite. See the Getting Started guide for details on getting the template ID for the workflow template you want to use. |
ironclad_api_base | The base URL for any direct API calls made in the Tray.io flows. This is only used in cases where the Tray.io Ironclad connector does not support a particular endpoint in the overall Ironclad public API. This needs to match the environment configured in the Ironclad authenticator configured earlier (e.g., "https://demo.ironcladapp.com" for the demo environment, "https://na1.ironcladapp.com" for production, etc.). |
These configuration variables can only be defined once you add a workflow to the project, so you can set them up after creating your first flow in your new project. Project config variables are accessed using the Options menu in the upper right corner of the Tray.io flow editor.
Launching an Ironclad Workflow
The first flow we will create in our Tray.io project will automatically launch our Ironclad vendor agreement workflow when a purchase request/order is created in NetSuite. Our flow will be configured with a webhook trigger which NetSuite will call. NetSuite will pass a purchase order ID as part of its call to the flow.
Create Tray.io Trigger
Create a new Tray.io flow. Provide a descriptive flow name such as “Launch Ironclad Workflow”. Select the “Webhook” trigger and create the workflow. Later, we will configure NetSuite to target this trigger when it is ready to launch an Ironclad workflow and will pass in a purchase order ID. See the Configure NetSuite Script to Launch Workflow section if you want a quick preview.
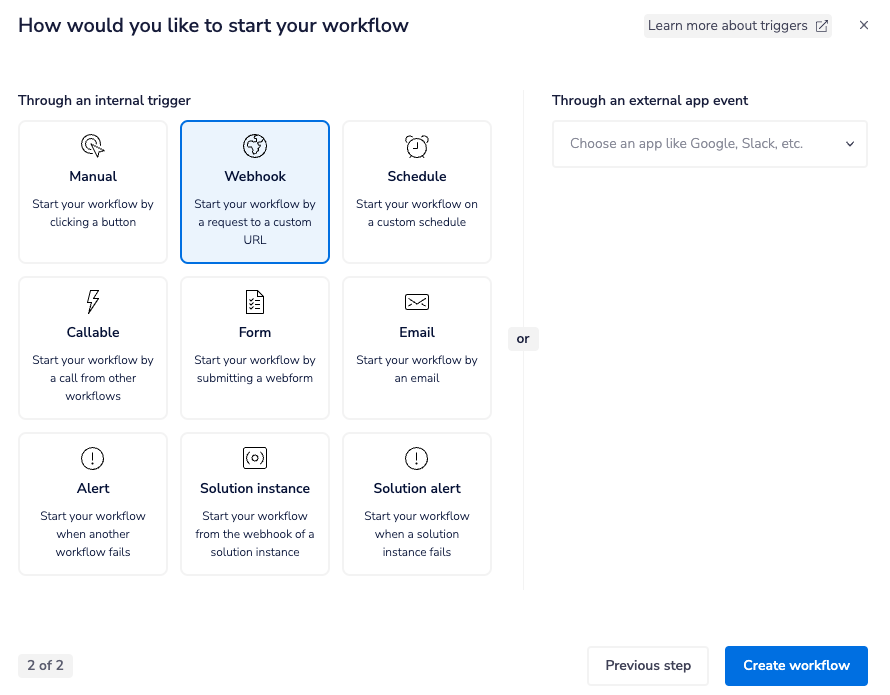
Retrieve NetSuite Data
We will add three NetSuite connectors to retrieve details about the purchase order, vendor, and submitter so they can be used to launch the Ironclad workflow.
Add a NetSuite connector to retrieve the purchase order details. Select "Get record" as the connector action and "Purchase order" as the record type. For "Record ID", select jsonpath as the method for setting its value and add $.steps.trigger.body.purchaseOrderID as the value. The purchase order ID will be sent by our NetSuite script when it calls the Tray.io flow.
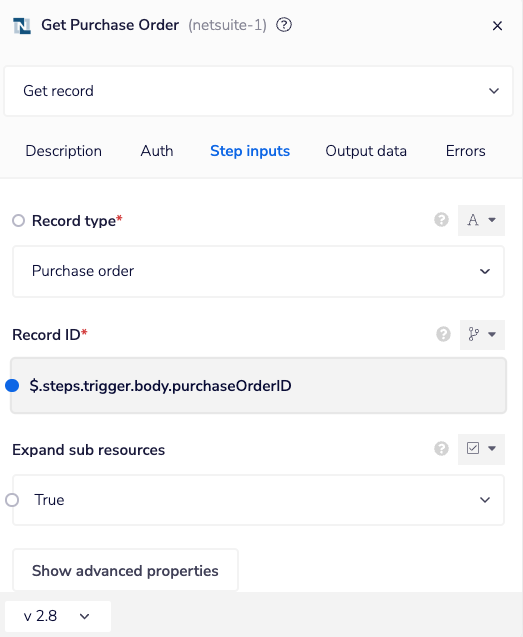
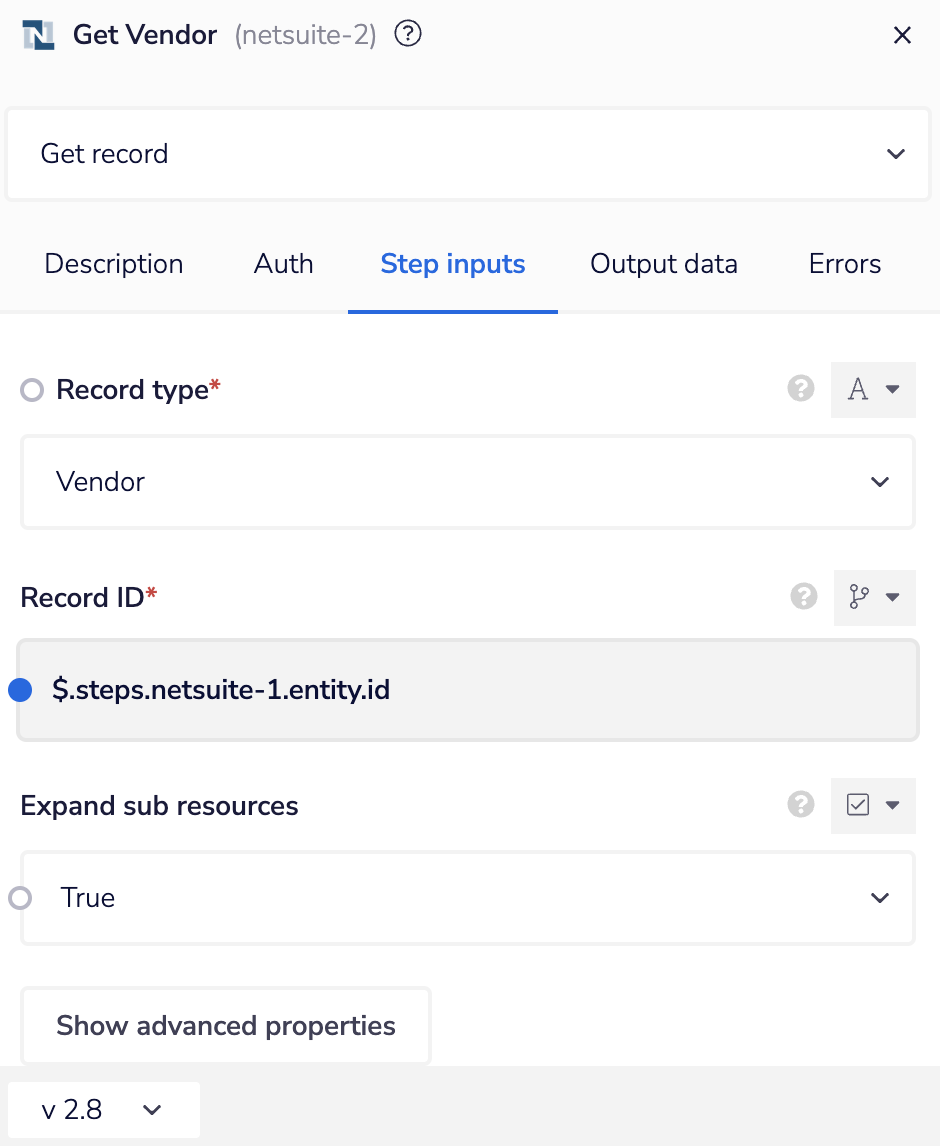
Add a second NetSuite connector to retrieve the vendor’s information so it can be used to launch the workflow. Select "Get record" as the action and "Vendor" as the record type. For "Record ID", we will use the entity ID returned by the preceding purchase order record.
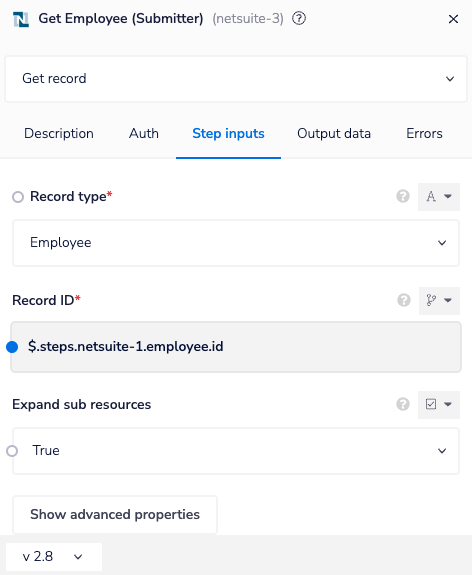
Add a third NetSuite "Get record" connector to retrieve the email address of the employee who submitted the purchase request/order. We will use them as the workflow owner in Ironclad and prompt them to provide additional information in Ironclad. Select Employee as the record type. For “Record ID”, we will use the employee ID returned by the preceding purchase order record.
Launch Ironclad Workflow
With all of the needed data fields collected, we can launch the Ironclad workflow. We use an Ironclad connector and set the authentication to use the Ironclad authenticator we configured in Tray.io Setup. Use this same authenticator for all of the Ironclad connectors used in the remainder of this guide.
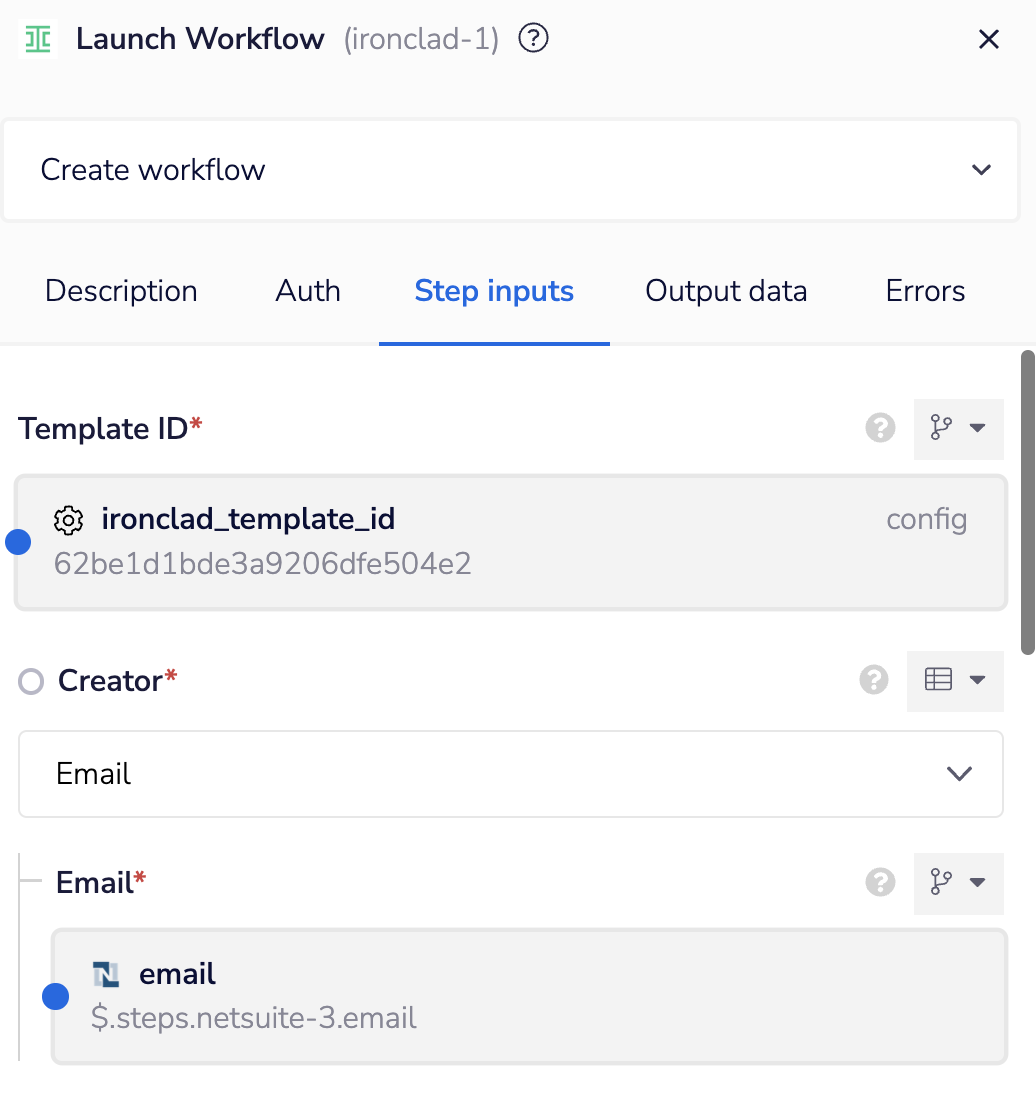
Add an Ironclad connector of type "Create Workflow". Add the Ironclad authentication that you set up previously in the Auth tab. Fill in the relevant fields in the step inputs tab:
- Template ID: Use the project level variable ironclad_template_id to reference the correct workflow that you will be launching. See the Getting Started reference for a refresher on retrieving the template ID of a workflow.
- Creator: Set the creator type to Email and map its value to the email address pulled in by the “Get Employee (submitter)” connector. This user will receive the internal form to upload the vendor contract and answer any questions you may have added to the form.
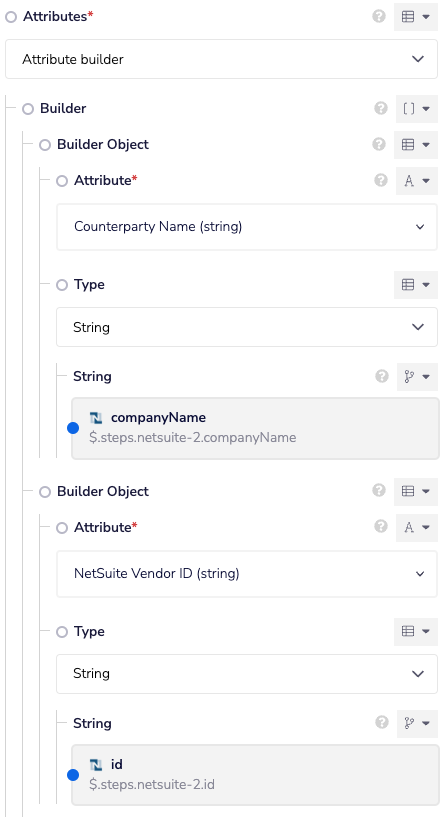
- Attributes: Using the template ID that was inputted, Tray.io will automatically pull in the attributes that can be populated on the Launch form through the “Builder Object”. Add the mappings in the table below.
For the Attributes section of the step inputs, use the "Attribute builder" option, and then map the following property entries under the Builder Object:
| Builder Attribute | Type | Value | Notes |
|---|---|---|---|
| Counterparty Name (string) | jsonpath | {$.steps.netsuite-2.companyName} | The vendor name from NetSuite. |
| NetSuite Vendor ID (string) | jsonpath | .steps.netsuite-2.id | The NetSuite ID of the vendor record. Supports system interactions. |
| NetSuite Purchase Order Number (string) | jsonpath | {$.steps.netsuite-1.tranId} | The purchase order number. |
| NetSuite Purchase Order ID (string) | jsonpath | {$.steps.netsuite-1.id} | The NetSuite ID of the purchase order. Supports system interactions. |
Steps one and two will yield the below design.
Step three will yield a design similar to the snippet below.
Create Ironclad Contract Record in NetSuite
As our final Tray.io flow step, we will create an Ironclad Contract record in NetSuite to store information about the workflow that was launched. This step (1) provides a record where relevant updates in Ironclad can be synced to NetSuite and (2) allows NetSuite users to locate any in-progress or completed agreements when looking at a vendor or purchase request/order.
Add a NetSuite connector. Select the “Find records” action. For “Record type”, locate the NetSuite ID for the Ironclad Contract record type and paste it in (customrecord_ironclad_contract in our guide). You can find and verify your record type’s ID in NetSuite under Customization > Lists, Records, and Fields > Record Types.
Reducing API Requests to NetSuiteIf you wish to eliminate these follow-up API requests to NetSuite, you can include all the relevant data (purchase order number, vendor ID, and submitter email) in the script payload that calls this flow.
This guide uses Tray.io’s connector to (1) take advantage of Tray.io’s point-and-click user interface and (2) minimize the number of variables managed in the NetSuite script.
Under "Record fields", add the below values to populate the Ironclad Contract record.
| Record field | Value | Notes |
|---|---|---|
Workflow ID - custrecord_ironclad_workflow_id | {$.steps.ironclad-1.id} | This is the ID of the workflow we launched. |
Workflow URL - custrecord_ironclad_workflow_url | {$.config.ironclad_api_base}/workflow/{$.steps.ironclad-1.id} | Here we combine the ironclad_api_base project config property with the workflow ID returned in the body of the previous step to compose the full URL to the Ironclad workflow. |
NetSuite Purchase Order Number (string) | {$.steps.netsuite-1.tranId} | The purchase order number. |
NetSuite Purchase Order ID (string) | {$.steps.netsuite-1.id} | The NetSuite ID of the purchase order. Supports system interactions. |
Step - custrecord_ironclad_step | Review (Pending Submission / Approval) | This indicates that the workflow is either pending user submission of the internal form or under review. |
Custrecord Vendor | {$.steps.netsuite-2.id} | This value uses the vendor ID to associate the Ironclad Contract record with the appropriate NetSuite vendor record. |
Custrecord Purchase Request | {$.steps.netsuite-1.id} | This value uses the purchase order ID to associate the Ironclad Contract record with the appropriate NetSuite purchase order record. |
Name | {$.steps.ironclad-1.title} |
Completed Tray.io Flow
Here is the completed Tray.io flow once all of the steps above have been configured:
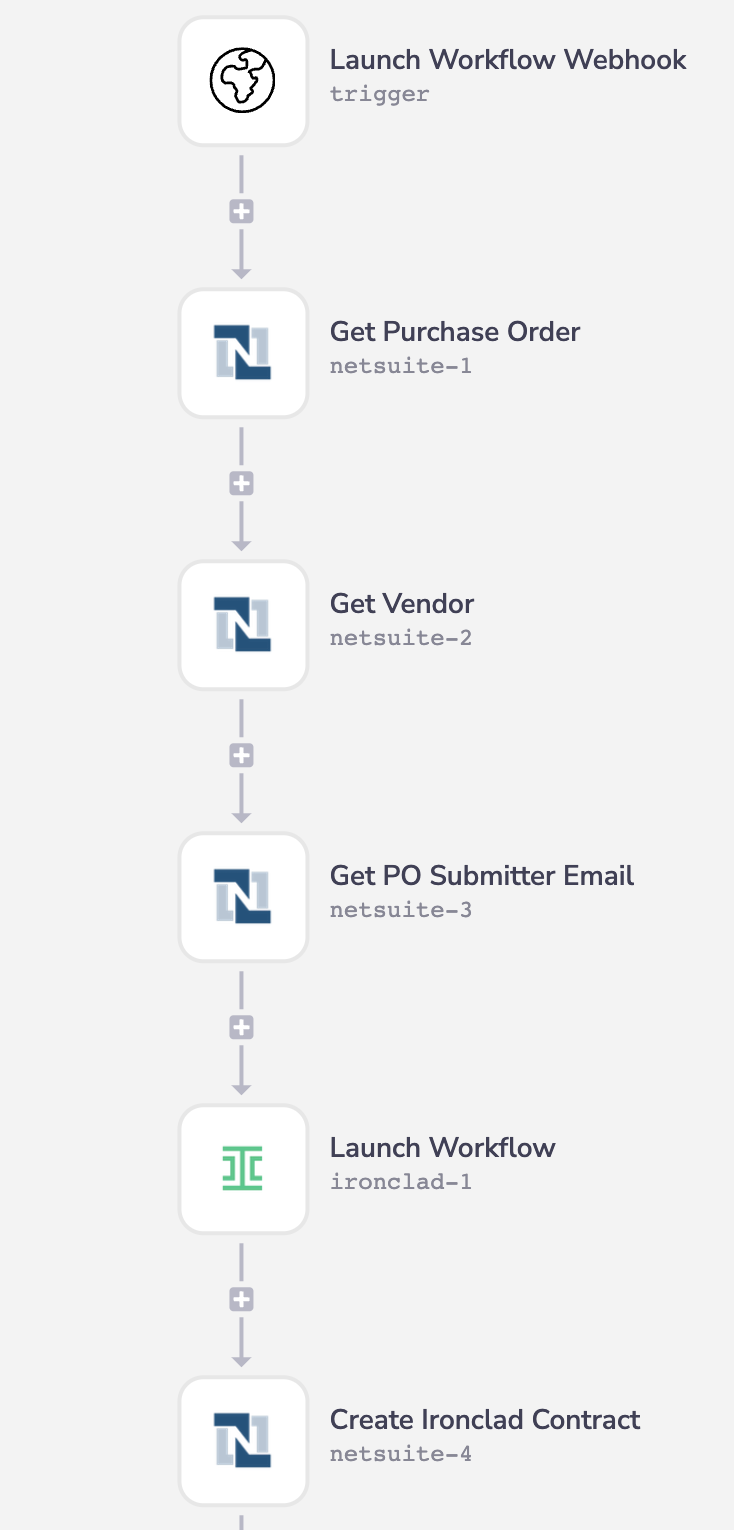
Configure NetSuite Script to Launch Workflows
Now we pivot to NetSuite to configure the triggering of our Tray.io flow when a purchase order is created. We will do this using a SuiteFlow in NetSuite that will fire when a purchase request/ order is created, and this SuiteFlow will use a custom script to call our Tray.io trigger endpoint. The first step of this is to upload a short script that sends a web request to the Tray.io flow we just created. Copy the below script and save it as a Javascript file (.js extension) with a descriptive filename such as launch_ironclad_workflow.js.
/**
* @NApiVersion 2.x
* @NScriptType WorkflowActionScript
*/
define(['N/runtime', 'N/https', 'N/log'], function launchWorkflow(runtime, https, log) {
 function onAction(scriptContext) {
    log.debug({
        title: 'Launch Ironclad Workflow',
    });
    const body = {
        purchaseOrderID: scriptContext.newRecord.getValue('id'),
    };
    var response = https.post({
        url: '[TRAY_WEBHOOK_URL]',
        body: JSON.stringify(body),
        headers: {
            'Content-Type': 'application/json',
        },
    });
    // Consider adding/removing the debug lines in this script when troubleshooting.
    log.debug({
        title: 'Response',
        details: 'status: ' + response.code
    });
    }
    return {
        onAction: onAction,
    };
});
In Tray.io, open the Launch a Workflow flow, locate the public URL of your webhook trigger (see Tray instructions), and copy it. Replace the placeholder value, [TRAY_WEBHOOK_URL], with the URL you copied.
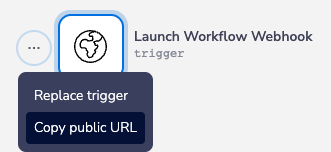
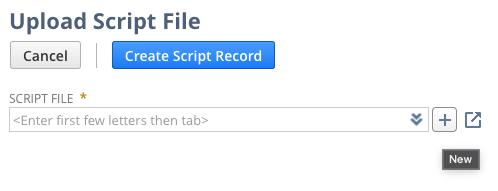
We will now deploy the script so it can be used in NetSuite. In NetSuite, navigate to Customization > Scripting > Scripts > New. Click the plus symbol to open a window to upload your file.
Enter your file’s name, select the "SuiteScripts" folder, select your file, and click "Save" when done.
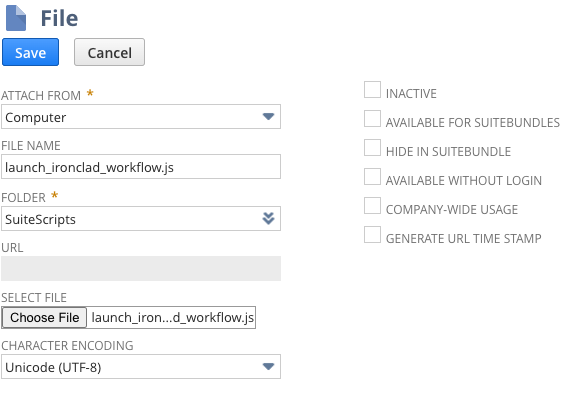
Click "Create Script Record" once your file has been saved. In the "Script" page that follows, provide a descriptive name (e.g., "Ironclad - Launch Workflow") and ID for the script record and save it. Your script is now available for use in a NetSuite workflow. For troubleshooting and more, see NetSuite’s guide to creating scripts.
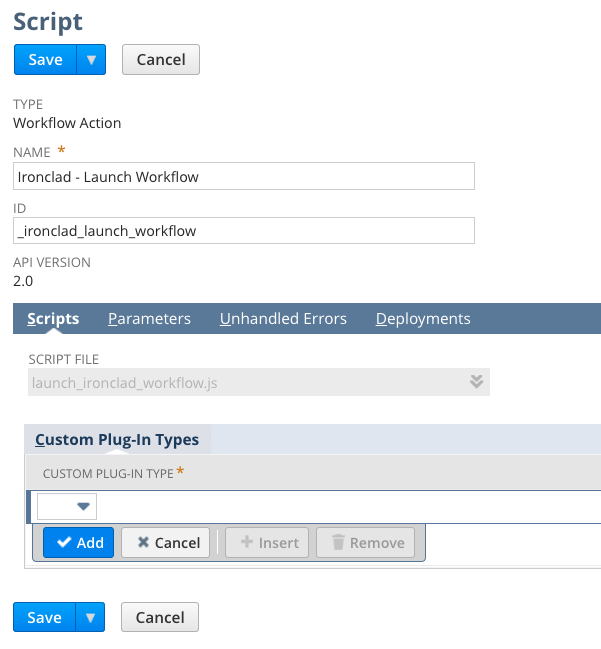
Add Launch Ironclad Workflow Action to NetSuite Workflow
We will now revisit the NetSuite SuiteFlow we created in Create a NetSuite Purchase Order SuiteFlow to add the workflow action created above. For this guide, we will launch a workflow immediately after a purchase request is submitted; this approach eliminates the need for user intervention. However, like any other NetSuite workflow action, it can be moved around and triggered based on your specific needs (e.g., on a button click).
In NetSuite, navigate to Customization > Workflow > Workflows and open your SuiteFlow in edit mode. Click into the Initiation state and click the pencil button to edit it.
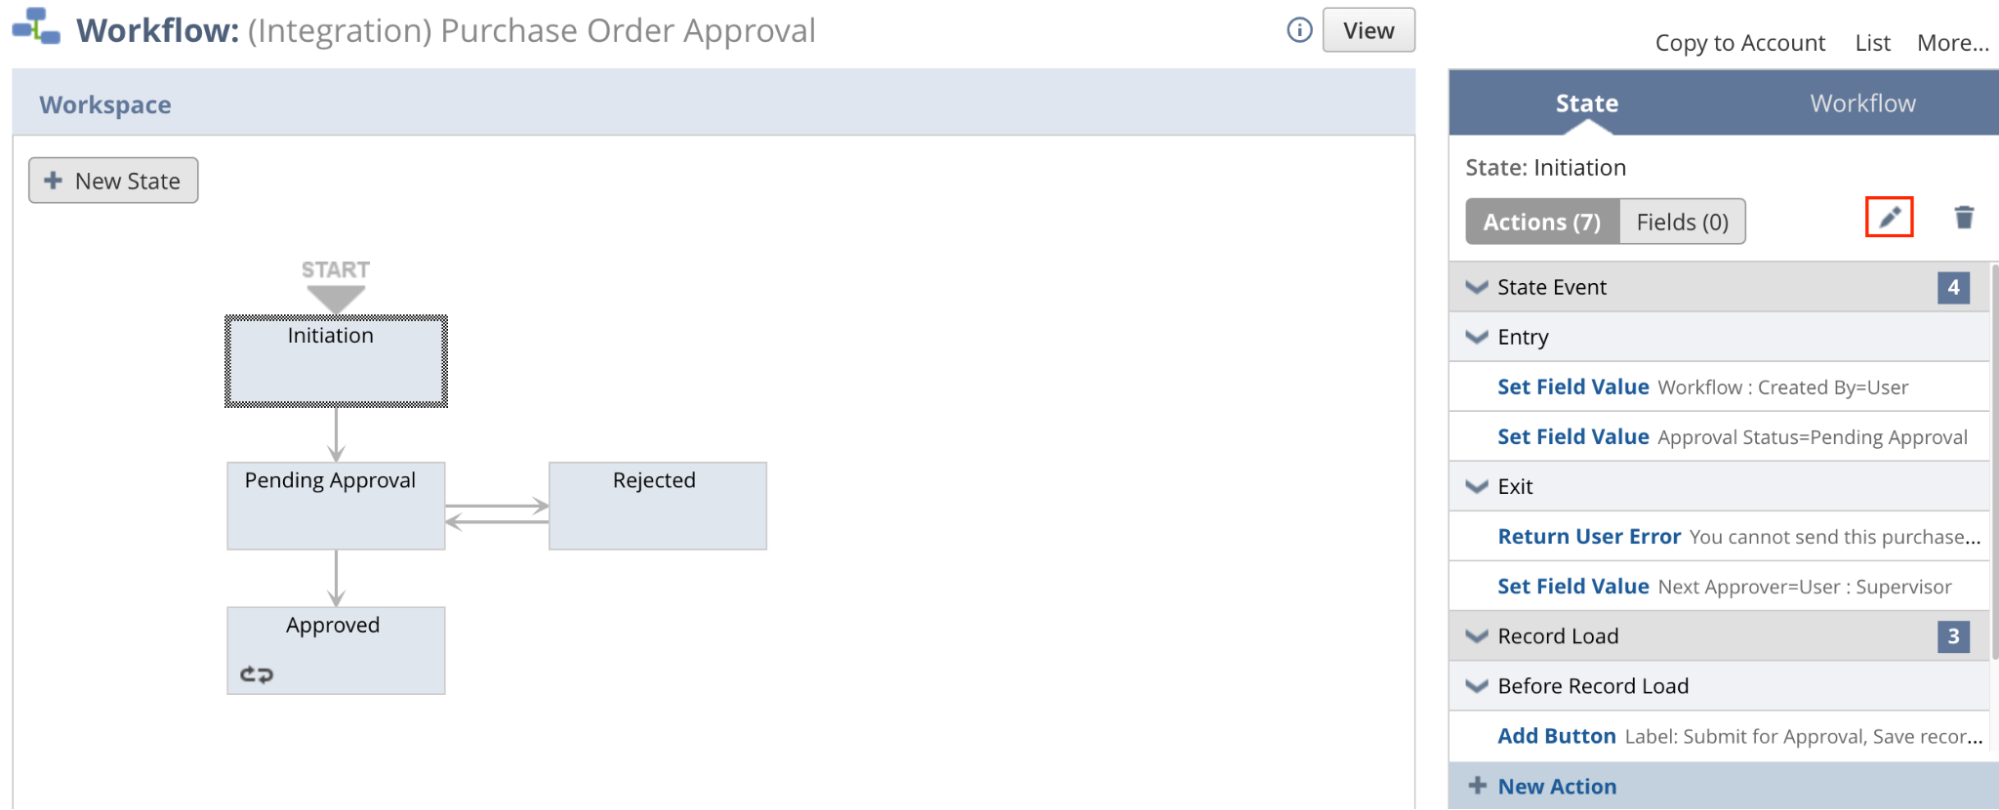
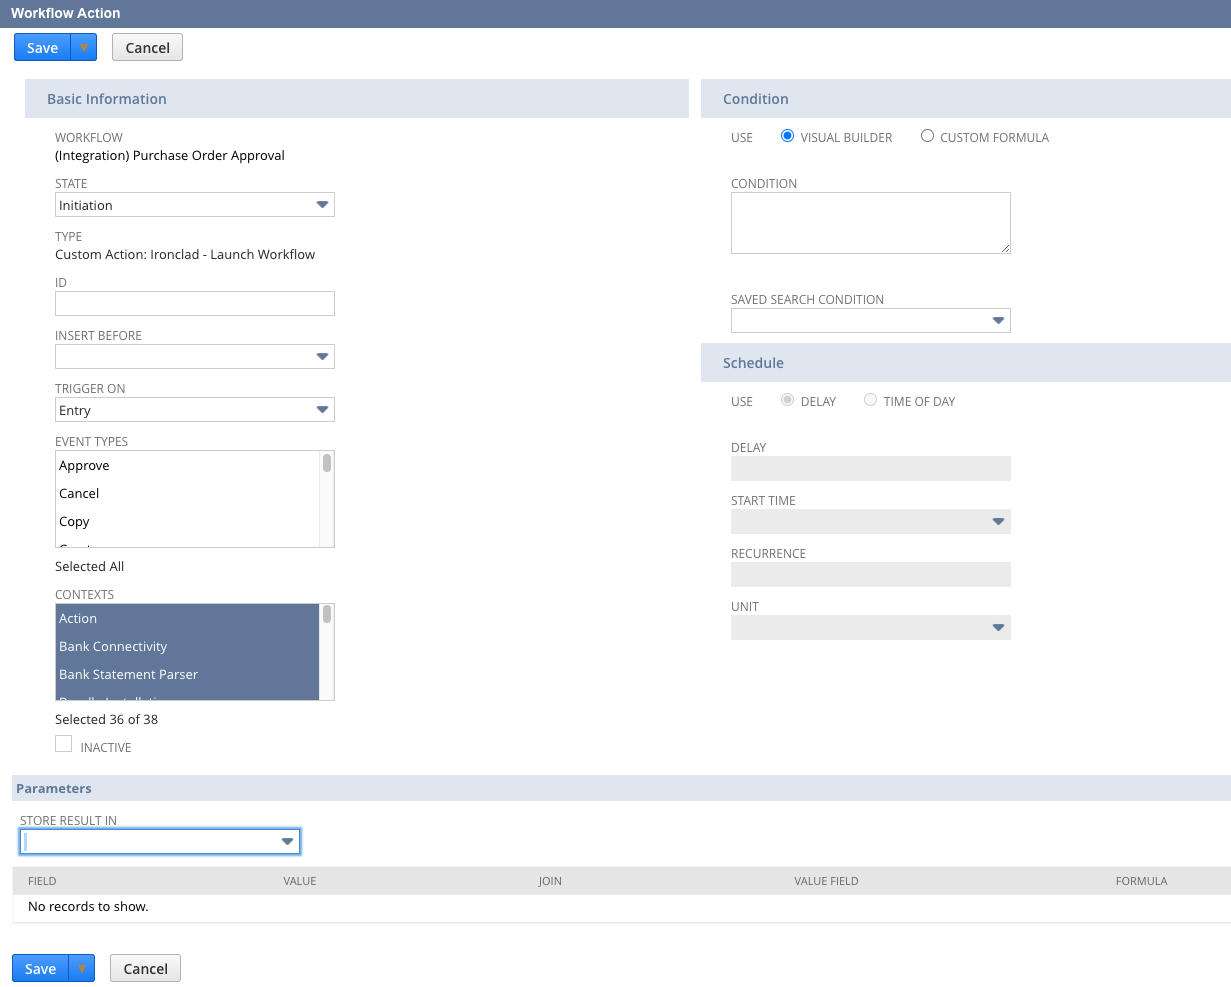
Click "New Action" and select the "Ironclad - Launch Workflow (Custom)" action that was added from the previous step. If you do not see it available, double-check that you have completed the previous step correctly.
Set the trigger to "Entry" so the workflow action runs immediately after a user submits a purchase request/order. Click save once you are done. NetSuite will now call our Tray.io flow and launch an Ironclad Workflow whenever a purchase request/order is submitted.
See It In Action
With our Tray.io flow and NetSuite SuiteFlow in place, we can now see the end-to-end process of a new purchase request/order being created in NetSuite, triggering an Ironclad workflow launch, and finally creating the Ironclad Contract record in NetSuite with the launched workflow details.
If a NetSuite user submits a purchase request/order such as the one shown here:
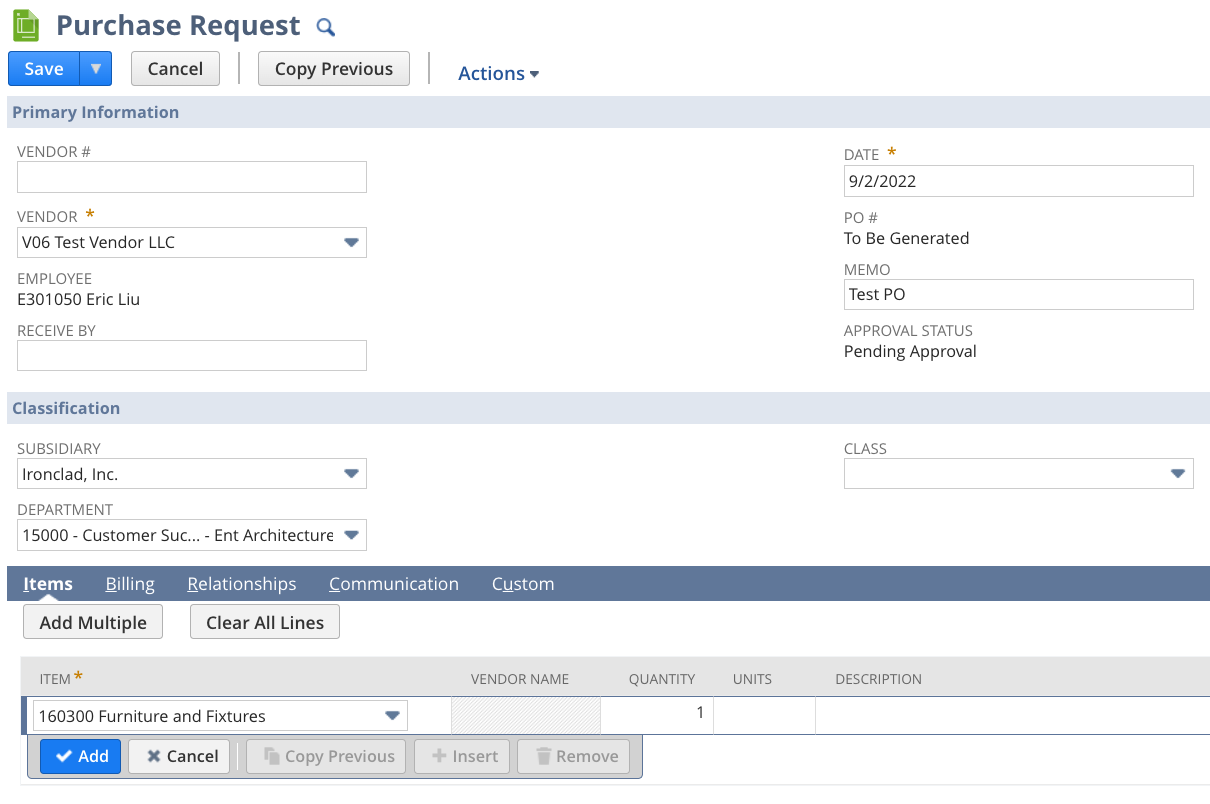
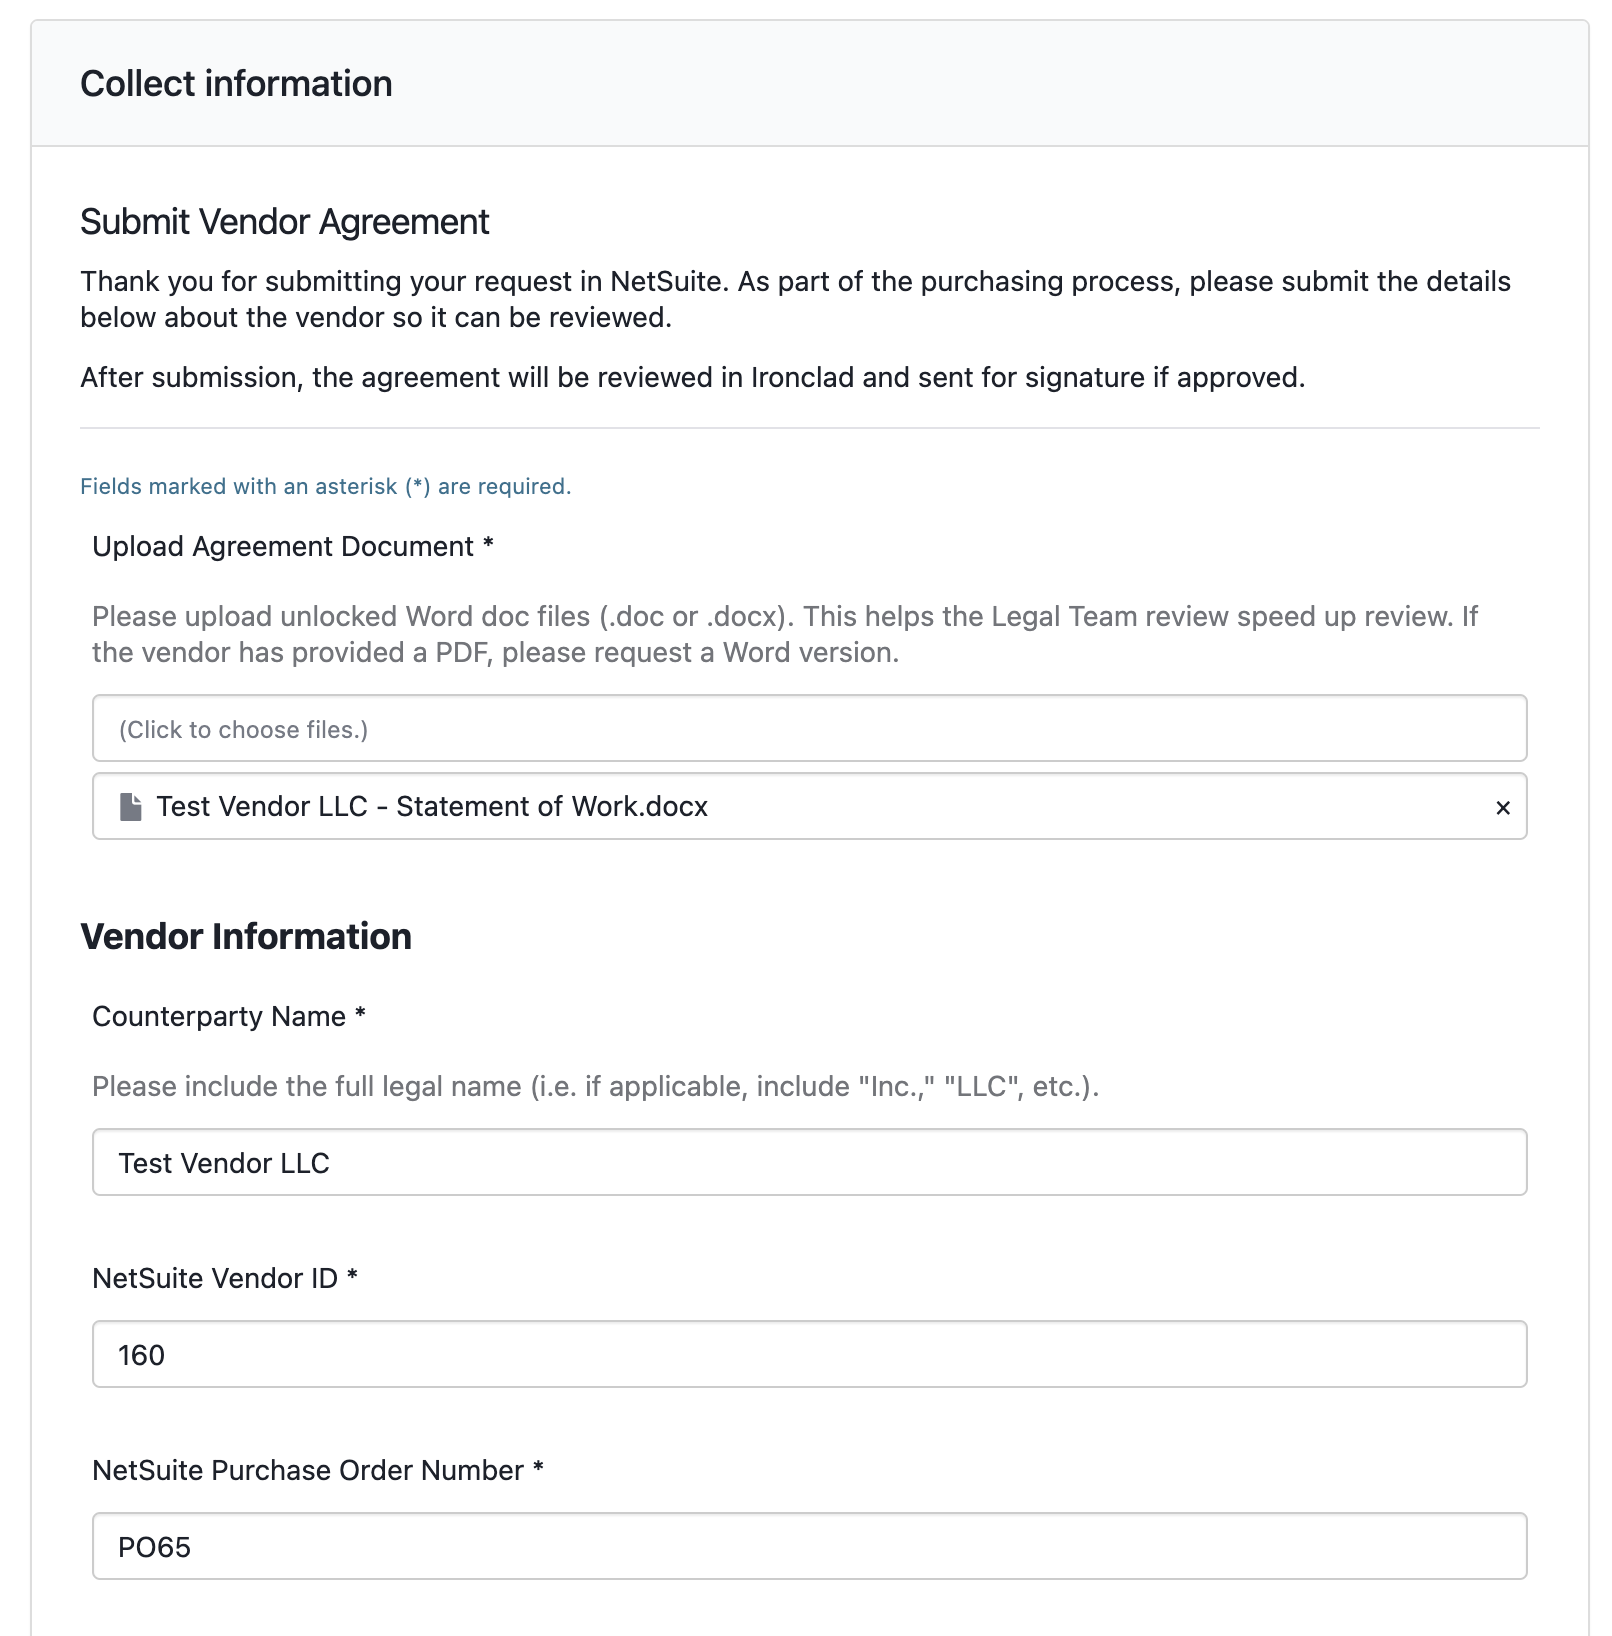
NetSuite will call our Tray flow and launch a new Ironclad Workflow. The purchase request submitter will receive an email from Ironclad to complete the internal form below, which has been pre-populated with NetSuite data. Users can upload the underlying contract for review and answer any custom questions you choose to build into the Ironclad workflow.
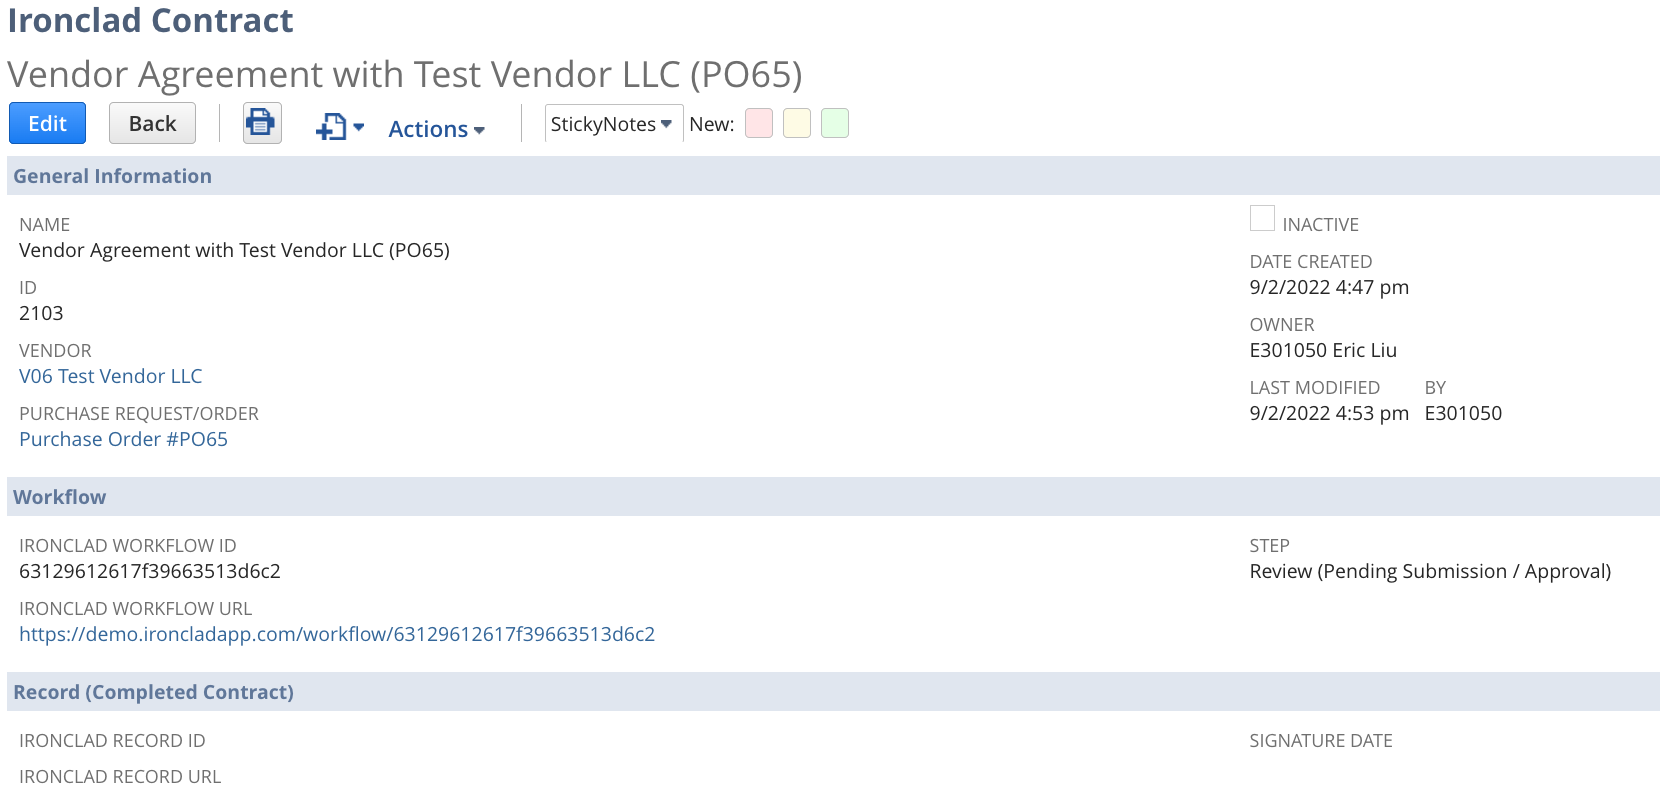
Simultaneously, an Ironclad Contract record will be created in NetSuite. Users can now easily reference the Ironclad workflow from NetSuite and see all the contracts created against a purchase request/order and vendor.
Syncing Contract Status to NetSuite
With the previous flow in place, new purchase requests/orders will launch an Ironclad workflow, the Ironclad workflow will receive the NetSuite purchase order and vendor record IDs, and the Ironclad Contract record in NetSuite will store the Ironcad workflow URL and ID. With these cross-references in place, we can also synchronize changes between the two systems.
To demonstrate this, the flow described here will listen for updates from Ironclad, determine when the Ironclad workflow has been fully approved, and update NetSuite by changing the "Step" field on the Ironclad Contract record. An Ironclad workflow is fully approved if it has moved from the review step to the sign step. If your procurement process allows the issuance of purchase orders once an agreement is fully approved and ready for signature, this solution may be a natural point for you to trigger additional actions in NetSuite.
Catch Ironclad Approval Status Changes
We want to trigger this flow on approval status events coming from Ironclad. Create a new Tray.io flow, provide a descriptive name (e.g., "Ironclad Workflow Approvals Completed"), and select webhook as the trigger. Copy the public URL from the trigger.

We then use this endpoint to configure a webhook subscriber in Ironclad, set it to catch workflow_approval_status_changed events and send them to this endpoint, which will trigger our Tray.io flow:
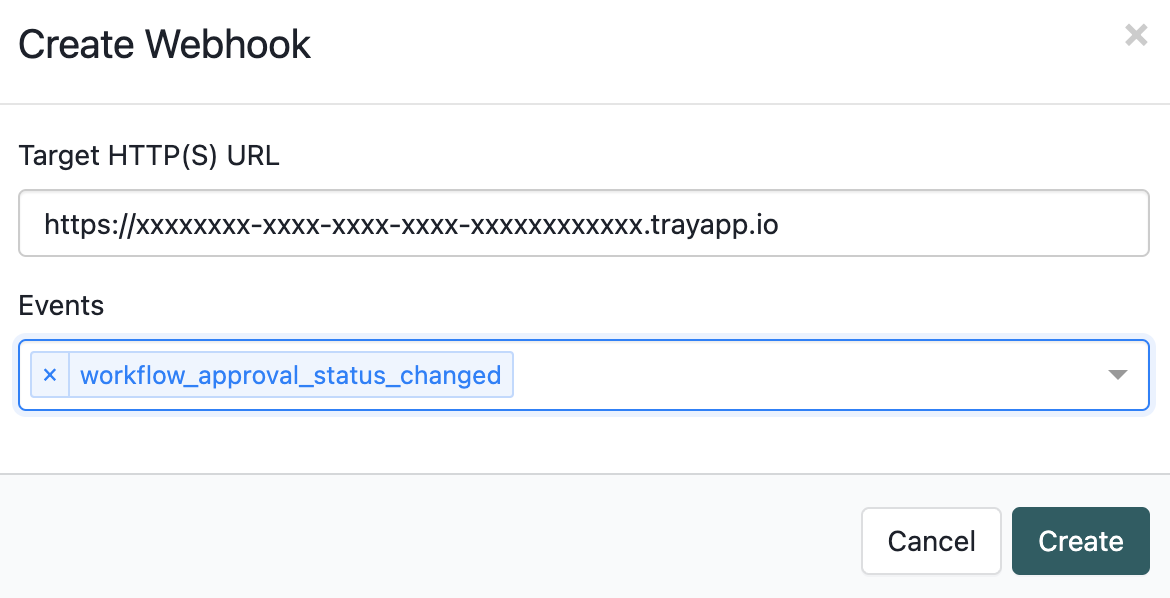
This webhook subscription will send events for all workflows and all approval status changed events to our Tray.io flow. We only want to (1) handle approval changes on vendor agreement workflows and (2) update NetSuite when all approvals have been collected. We will add filters to the flow to check if it’s a relevant change.
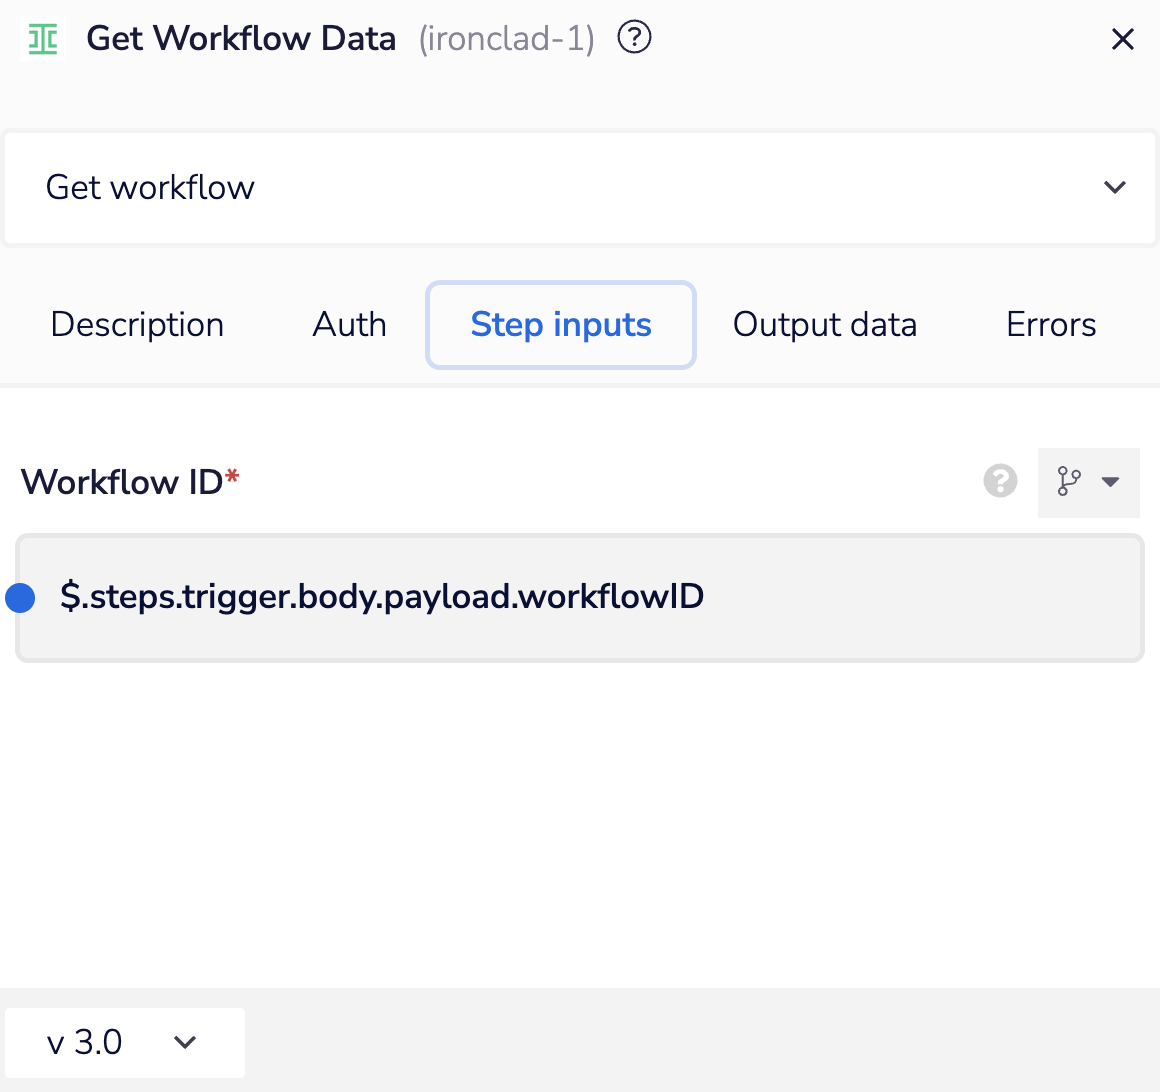
First, we will retrieve information from Ironclad about the workflow that triggered the webhook. Add an Ironclad connector, select “Get workflow” as the action, and map the “Workflow ID” attribute to the workflow ID value included in the webhook trigger’s payload ($.steps.trigger.body.payload.workflowID).
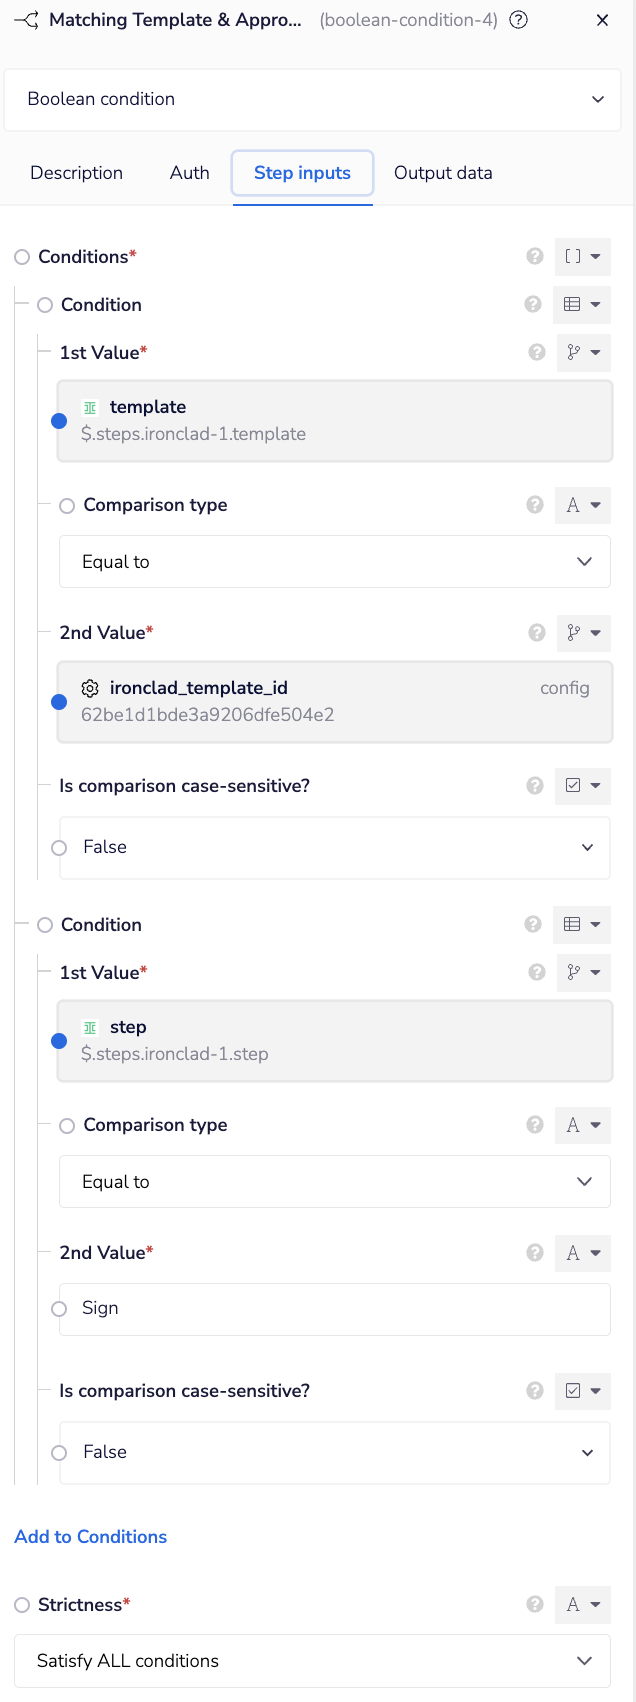
Next, we will check the template and step attributes returned by Ironclad to verify that the webhook came from a vendor agreement workflow and has entered the Sign step (i.e. all approvals were collected). Add a "Boolean condition" connector and add two conditions to it:
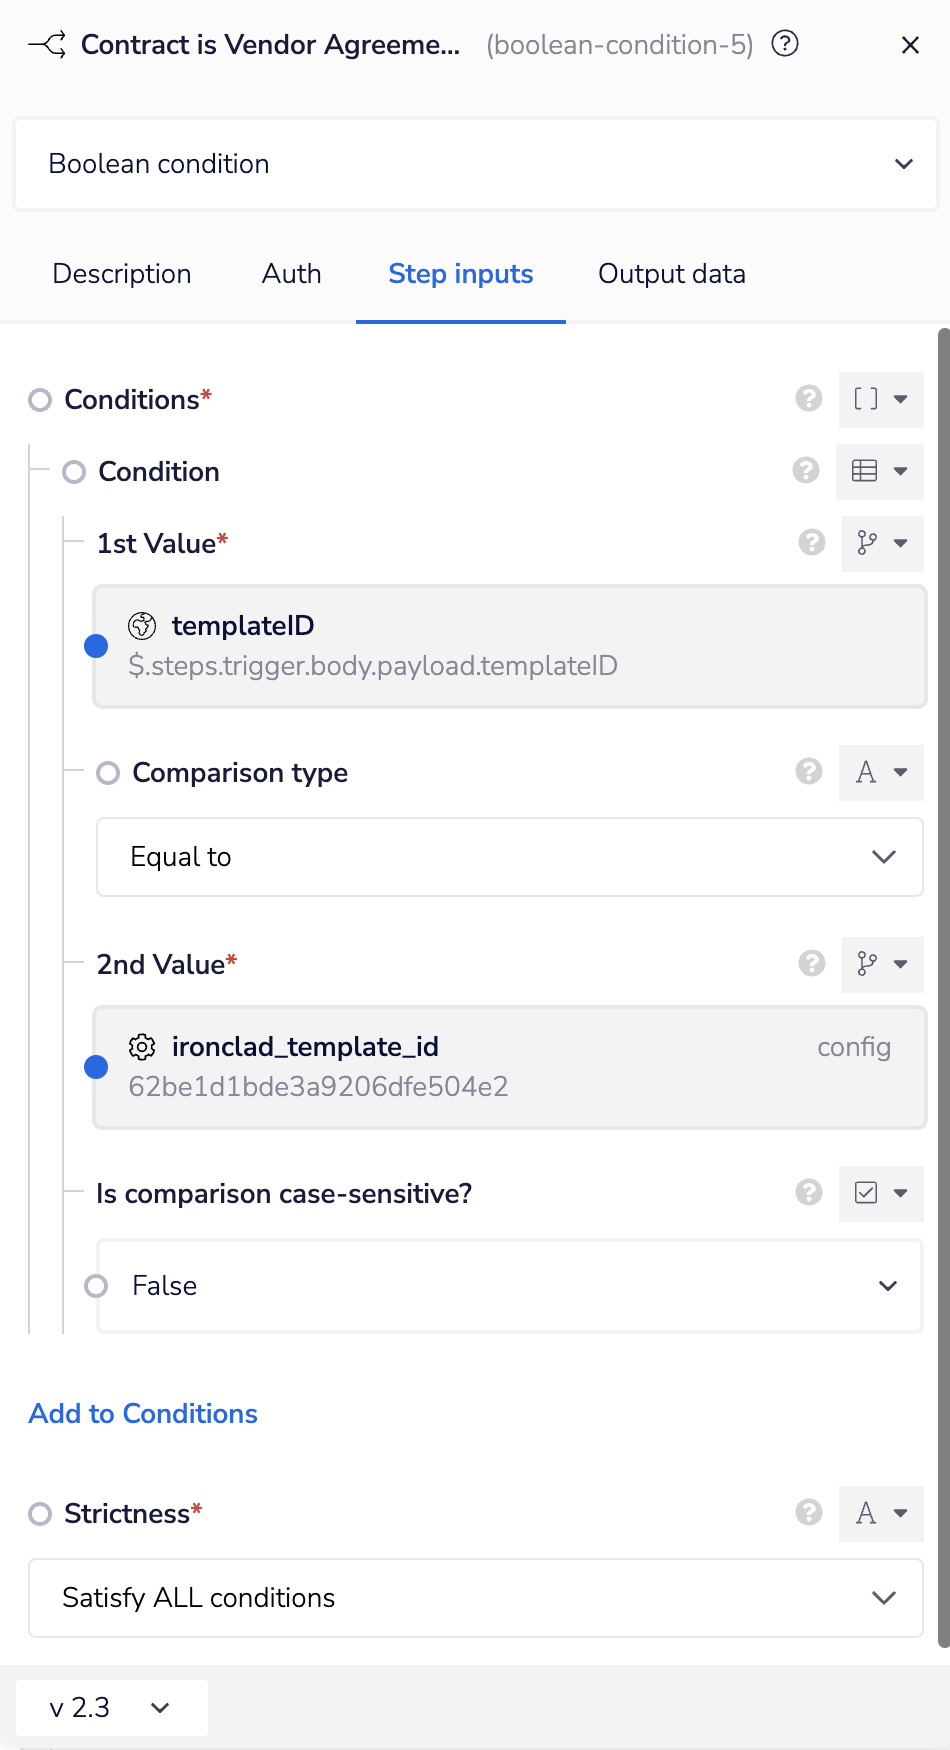
- Template: Check that the "template" value of the workflow matches the vendor agreement template id stored in our Tray project configuration variable.
- Step: Check that the "step" value of the workflow is Sign.
Set the "Strictness" value to Satisfy ALL Conditions.
Update NetSuite Ironclad Contract Record
If the condition in the preceding step is true, we will update the NetSuite Ironclad Contract record. Two NetSuite connectors will be used to find and update the NetSuite Ironclad Contract record that corresponds to the workflow.
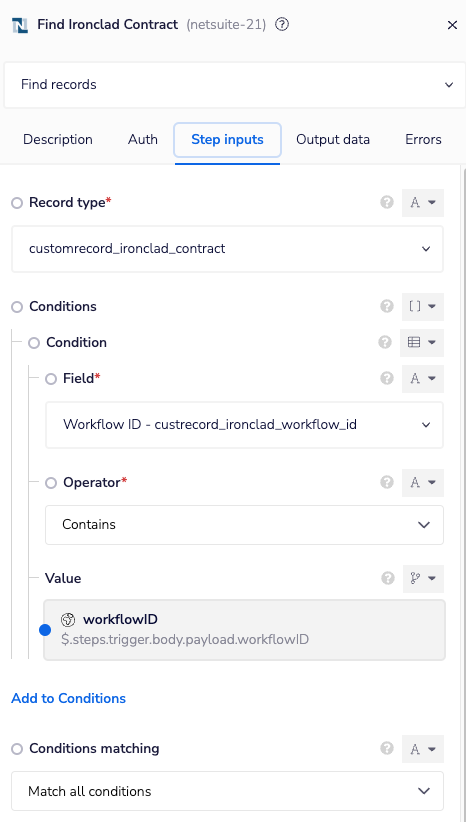
Under the “True” branch from the previous condition, add a NetSuite connector step to find the Ironclad Contract record. Select the “Find records” action and configure the attributes below:
- Record type: Paste in the ID of Ironclad Contract record type (
customrecord_ironclad_contractin our guide). See the Create Ironclad Contract Record step if you need a refresher on locating the ID in NetSuite. - Workflow ID: We will use the workflow ID stored on the Ironclad Contract record to locate the correct record. Add the “Workflow ID” field from NetSuite as a condition and map it to the workflow ID from the webhook trigger’s payload (
$.steps.trigger.body.payload.workflowID).
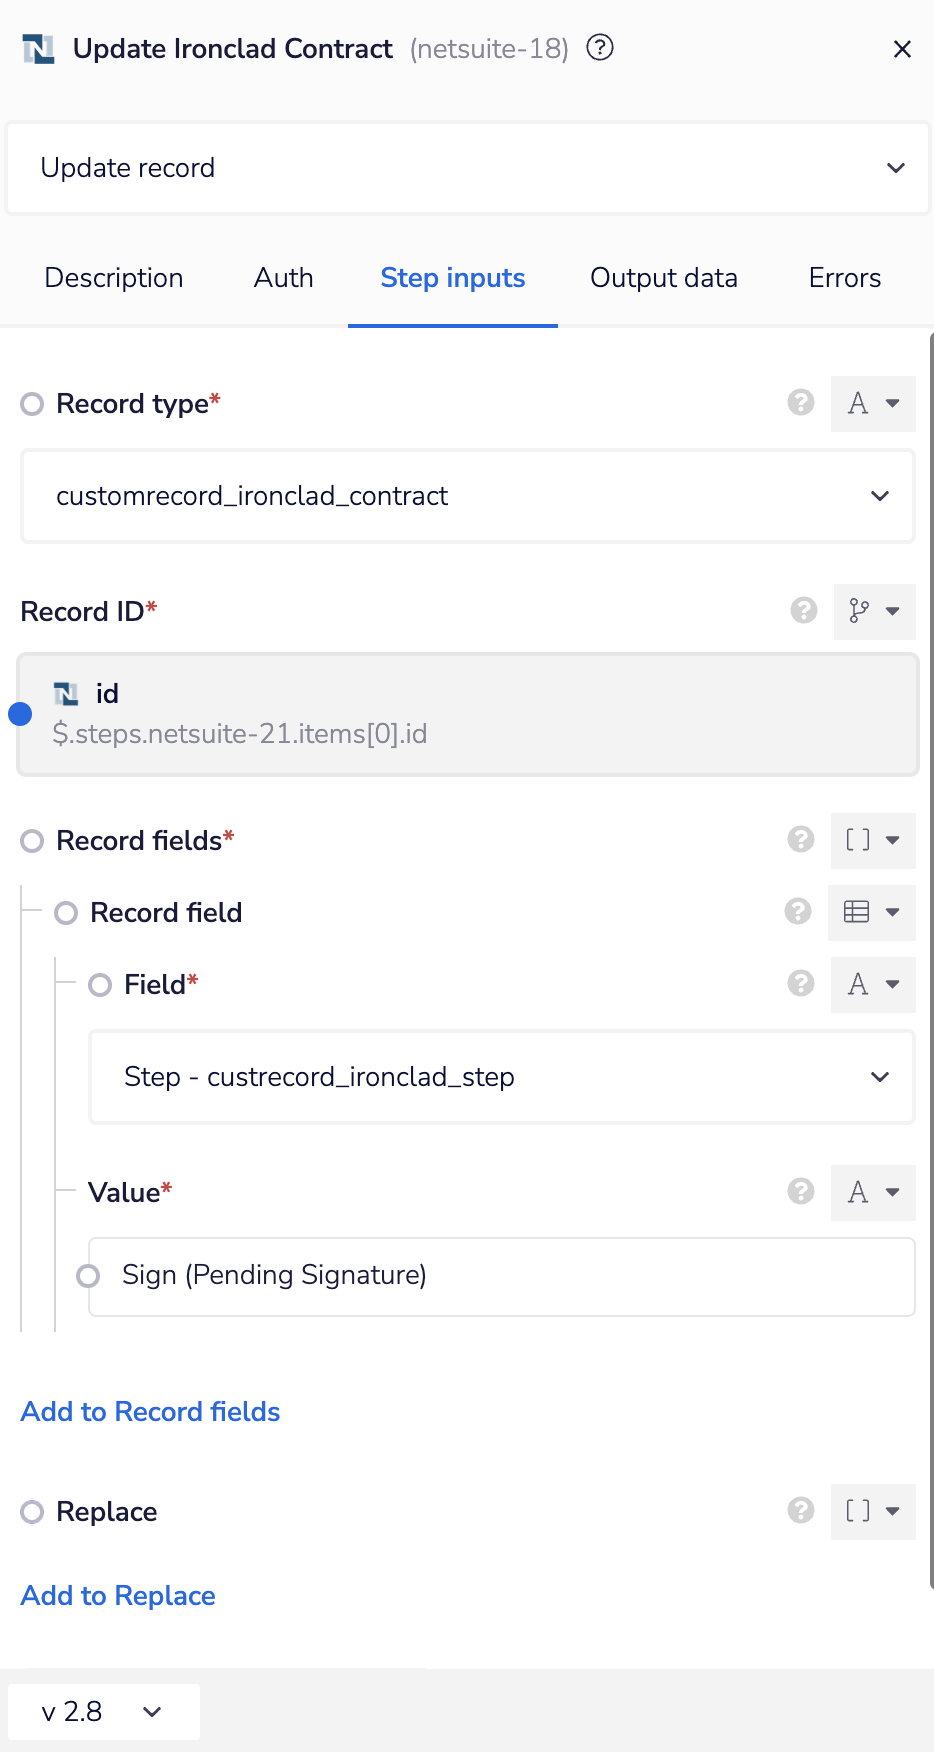
Add a NetSuite connector after the preceding one to update the Ironclad Contract record. Select “Update record” as the action, add Ironclad Contract as the record type, and update the “Step” value to Sign (Pending Signature).
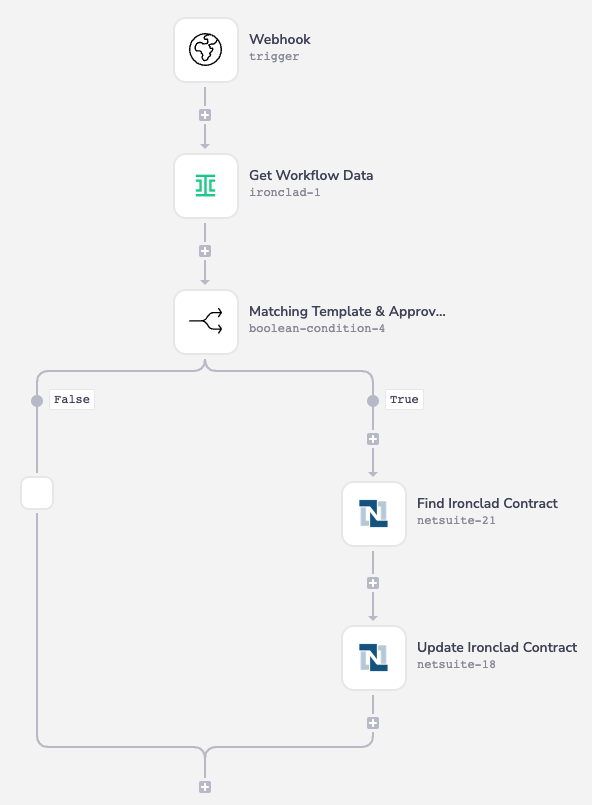
Completed Tray.io Flow
Here is the completed Tray.io flow once all of the steps above have been configured:
See It In Action
With this flow in place, we can now complete all approvals in the Ironclad workflow and have this reflected in NetSuite. Continuing from the running example, suppose we submit the contract as the business user and approve it internally.
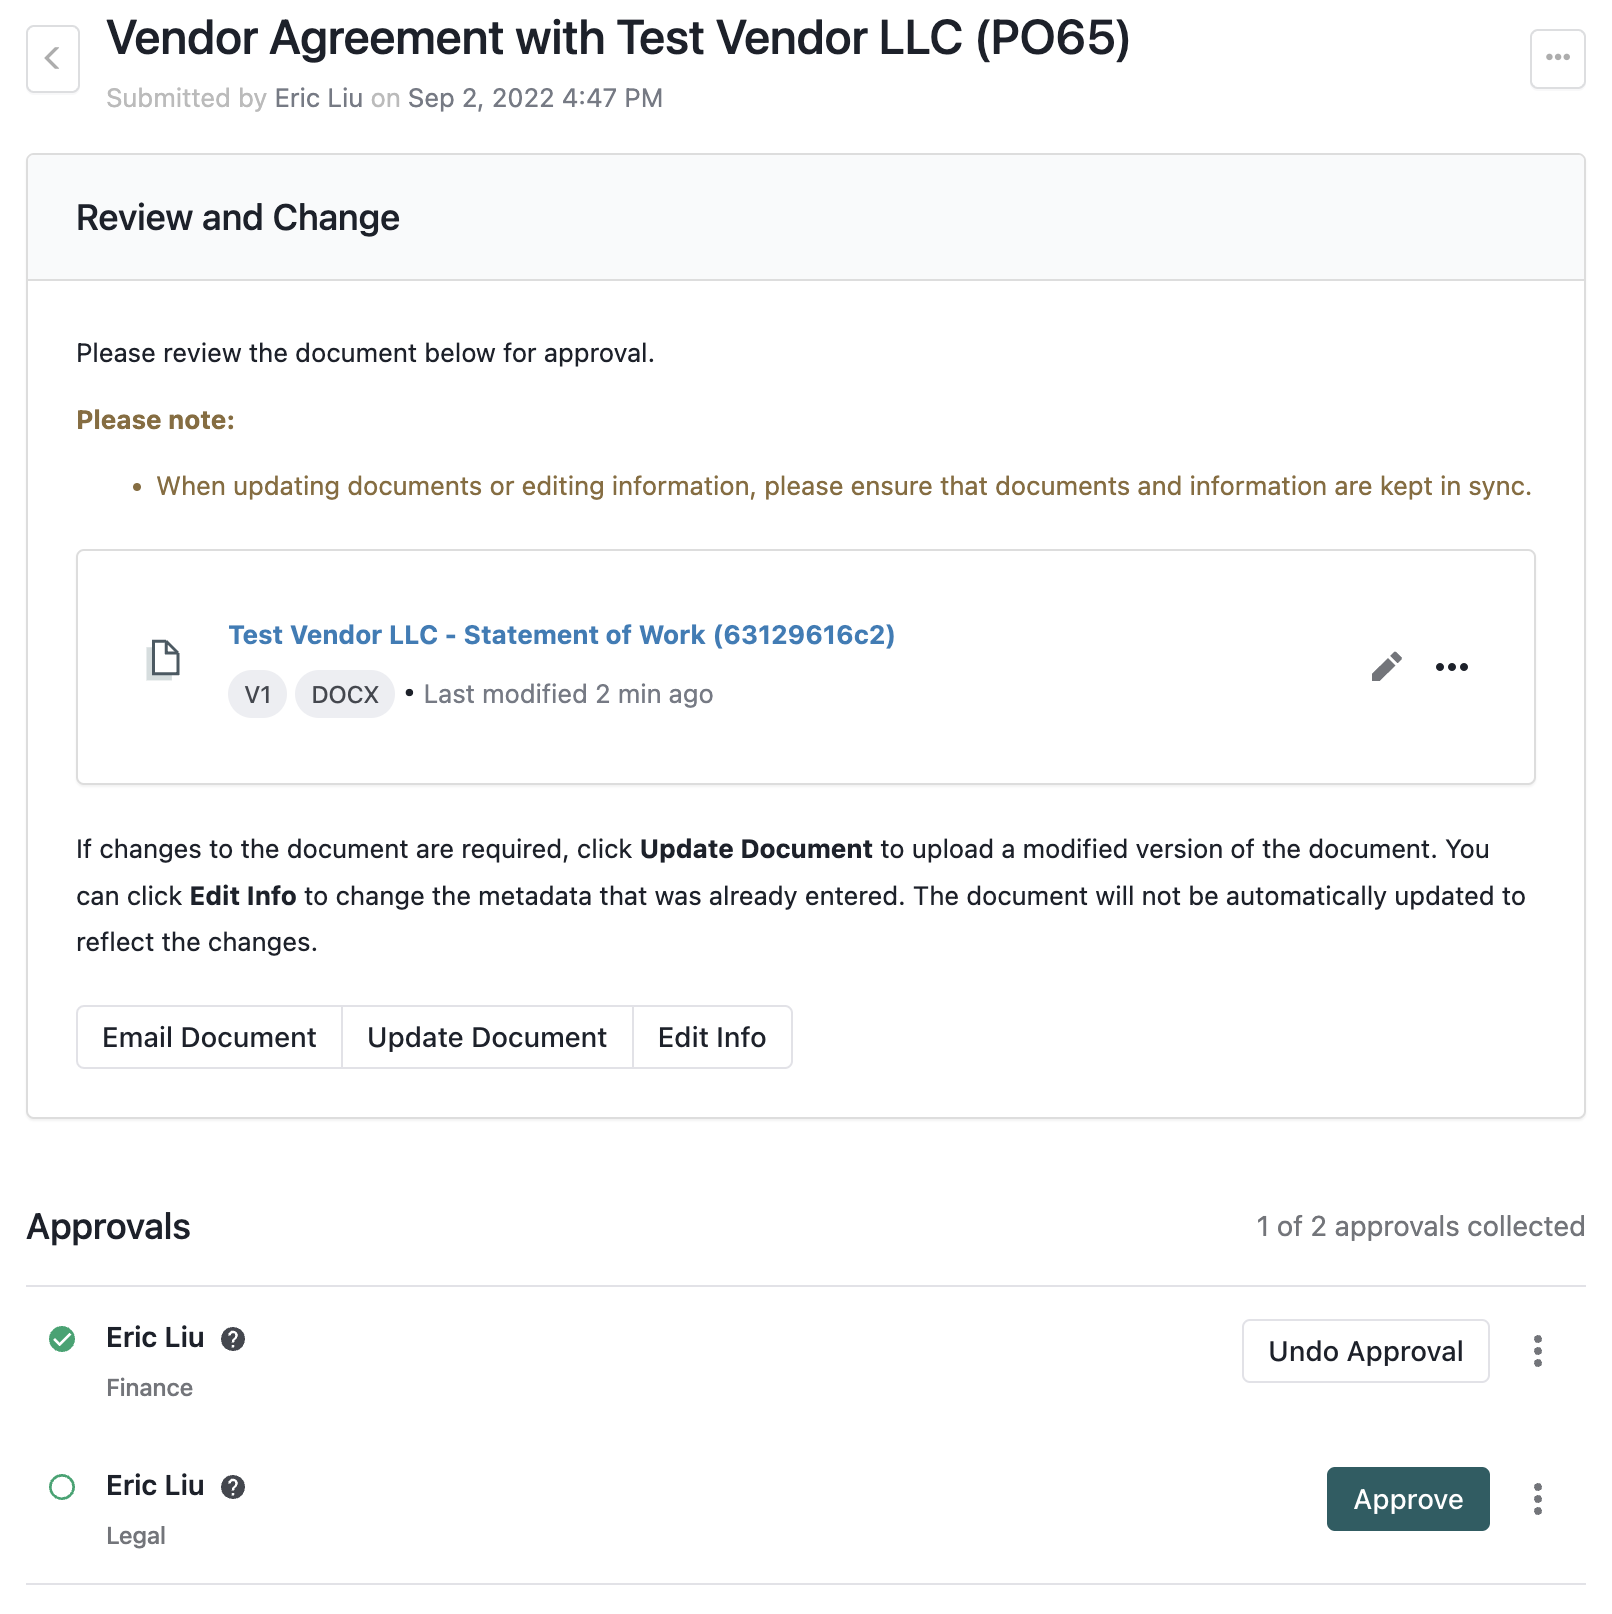
Each approval will send a workflow_approval_status_changed event to our Tray.io flow, the flow will check the template ID and step, and the flow will update the “Step” value in the NetSuite Ironclad Contract record if it is fully approved.
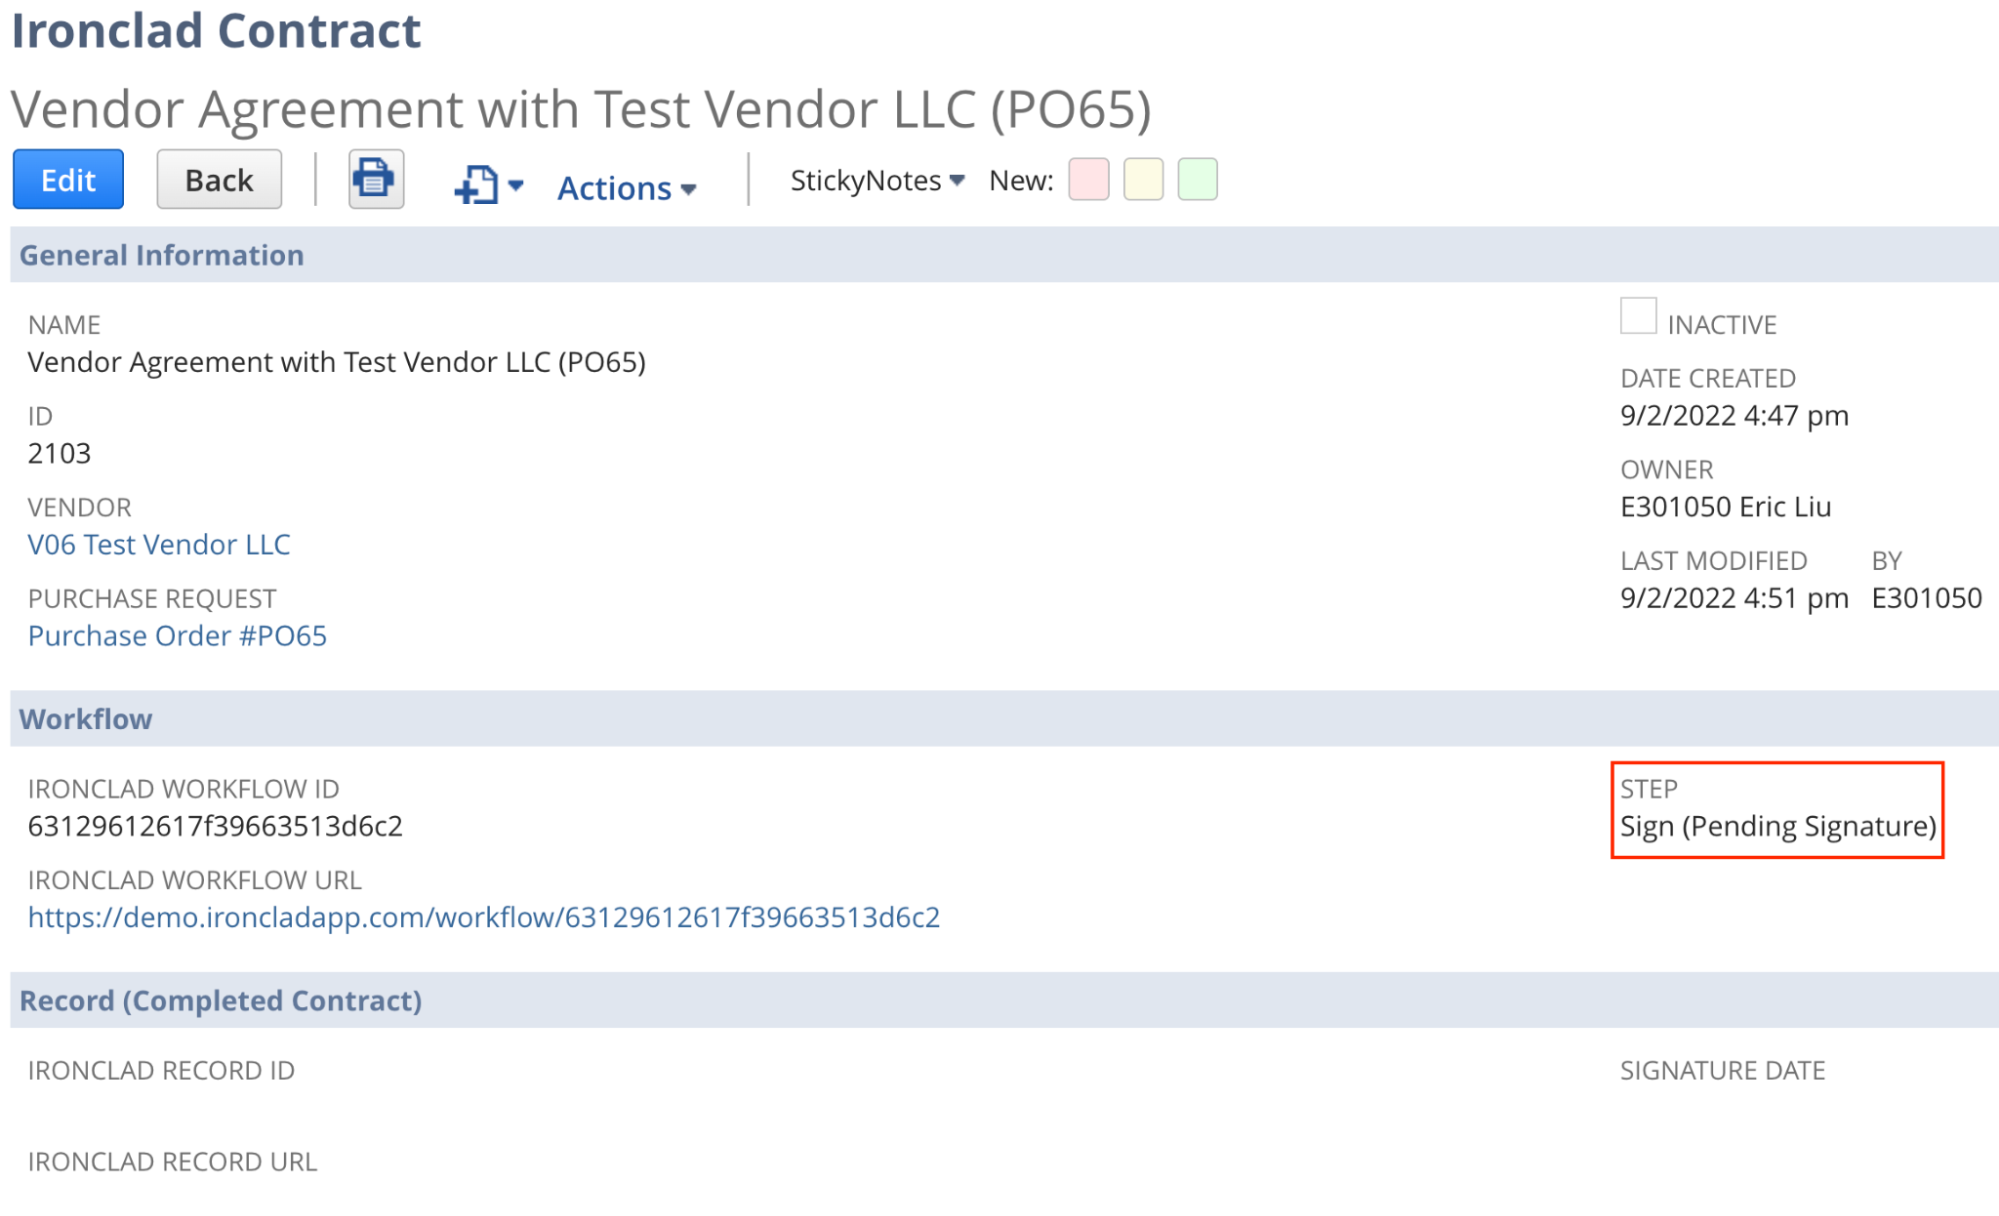
Finalizing the Agreement on Workflow Completion
In our last flow in this guide, we’ll show how to send the completed contract details from Ironclad to NetSuite when the workflow completes. In this case, when the workflow completes, we will update the Ironclad Contact record in NetSuite with a link to the final executed record in Ironclad and store the date of signature.
Catch Workflow Completed Events
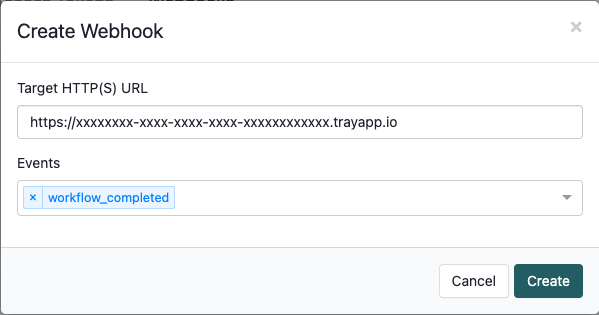
Similar to our previous flow, we will use a Tray.io trigger as the endpoint for a new webhook subscriber in Ironclad. In this case, we want to catch the workflow_completed event:
After the flow trigger, add a “Boolean condition” connector to see if the workflow that triggered the event is our vendor agreement workflow type:
Get Ironclad Workflow Details
In the “True” branch of our condition, we first use an Ironclad connector step to get the final workflow data, which will include the signing date formula we created.
Note: If you have an archive step, a user technically can modify the final workflow data that is stored as a record. However, to simplify the attribute mapping in the next steps, we will use the workflow’s data.
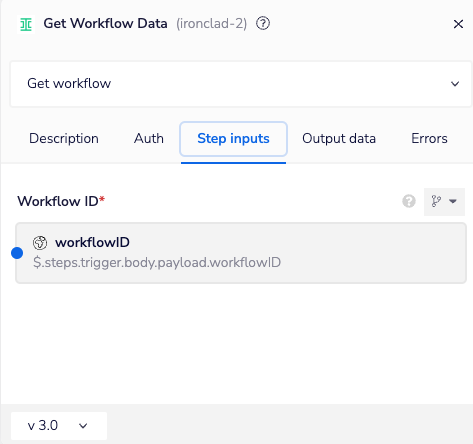
Update NetSuite Ironclad Contract Record
Add a NetSuite connector to find the Ironclad Contract record. Select the Find records action, paste in the Ironclad Contract record ID, and filter for a record that has a matching workflow ID. See the Update NetSuite Ironclad Contract Record step for additional details (same configuration).
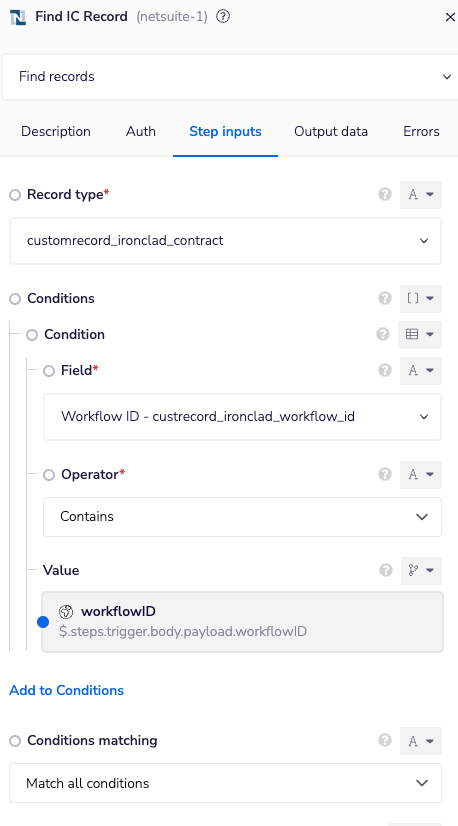
Update the Ironclad Contract Record
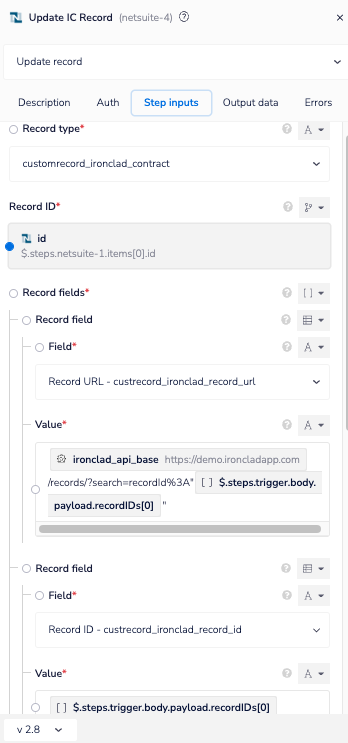
Add a NetSuite connector to update the Ironclad Contract record. Select the “Update record” action, add Ironclad Contract as the record type. Map the below values to update the Ironclad Contract record.
| Record field | Value | Notes |
|---|---|---|
Record ID - custrecord_ironclad_record_id | {$.steps.trigger.body.payload.recordIDs[0]} | This is the ID of the final record. |
Record ID - custrecord_ironclad_record_id | {$.steps.trigger.body.payload.recordIDs[0]} | This is the ID of the final record. |
Record URL - custrecord_ironclad_record_url | {$.config.ironclad_api_base}/records/?search=recordId%3A"{$.steps.trigger.body.payload.recordIDs[0]}" | Here we combine the ironclad_api_base project config property with the record ID returned in the webhook to compose the full URL to the Ironclad record. |
Step - custrecord_ironclad_step | Completed | |
Signature Date - custrecord_ironclad_signature_date | {$.steps.ironclad-2.attributes.signingDate} |
Completed Tray.io Flow
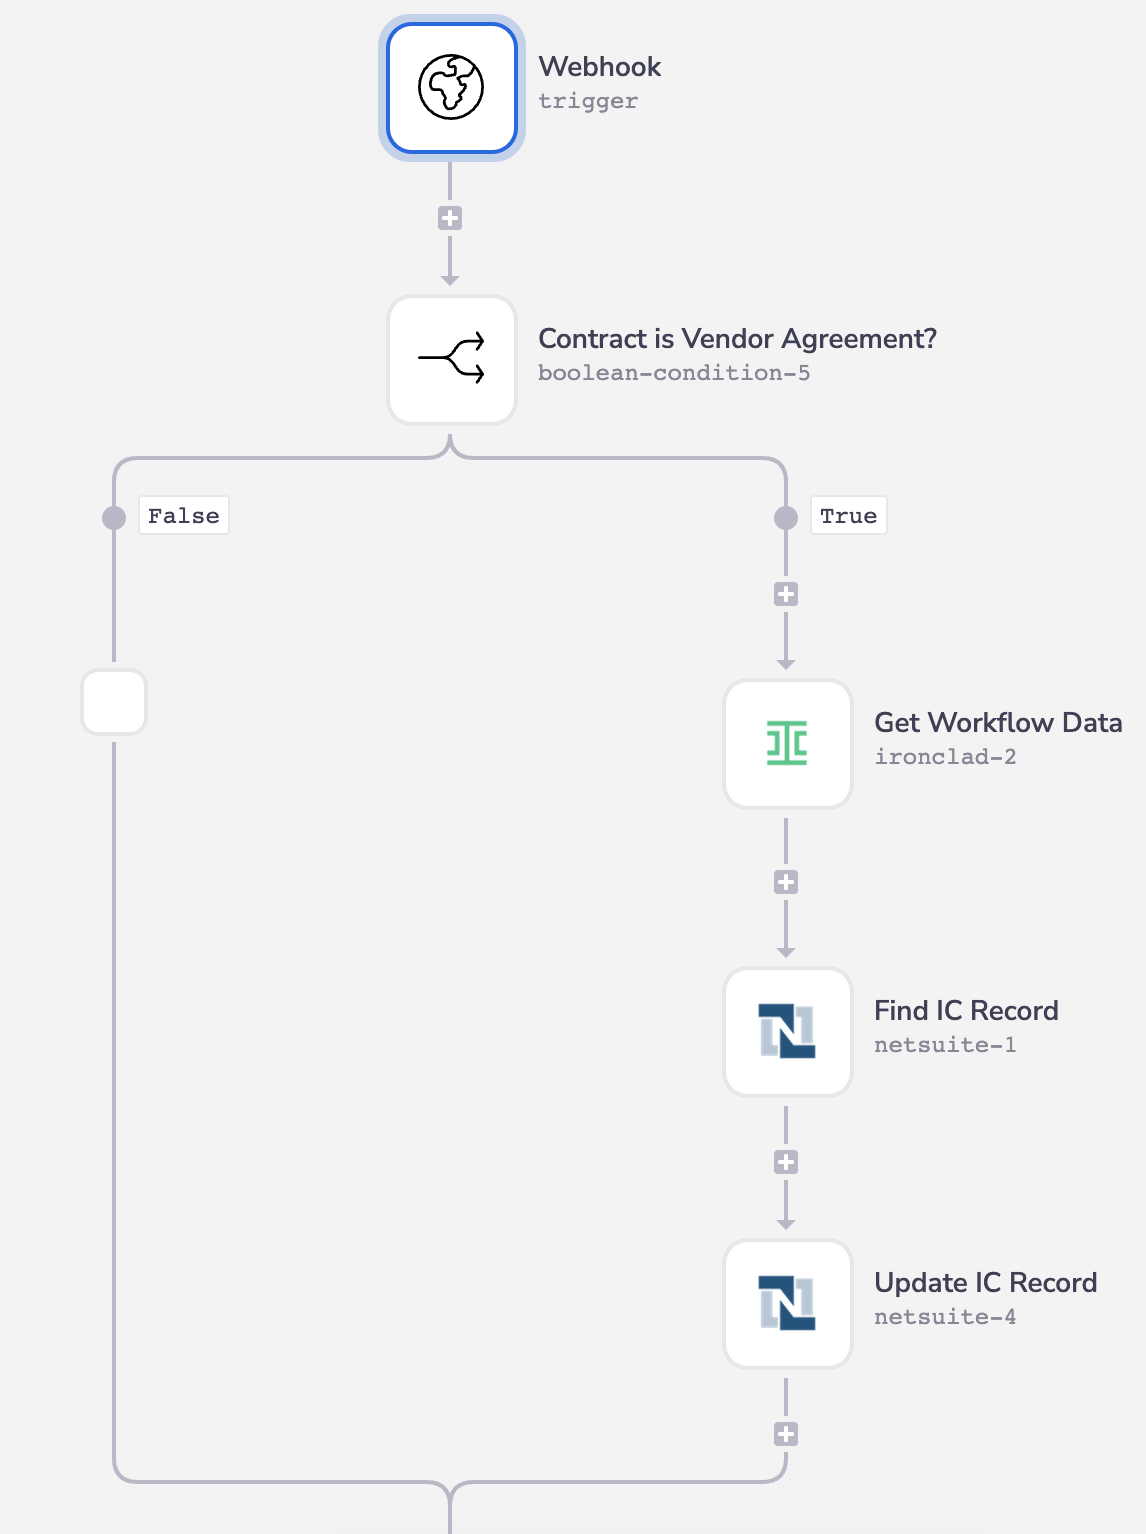
Here is the completed Tray.io flow once all of the steps above have been configured:
See It In Action
With our final flow in place, we can continue our previous example and see the Agreement being updated with final contract details. If the Ironclad workflow is fully approved, all required signatures are collected and the contract is archived in the repository:
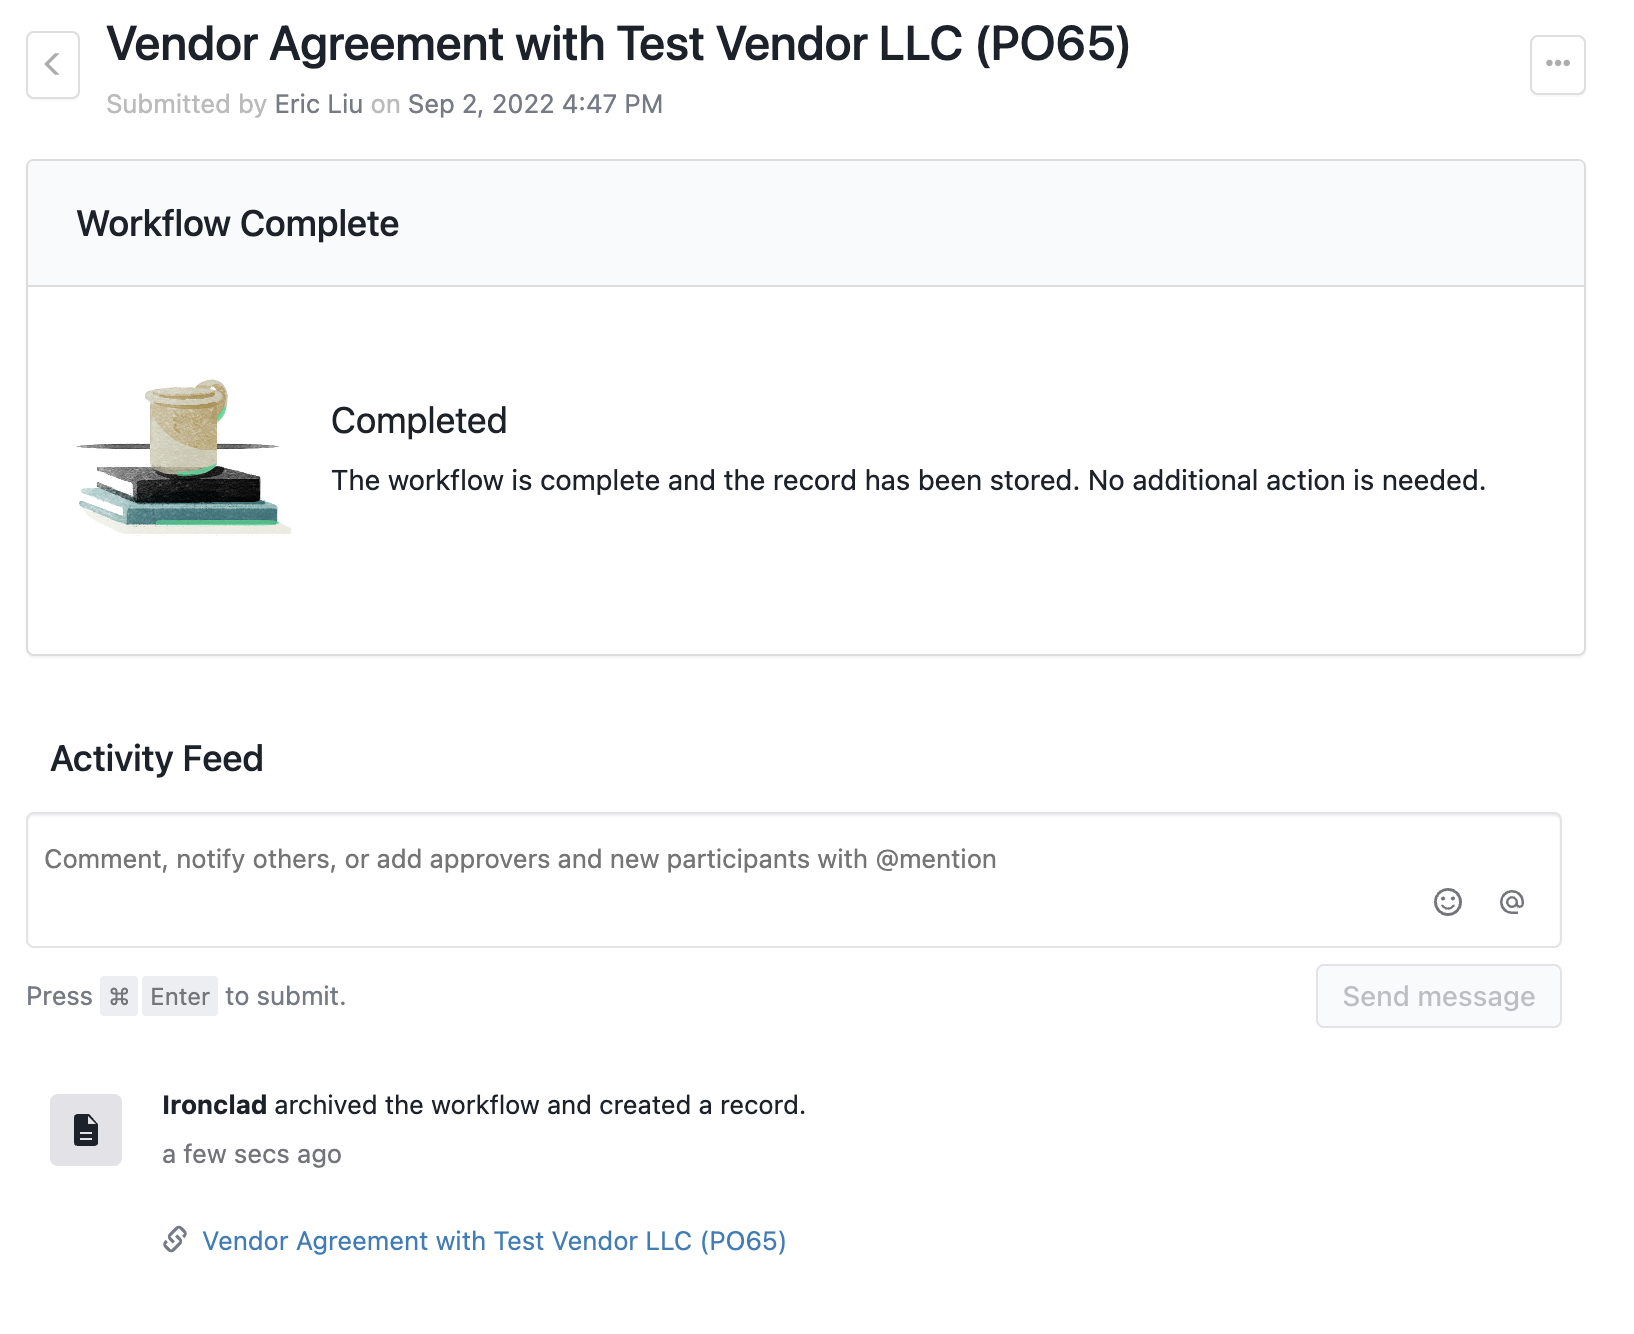
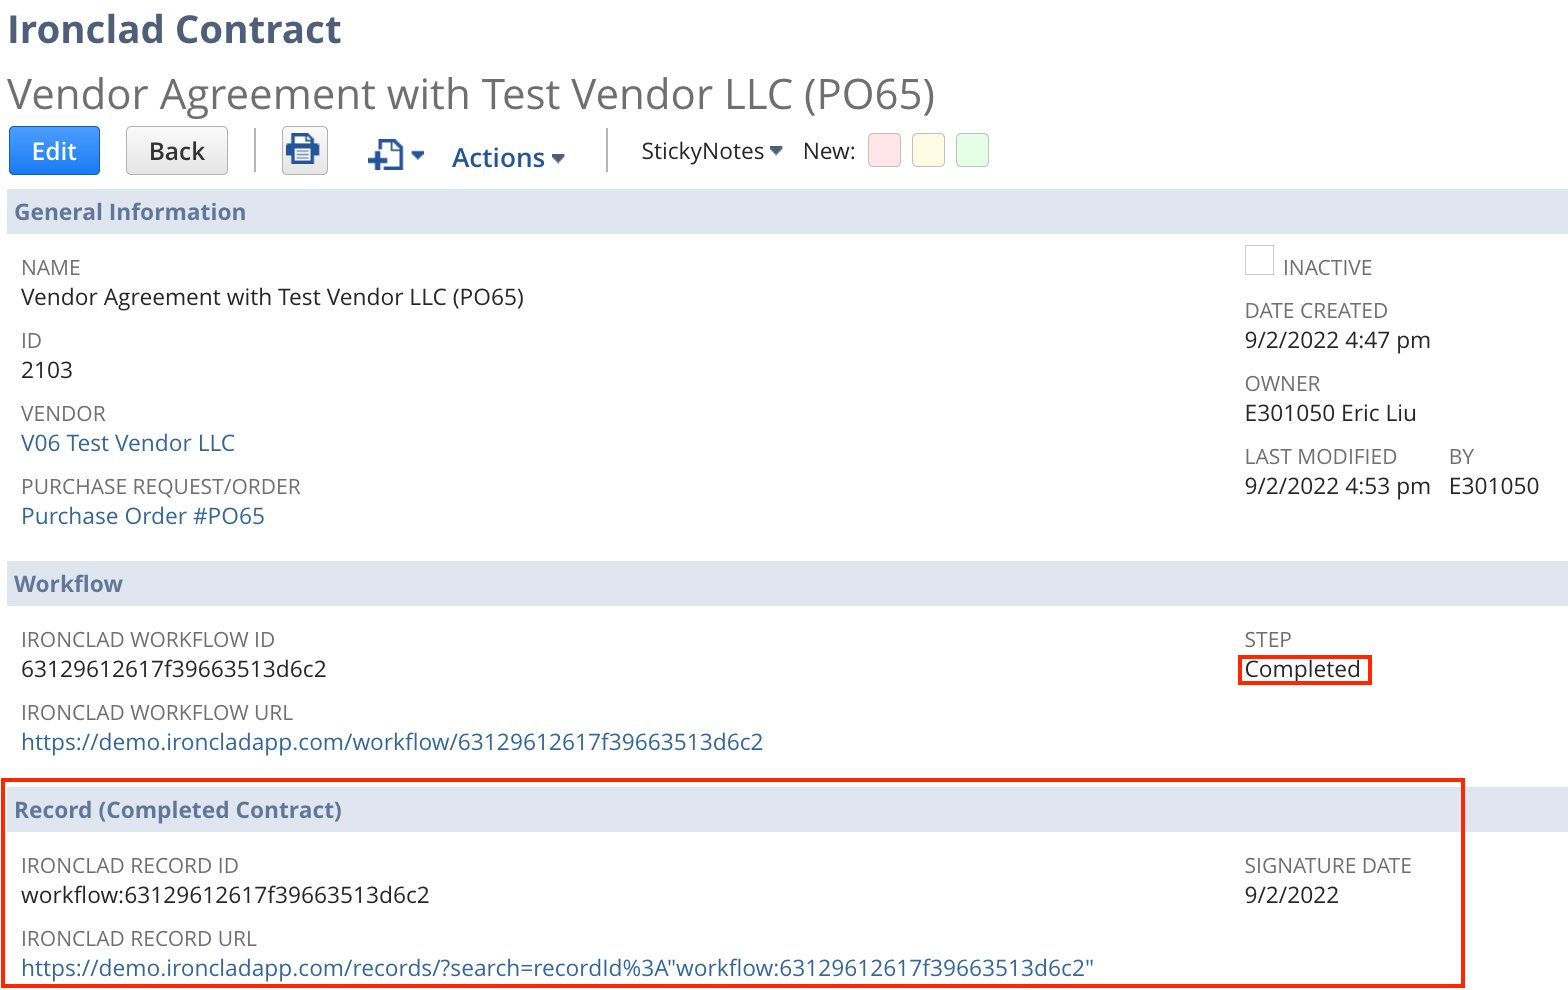
Ironclad will fire a workflow_completed event for the workflow, which will trigger our flow. The template ID of the workflow will match the target template, and the flow will progress to retrieve the workflow and record details, and save the final URL and signature date to the Ironclad Contract record.
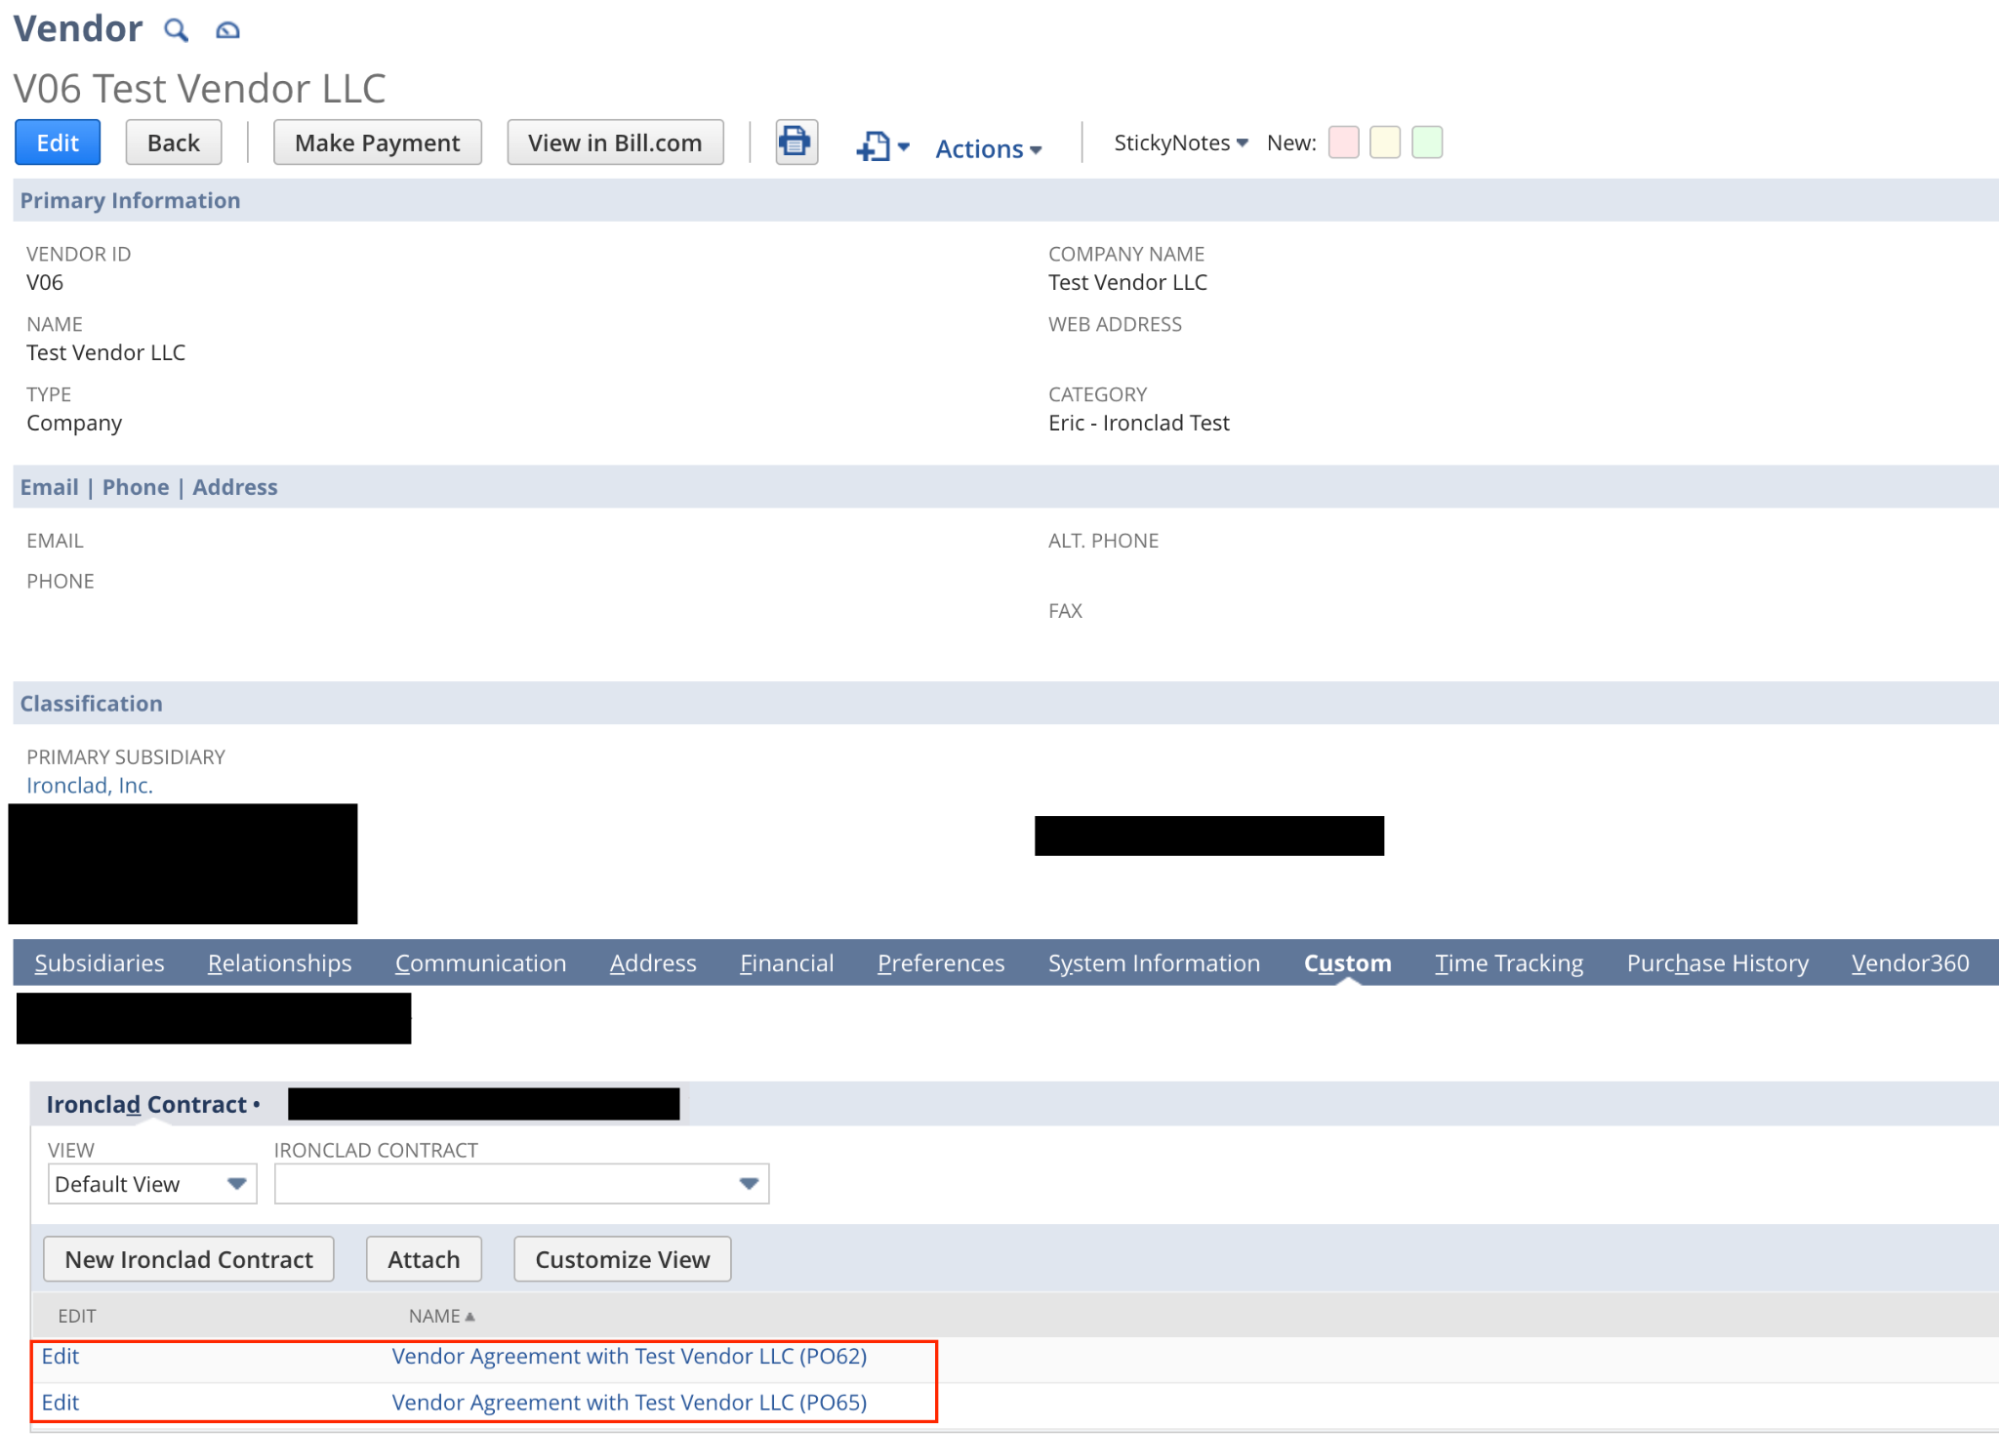
In addition, if we click into the vendor record, we can now see a list of all contracts in-progress or executed for that vendor.
Going Further
The principles above can be applied to other interactions between NetSuite and Ironclad. If you are interested in syncing data during other points in an Ironclad workflow, consider exploring the two paths below:
NetSuite to Ironclad
Adapt the script in the Configure NetSuite Script to Launch Workflows step to call another Tray.io flow when a relevant NetSuite event occurs.
In the flow, you can then use the Create a Comment on a Workflow endpoint to add activity feed comments to alert users of NetSuite events, leverage the Update Approval on a Workflow endpoint to pass system approvals, or use the Update Workflow Metadata endpoint to update data.
Ironclad to NetSuite
Check out the Webhooks events reference page for triggering Tray.io flows in other scenarios and updating NetSuite afterwards.
Alternatively, if you have contracting processes that start in Ironclad and need to use fuzzy matches to determine which NetSuite records they apply to, consider the NetSuite sales order from Ironclad contract guide.
Updated 5 months ago
