Dynamics 365 Integration (via Tray.io)
Please note:Ironclad now uses the OAuth 2.0 Authorization Framework to authenticate API requests. As of November 22nd, 2024, our previous bearer token method of authentication has been deprecated. We are currently in the process of updating this guide with details on how to implement with OAuth 2.0. In the meantime, please refer to our article Migrating to OAuth 2.0.
This guide demonstrates the principle steps involved in creating an integration between Ironclad and Microsoft Dynamics CRM, utilizing Tray.io as a middleware tool. The use case we use is a typical sales process, where opportunities and related agreement details are initiated in MS Dynamics, triggering a contract process in Ironclad.
Please note that the approach shown here is only meant to demonstrate an example solution for building this integration, but it is a custom integration and not an out-of-the-box supported connector. To view a list of out-of-the-box connectors that Ironclad supports, check out our Help Center.
We use Tray.io in this guide as a representative middleware software to demonstrate what an integration between MS Dynamics and Ironclad might look like. If you need to leverage an alternative integration path, our public APIs can be consumed from any system or middleware that can directly leverage a RESTful API through our supported authentication modes, and systems can subscribe to Ironclad events if they can expose endpoints that support our outbound event authentication modes.
The runtime interactions that we will show between Ironclad, Tray.io and MS Dynamics are summarized in the figure below.
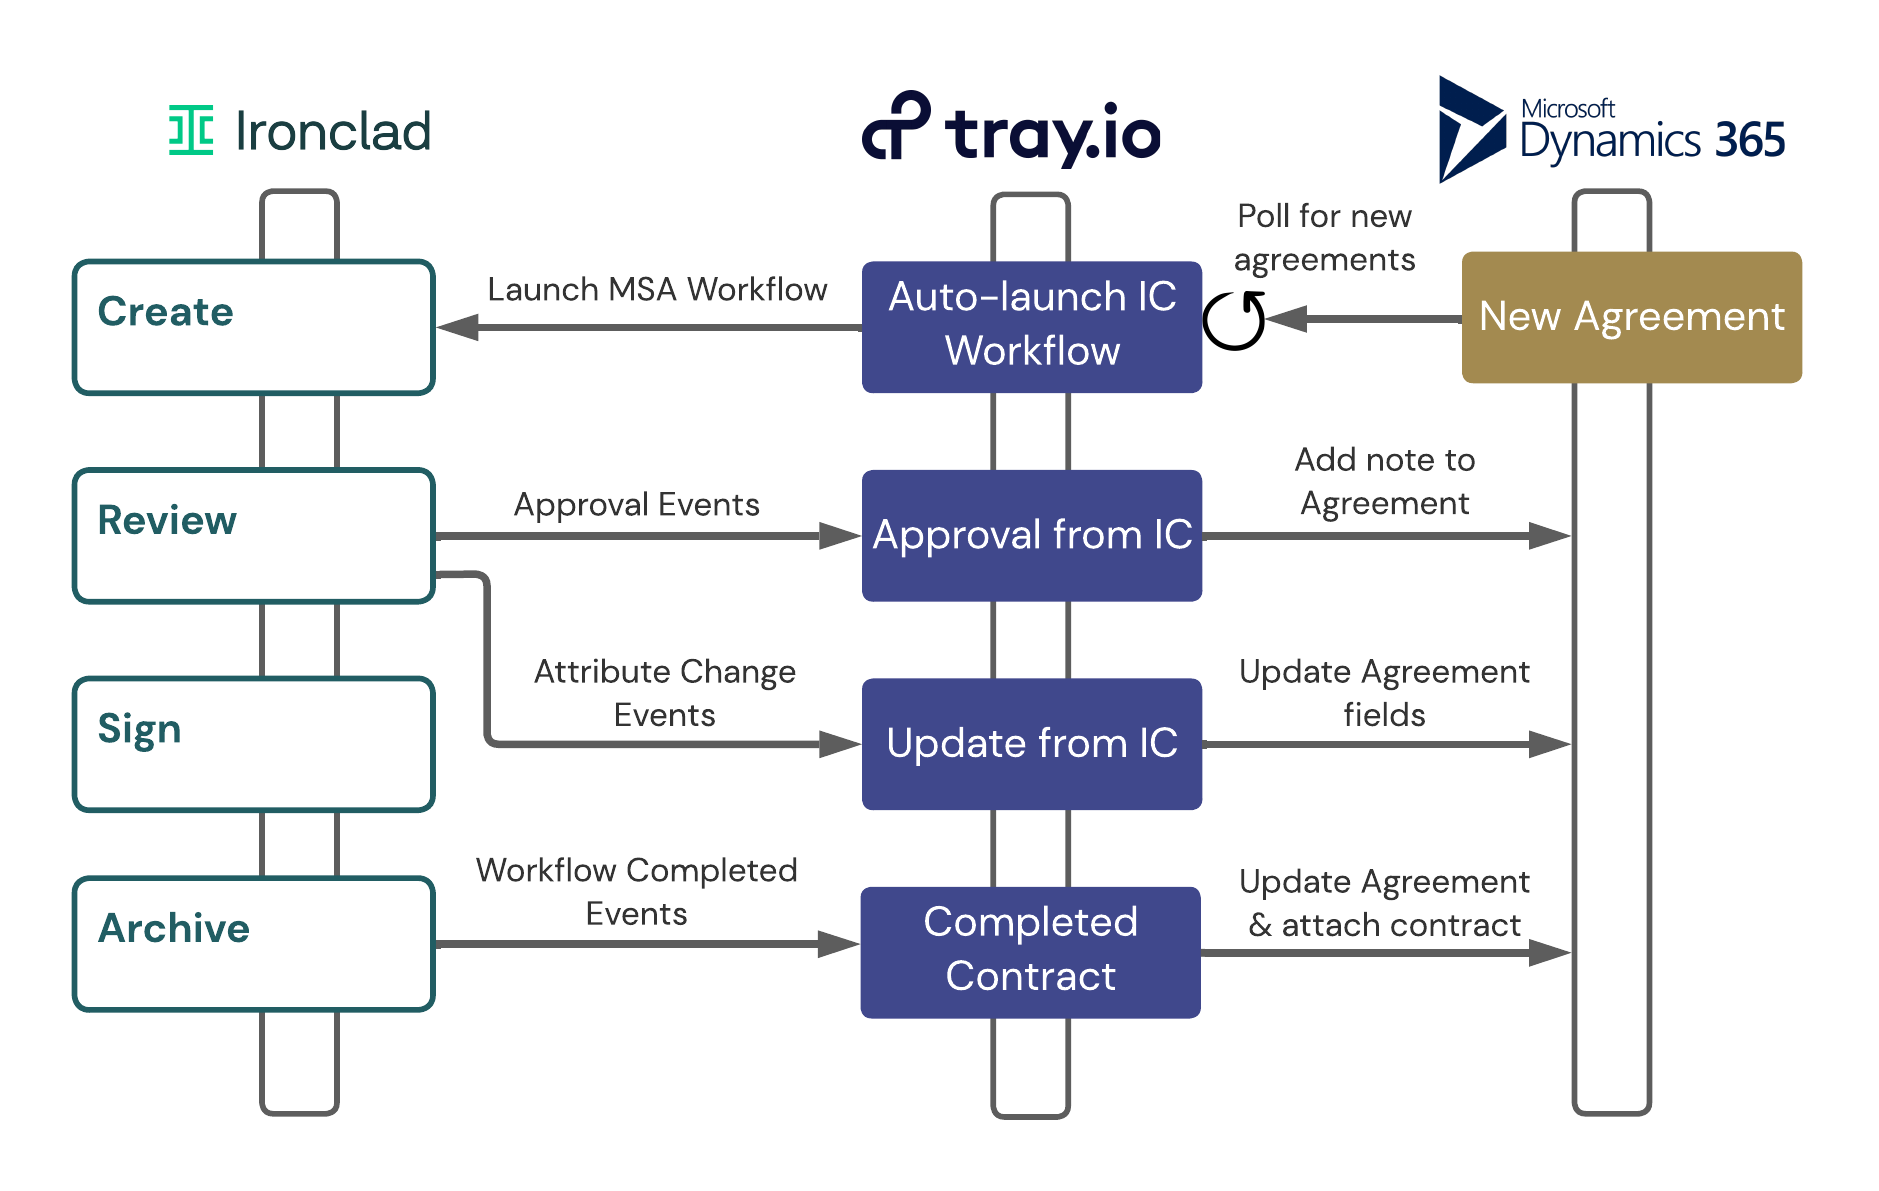
This guide has the following sections:
- Background
- Basic Setup
- Launching an Ironclad Workflow
- Syncing Contract Changes to Dynamics
- Logging Approvals in Ironclad to Dynamics
- Finalizing the Agreement on Workflow Completion
- API Access: Your Ironclad environment will need to have API access enabled, since the Tray.io connector makes use of the Ironclad public APIs to enable the integration.
- Ironclad Account: Several of the solution patterns require specifying an Ironclad user for actions (e.g., who is approving, who is commenting, etc.). Creating a generic Ironclad user account that your integration can use to register actions is recommended for consistency and simplicity.
- Reference Documentation: Please see Ironclad’s API Reference documentation for the most up-to-date details on our endpoints. For information on building workflows in Ironclad, please see Ironclad Academy for guided training and Ironclad Support Center for product articles.
- This guide makes use of Tray.io’s native Ironclad and MS Dynamics connectors, which allows for quick and easy setup with (almost) no code.
- Visit Tray.io’s Knowledge Base for introductory resources as well as their Documentation for specific connector information.
"Workflows"Both Ironclad and Tray.io have the concept of “workflows”. In the case of Ironclad, a workflow defines a contracting process for a particular type of agreement, while in Tray.io a workflow is a flow of actions that are taken in various integration scenarios (triggered by events, or run periodically on a schedule). In the guide that follows we will be clear about which type of workflow we are referencing as we describe the steps in configuring this solution. Whenever possible we will refer to Ironclad workflows as “workflows” and Tray.io workflows as “flows” for clarity.
- We assume that you are familiar with the basics of Microsoft Dynamics concepts, such as tables, forms and views.
- Our guide assumes that the MS Dynamic Sales app is in use, with the standard Opportunity and Account tables that exist there.
- You will need a login that has appropriate privileges to create and update records in these tables, as well as the custom Agreement table that we create as part of this guide.
There are a few details you’ll need to configure in Ironclad, Tray.io and MS Dynamics before configuring the actual integration flows in Tray.io.
As mentioned in the Background section, we are assuming that MS Dynamics Sales is in use. Our integration makes use of a custom table called Agreement, that represents an agreement to be made with an Account in general (such as an NDA) or connected to a specific Opportunity (such as a Master Services Agreement, or MSA).
Create the new Agreement table by going to the Power Apps app in your Dynamics environment, and navigate to Dataverse -> Tables. Create a new table and name it "Agreement", and make sure to check the “Enable Attachments” option, since we will be adding notes to the Agreement to log approvals and also to attach the final contract document.
Add the following columns to the Agreement table (in addition to the standard columns that Dynamics creates automatically):
| Column name | Type | Notes |
Account | Lookup | Set this as a lookup to the Account table, for agreements that are directly related to the account (such as NDAs). |
Opportunity | Lookup | Set this as a lookup to the Opportunity table, for agreements that are related to specific opportunities with an account (such as MSAs). |
Agreement Number | Autonumber | Use any format you’d like for the auto-number sequence. We will send this to Ironclad to store on the workflow once it is launched. |
Agreement Start Date | Date only | |
Agreement Type | Choice | Add any choices you’d like, but ensure that one of the choices is “MSA”. Our launch flow will be triggered when an agreement with this type is created. Make note of the value that you use for the "MSA" choice, because we will use it in our Tray.io flow to filter on these types of Agreements. |
Agreement Value | Currency | |
Counterparty Signer Email | ||
Counterparty Signer Name | Single line of text | |
Ironclad Workflow | URL | We will store a link to the Ironclad workflow here after it is launched. |
Ironclad Workflow Status | Single line of text |
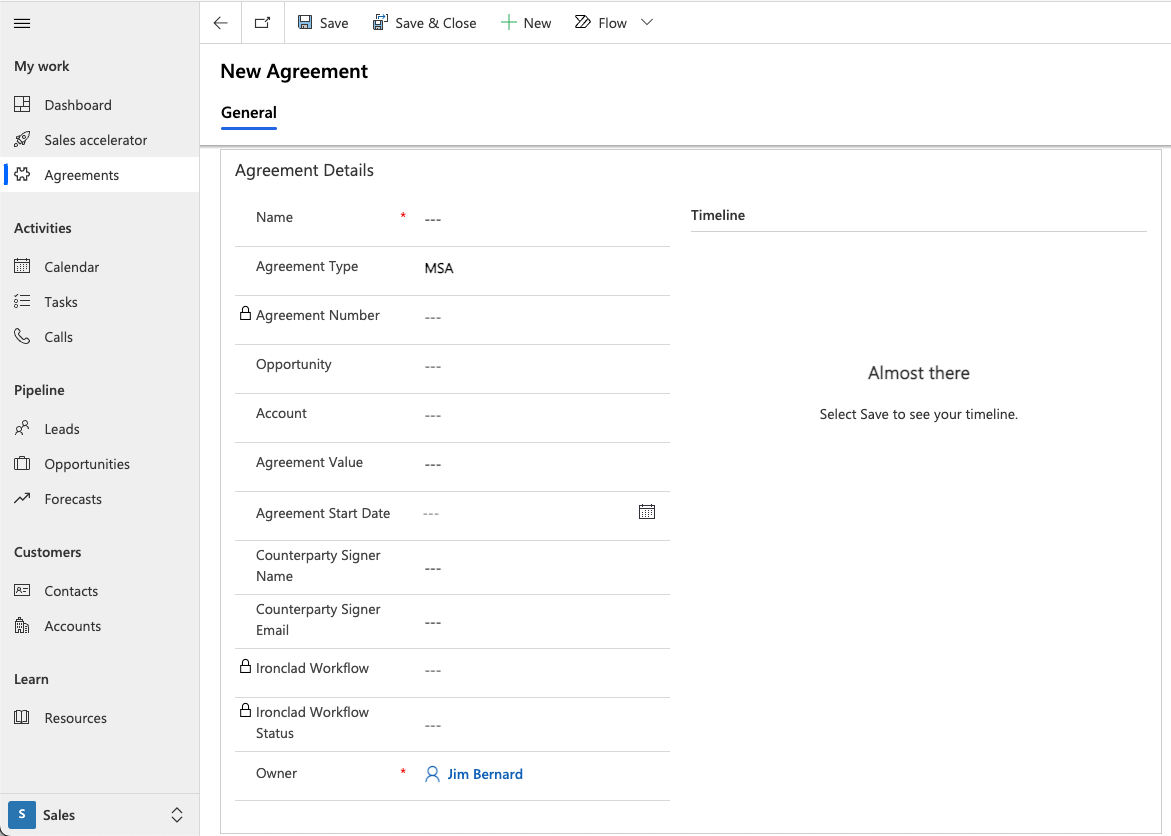
You should also update the default Form for the Agreement table, and add the Agreement table to your preferred Sales app in Dynamics so that you can easily create new Agreement records and see their status. Our example flows will also be using notes attached to the Agreement to show updates to the Ironclad workflow, so you should also add a Timeline component to the form so that those updates can be seen. As an example, the screen below shows a default form defined for the new Agreement table in Dynamics:
You’ll need an appropriate contract workflow defined in Ironclad. Our example uses a Master Services Agreement (MSA) use case, but the only details we depend on here are some of the standard fields that exist on almost all Ironclad workflows (Agreement Date, Counterparty Signer Email, Counterparty Signer Name), as well as the following custom attributes that you will need to add to the workflow:
| Attribute | Attribute ID | Type | Notes |
| Dynamics MSA ID | dynamicsMsaId | Text | This will be used to store the ID of the Dynamics Agreement record that triggered the workflow launch. |
| Dynamics MSA Number | dynamicsMsaNumber | Text | This will store the human-readable Agreement Number of the Agreement that triggered the workflow. |
| Total Contract Value | totalContractValue | Monetary | This will store the Agreement Value from the Agreement in Dynamics. |
In order to configure the Tray.io Ironclad authentication, you will also need to create an API key from your Ironclad instance. Tokens can be generated in Ironclad under [Your Name] > Company Settings > API > Access Tokens. Be sure to make note of the API token value.
Thanks to the built-in Dynamics and Ironclad connectors and authenticators in Tray.io, we can set up authentication for both platforms to be used throughout the Tray.io flows we describe in the rest of this guide. For each of the authentication entries described next, navigate to the Authentications tab in Tray.io and select “Create new authentication”.
Provide a name for your authentication entry and select Ironclad as the service. On the next screen, enter the API key that you saved when you created the key from the Ironclad API Settings page.
For the subdomain, ensure that you specify the environment that matches the Ironclad instance where you created the API key, e.g.:
| Environment Value | Ironclad Server |
|---|---|
| <blank value> | na1.ironcladapp.com (production) |
| “demo” | demo.ironcladapp.com |
| “preview” | preview.ironcladapp.com |
Provide a name for your authentication entry and select Microsoft Dynamics 365 as the service. In the details screen, enter the main URL of your Dynamics 365 app (of the format xxx.crm.dynamics.com). On submitting these details, Tray.io will attempt to connect and authorize the Tray.io app with your Dynamics environment. You will be prompted to login to Dynamics if you are not already logged in, and then asked to approve the actions that Tray.io requires in your Dynamics environment. Be sure that the Dynamics account you use to configure the authenticator has sufficient privileges to create, update or delete records in the tables required for your Tray.io flow actions. In our case, the account needs to update fields in the Agreement table that we created earlier, and also access details in related Opportunity and Account records.
It is often useful to create a project in Tray.io to contain the various flows required for your use case. This allows you to easily find the related flows, but it also allows you to create project-level configuration variables that can be used in your flow actions, to make them more manageable as details or environments change.
Create a project in Tray.io from your home page by selecting the Projects section in the left navigation and click “Add Project”. Name the project whatever you’d like. We’ll create the flows described below within this project.
For our example solution, we will be using three project config variables:
| Config variable name | Purpose |
ironclad_msa_template_id | ID of the workflow template that will be used to launch workflows when new MSA agreements are created in Dynamics. See the Ironclad Developer Hub for details on getting the template ID for the workflow template you want to use. |
ironclad_creator_email | Email address of the Ironclad user that will be used as the creator of the MSA workflows. |
ironclad_api_base | The base URL for any direct API calls made in the Tray.io flows. This is only used in cases where the Tray.io Ironclad connector does not support a particular endpoint in the overall Ironclad public API. This needs to match the environment configured in the Ironclad authenticator configured earlier (e.g., “https://demo.ironcladapp.com” for the demo environment, “https://na1.ironcladapp.com” for production, etc.). |
These configuration variables can only be defined once you add a workflow to the project, so you can set them up after creating your first flow in your new project. Project config variables are accessed using the Options menu in the upper right corner of the Tray.io flow editor.
The first flow we will create in our Tray.io project will automatically launch our Ironclad MSA workflow when an Agreement of type “MSA” is created in MS Dynamics.
Our flow will be configured with a scheduled trigger, to fire on a periodic basis to check for new Agreement records in Dynamics. For each new “MSA” Agreement record found, the flow will retrieve the various Dynamics data fields required in the Ironclad workflow, and then launch the Ironclad workflow with a call to the appropriate endpoint in the public API.
Triggering Automatically on Dynamics UpdatesIf you are willing to write some custom code in your Dynamics environment, it is possible to implement a webhook mechanism using Power Automate Custom Connectors. This would allow you to automatically trigger a Tray.io flow on specific events in Dynamics, such as creating an
Agreementrecord. Refer to your MS Dynamics and MS Power Automate documentation for details on this approach.
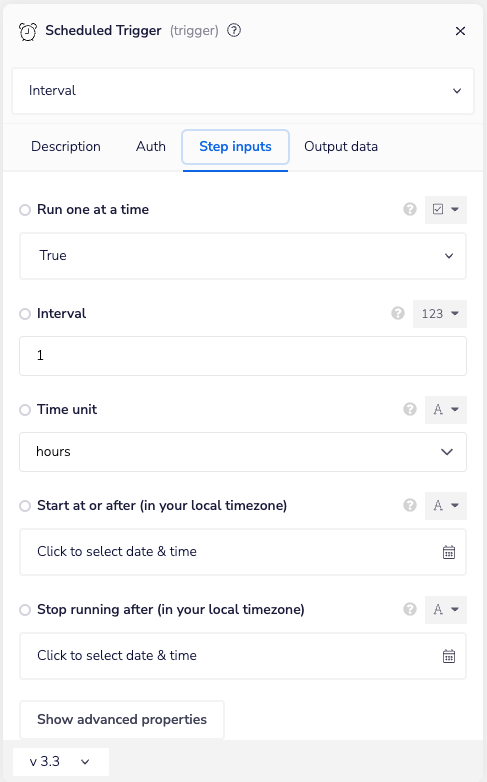
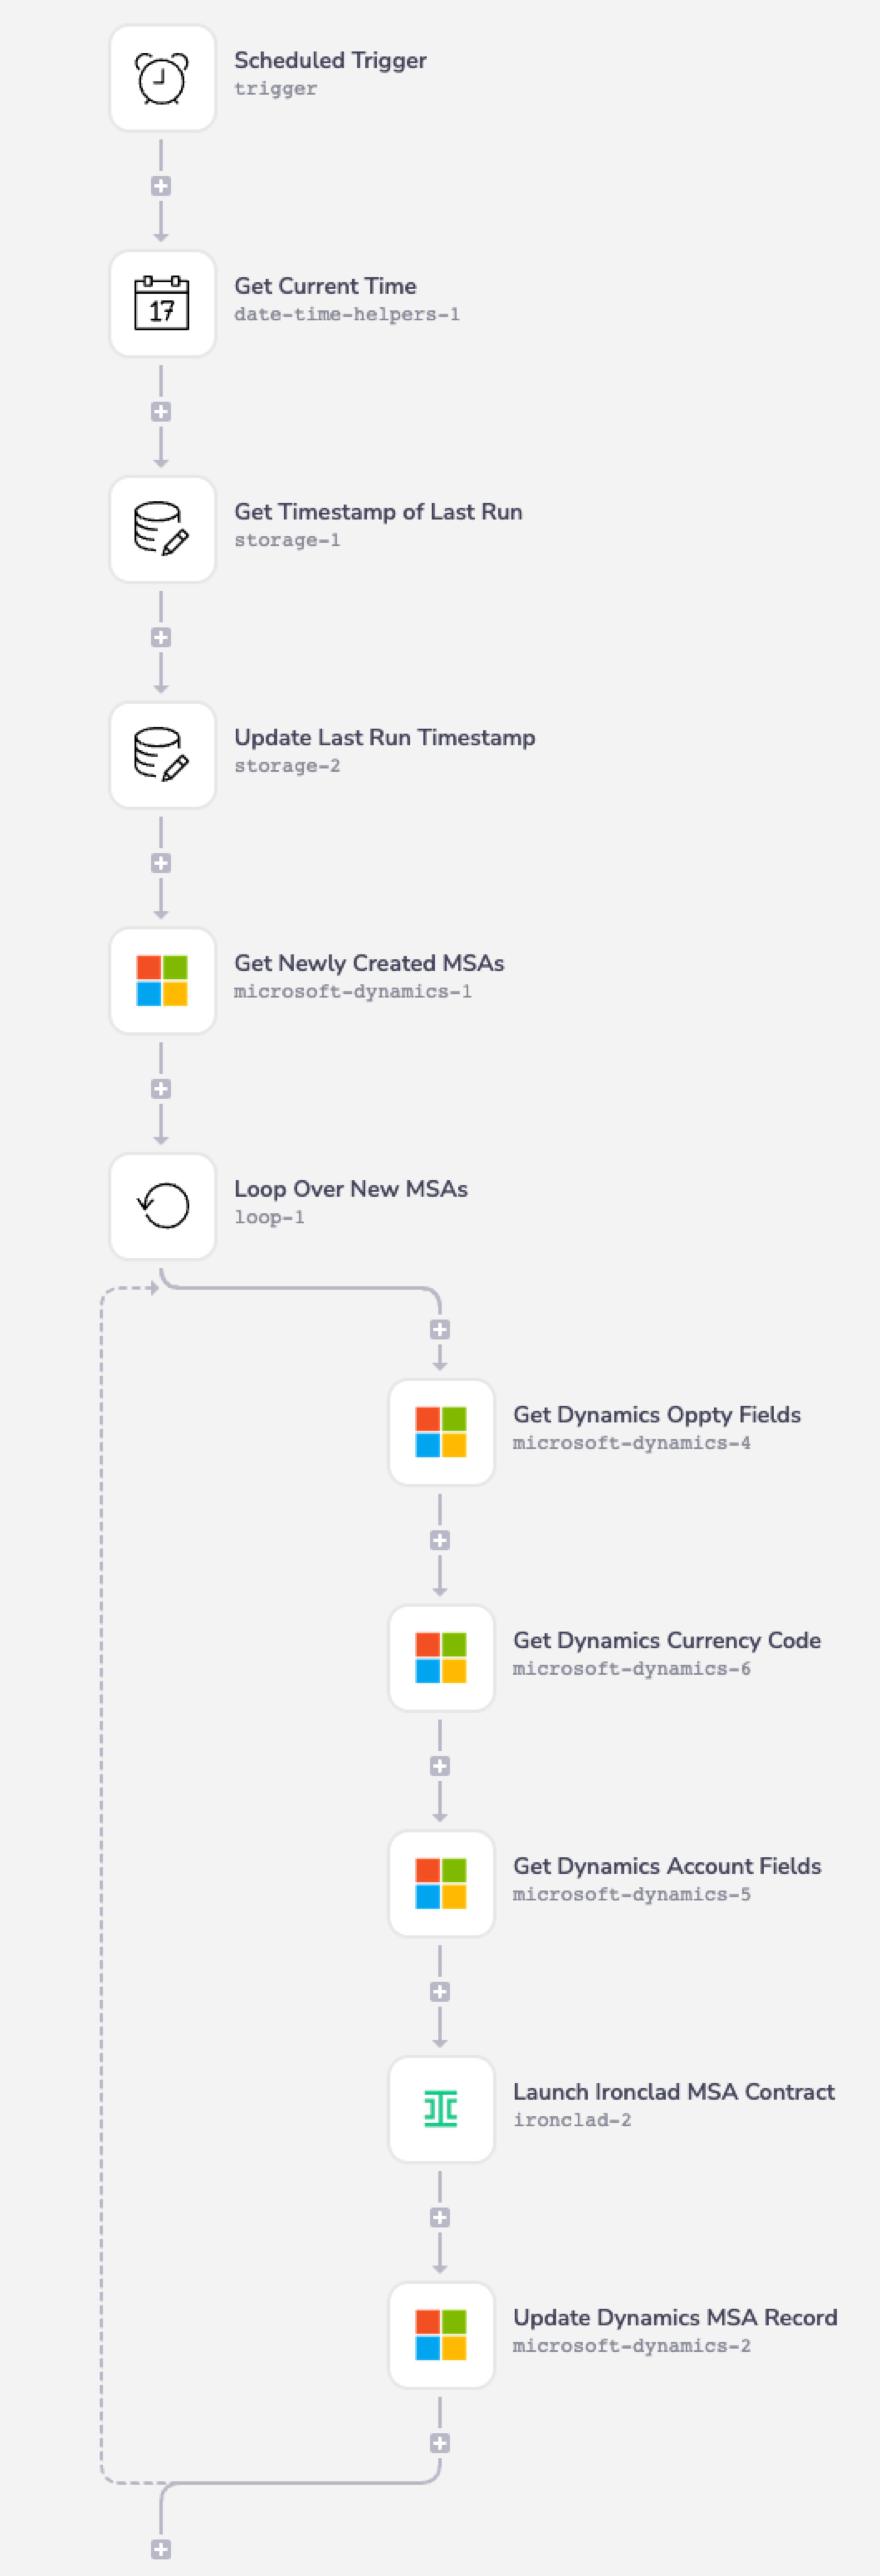
The first step in our flow is a trigger action, set to run on an Interval. In the step inputs, configure the interval trigger with “Run one at a time” as true, and set the interval to a reasonable amount of time for your context. In the example shown below we’ve set the trigger to fire every hour, but for development and debugging purposes you may want to set this to run every few minutes.
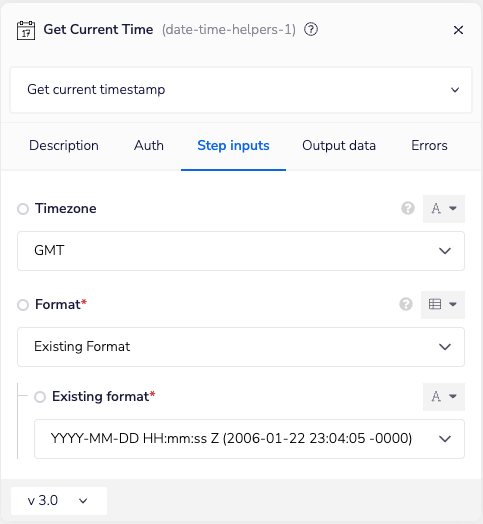
In order to avoid processing a large number of historical records when the flow first starts, we want to only look for Agreements that were created since the flow last ran. To do this, we first get the current time to use as a default value if this is the first run of the flow.
Next we determine the time of the last run of the flow by checking a last_run_timestamp storage variable in the flow. If the variable has been set, we use that as the last run time, and if it hasn’t, we take the current time that we retrieved in the previous action as the last run time.
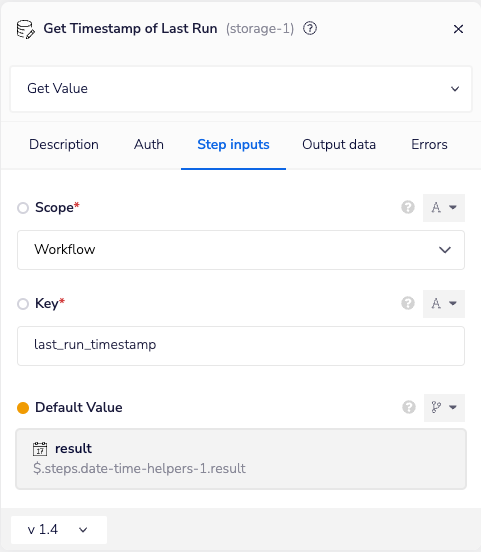
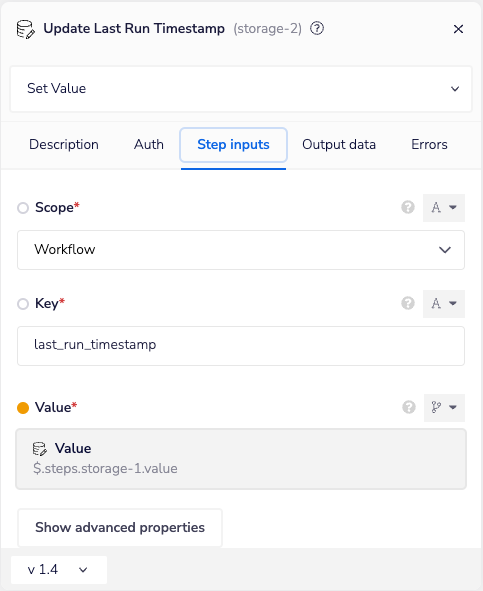
After determining the last run time, we store it in the last_run_timestamp storage variable for the next run of the flow.
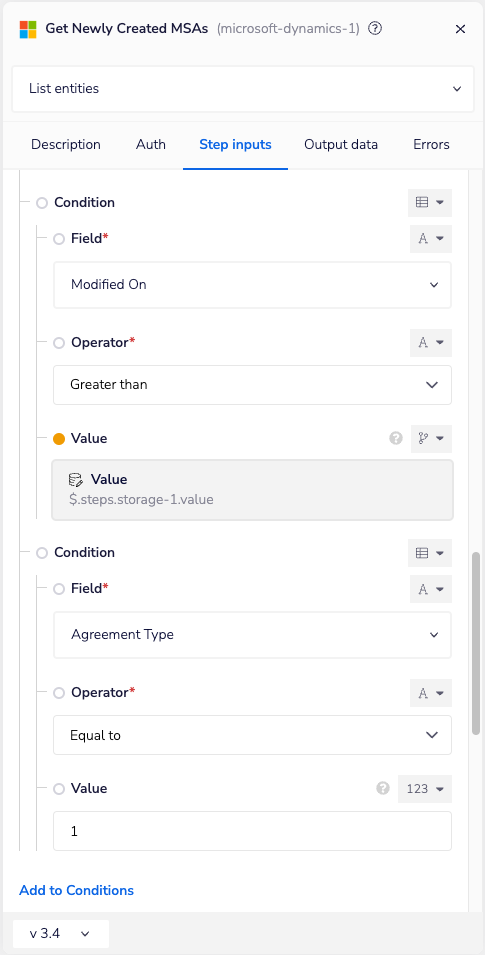
Next we use the Tray.io Dynamics connector to retrieve all Agreement records of type “MSA” that were created since the last run of the flow. Create a Dynamics connector using the “List entities” option, and set the Authentication to the Dynamics authenticator you created in Tray.io Setup. Use the same authenticator for all of the Dynamics connectors used in this guide.
Configure the step inputs to look for entities of type Agreement, and add the following fields to the list of fields to be pulled for each matching Agreement record - we will need these to launch the Ironclad workflow:
Agreement IDOpportunityAgreement TypeAgreement NumberAgreement ValueOwnerCounterparty Signer NameCounterparty Signer EmailAgreement Start Date
Set the conditions on the connector to check for records modified after the last flow run time, and whose Agreement Type is “MSA”. Note that the Agreement Type check will need to use the numeric value that was assigned to that choice option in the Agreement Type field in the Agreement table in Dynamics. In our case, we gave the “MSA” choice a value of 1, so we check for that value here.
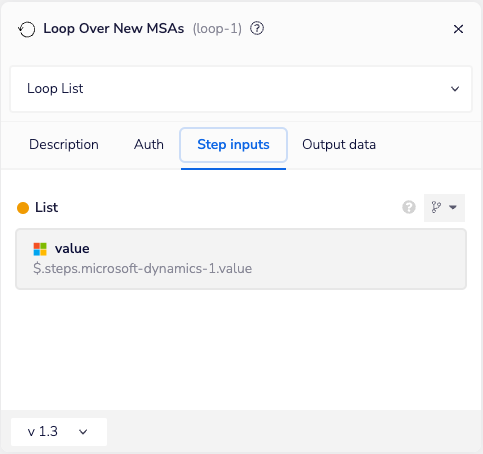
Once we’ve retrieved the matching Agreement records, we want to iterate through them and launch an Ironclad workflow for each one. We do this with a loop action, using the list of entities output from the previous step.
Within the loop, we first need to collect some additional data fields about the Agreement and the related Opportunity, since we require them to launch our Ironclad workflow. First, we add a Dynamics connector using its “Get entity” action, to retrieve the Total Amount, Account and Currency fields from the Opportunity linked to the Agreement.
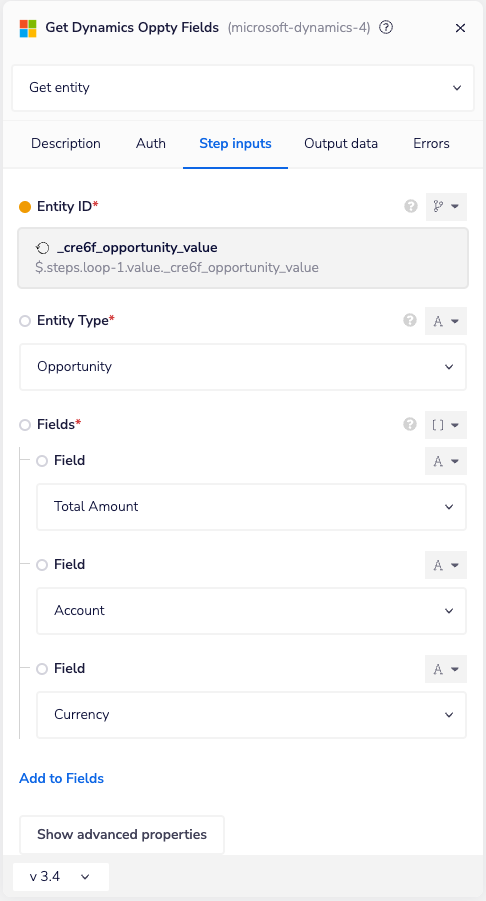
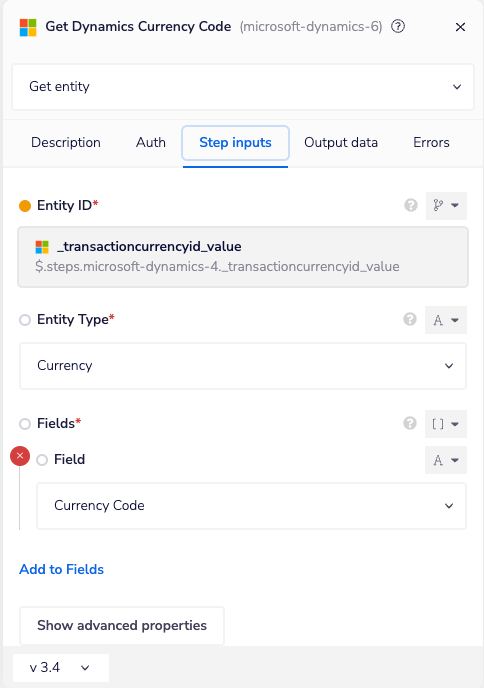
Next, we need to get the ISO currency code for the currency used on the Agreement, so that we can set it on the Total Contract Value attribute in Ironclad:
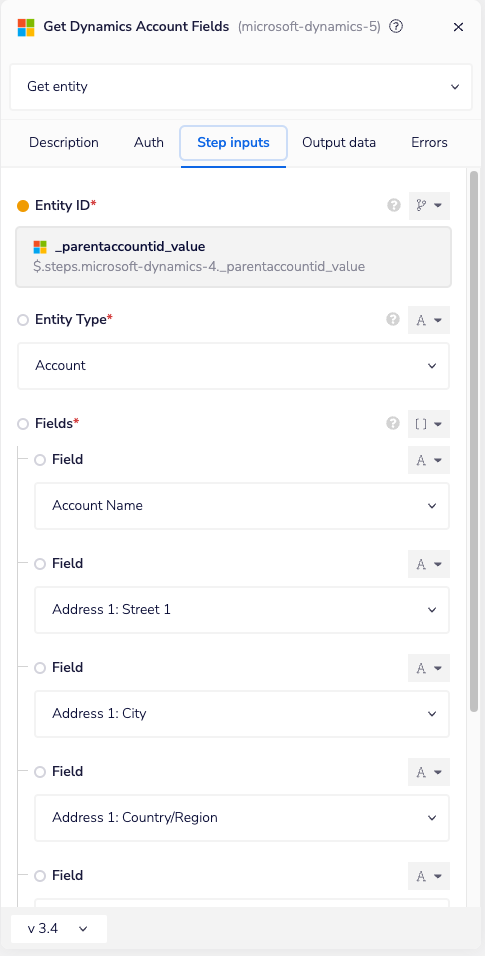
Finally, we retrieve the name and address fields from the Account linked to the Opportunity:
Why Use the Opportunity Account?Note that we are not using the Dynamics
Accountlinked on theAgreement- in this use case we are driving MSA contracts, and these would typically be done in reference to a specificOpportunityrather than directly to anAccount. If we were driving an NDA or similar contract process, we would likely use theAccountfrom theAgreement.
With all of the needed data fields collected, we can launch the Ironclad workflow. We use an Ironclad connector and set the authentication to use the Ironclad authenticator we configured in Tray.io Setup. Use this same authenticator for all of the Ironclad connectors used in the remainder of this guide.
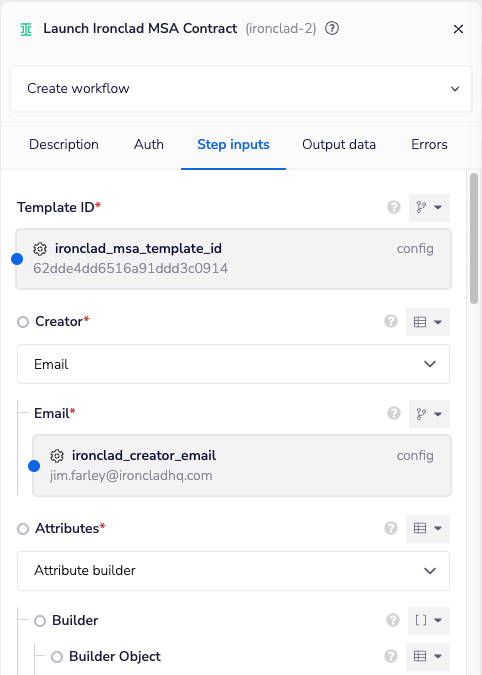
We use the "Create Workflow" action on the connector, set the Template ID step input to be the ironclad_msa_templateid project configuration variable, and set the Email field of the Creator input to be the ironclad_creator_email project config variable:
In the Attributes section of the step inputs, use the "Attribute builder" option, and then map the following property entries under the Builder Object:
| Builder Attribute | Type | Value | Notes |
Dynamics MSA ID (string) | String | $.steps.loop-1.value.cre6f_agreementid | The Dynamics record id for the Agreement. Note that the prefix of the field ID from Dynamics (“cre6f” in our example) will be different in your Dynamics instance. We store this record ID on the workflow so that we can later update the Agreement when updates occur on the workflow. |
Dynamics MSA Number (string) | String | $.steps.loop-1.value.cre6f_agreementnumber | The Agreement Number for the Agreement. |
Agreement Date (date) | Date | $.steps.loop-1.value.cre6f_agreementstartdate | The Agreement Start Date from the Agreement. |
Counterparty Signer Name (string) | String | $.steps.loop-1.value.cre6f_counterpartysignerename | The Counterparty Name from the Agreement. |
Counterparty Signer Email (email) | $.steps.loop-1.value.cre6f_counterpartysignereemail | The Counterparty Signer Email from the Agreement. | |
Total Contract Value (monetaryAmount) | Monetary Amount | See below | |
Total Contract Value -> Currency | $.steps.microsoft-dynamics-6.isocurrencycode | The isocurrencycode field retrieved in the “Get Dynamics Currency Code” flow step. | |
Total Contract Value -> Amount | $.steps.loop-1.value.cre6f_agreementvalue | The Agreement Value from the Agreement record. | |
Counterparty Name (string) | String | $.steps.microsoft-dynamics-5.name | The Account name property retrieved in the “Get Dynamics Account Fields” step.. |
Counterparty Address (address) | Address | See below | |
Counterparty Address -> Lines -> Line | jsonpath | $.steps.microsoft-dynamics-5.address1_line1 | The address1_line1 property retrieved in the “Get Dynamics Account Fields” step. |
Counterparty Address -> Locality | $.steps.microsoft-dynamics-5.address1_city | The address1_city property retrieved in the “Get Dynamics Account Fields” step. | |
Counterparty Address -> Country | $.steps.microsoft-dynamics-5.address1_country | The address1_country property retrieved in the “Get Dynamics Account Fields” step. | |
Counterparty Address -> Region | $.steps.microsoft-dynamics-5.address1_stateorprovince | The address1_stateorprovince property retrieved in the “Get Dynamics Account Fields” step. | |
Counterparty Address -> Postcode | $.steps.microsoft-dynamics-5.address1_postalcode | The address1_postalcode property retrieved in the “Get Dynamics Account Fields” step. |
Once the Ironclad workflow is launched, we want to store the URL and status of the workflow in the corresponding fields in the Agreement record in Dynamics. The Ironclad launch step above will generate an output with all of the attributes of the launched workflow, including the new workflow ID. We use these values in a Dynamics connector with the “Update entity” action, setting the Entity ID step input to the agreementid field from the Agreement for the current loop ($.steps.loop-1.value.cre6f_agreementid in our example). Set the Entity Type step input to Agreement, and then map the following fields in the Fields section of the step inputs:
| Field | Value | Note |
Ironclad Workflow | {$.config.ironclad_api_base}/workflow/{$.steps.ironclad-1.response.body.id} | Here we combine the ironclad_api_base project config property with the workflow ID returned in the body of the previous step to compose the full URL to the Ironclad workflow. |
Ironclad Workflow Status | $.steps.ironclad-2.response.body.step | |
| Name | $.steps.ironclad-2.response.body.title |
Here is the completed Tray.io flow once all of the steps above have been configured:
With our workflow launch flow in place in Tray.io, we can now see the end to end process of a new Agreement being created in Dynamics, causing an Ironclad workflow launch, and finally updating the Agreement with the launched workflow details.
If a Dynamics user creates an Agreement record such as the one shown here:
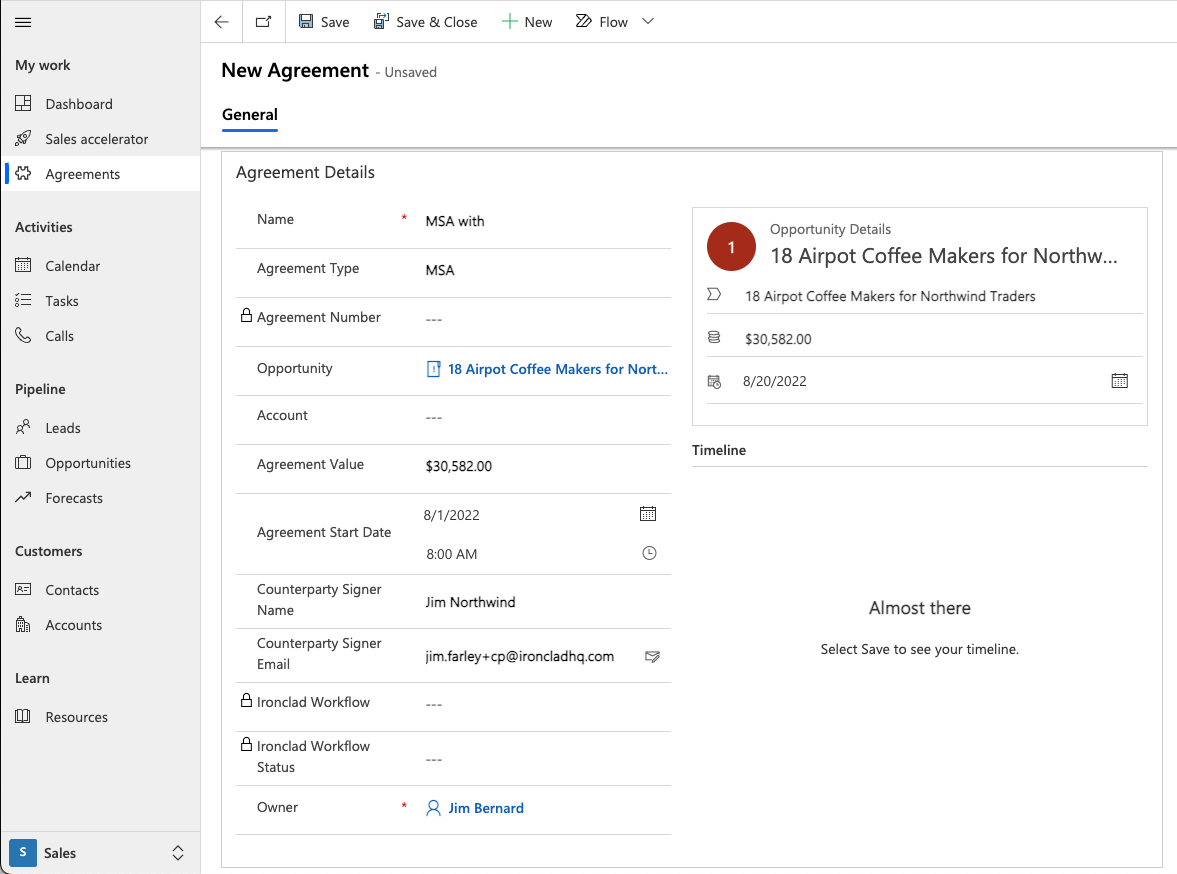
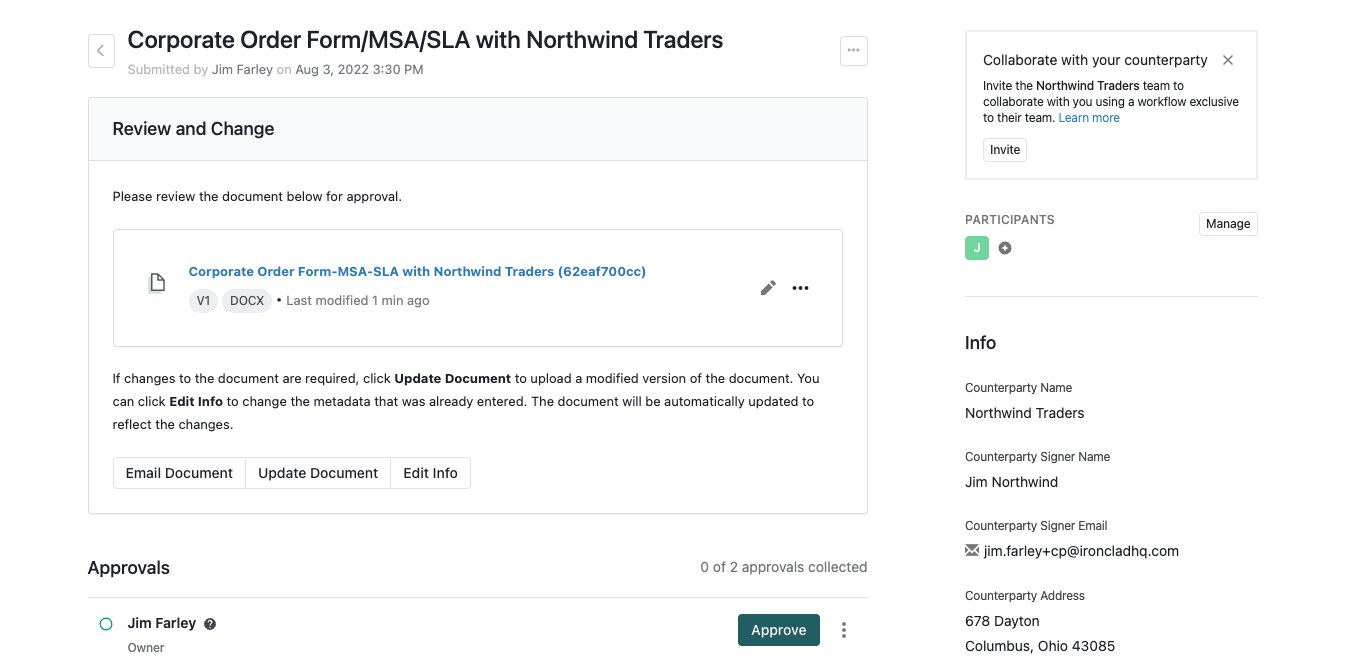
The next time our scheduled flow runs, it will match the MSA agreement type on the new record and launch the MSA workflow in Ironclad with the details from the Agreement:
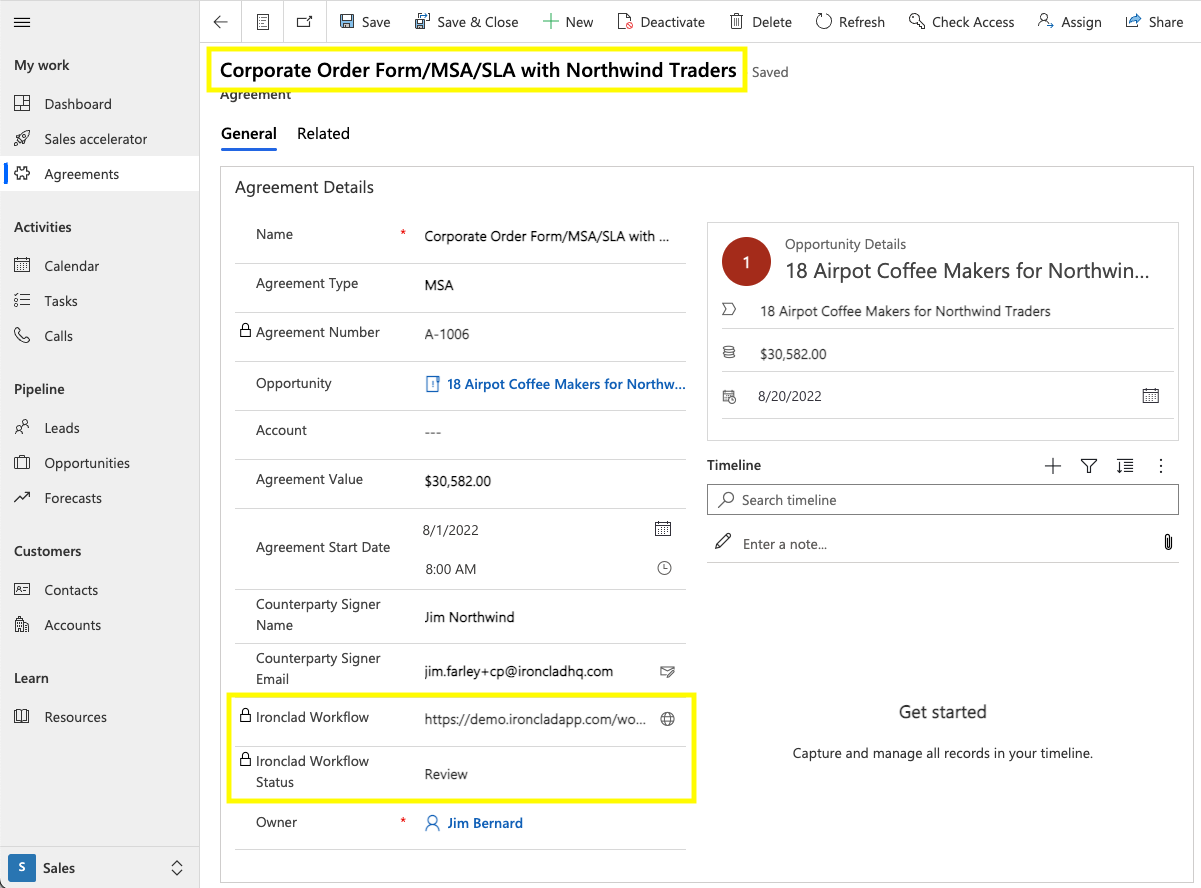
The final step of our flow will then update the Agreement record to change the name to the name of the workflow, and set the Ironclad workflow details:
With the previous flow in place, new MSA agreements will launch an Ironclad workflow, the workflow will have an attribute holding the Dynamics record ID of the corresponding Agreement, and the Agreement record in Dynamics will have a field holding the URL of the Ironclad workflow. With these cross-references in place, we can also synchronize any changes between the two systems. To demonstrate this, the flow described here will synchronize changes to the total contract value attribute in Ironclad to the Agreement record in Dynamics.
Agreement vs Opportunity ValueYou might notice that this example is using a contract value field,
Agreement Value, on theAgreementrecord in Dynamics, rather than using anOpportunityfield likeTotal Amount. We do this to keep our example simple - theTotal Amounton theOpportunityis usually calculated from relatedOpportunity Productson theOpportunity, and adjusting the value as part of the Ironclad process could conflict with business rules defined for the table in Dynamics.
We want to trigger this flow on workflow attribute change events coming from Ironclad. To do this, we use a Tray.io trigger step. This creates an endpoint that we can then access using the settings menu on the step in the flow.

We then use this endpoint to configure a webhook subscriber in Ironclad, set to catch workflow_attribute_updated events and send them to this endpoint, which will trigger our Tray.io flow:
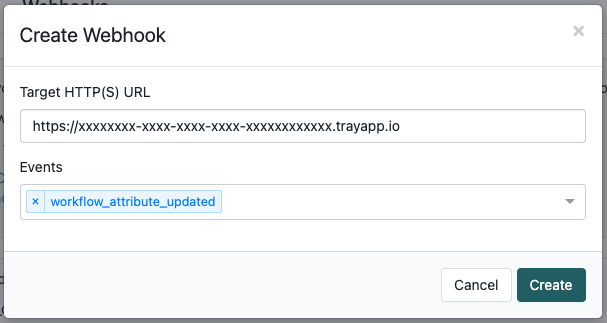
This webhook subscription will send events for all workflows and all updated attributes to our Tray.io flow. We only want to handle total contract value attribute changes on MSA-type workflows, so we will add some filters to the flow to check the event to see if it’s a relevant change.
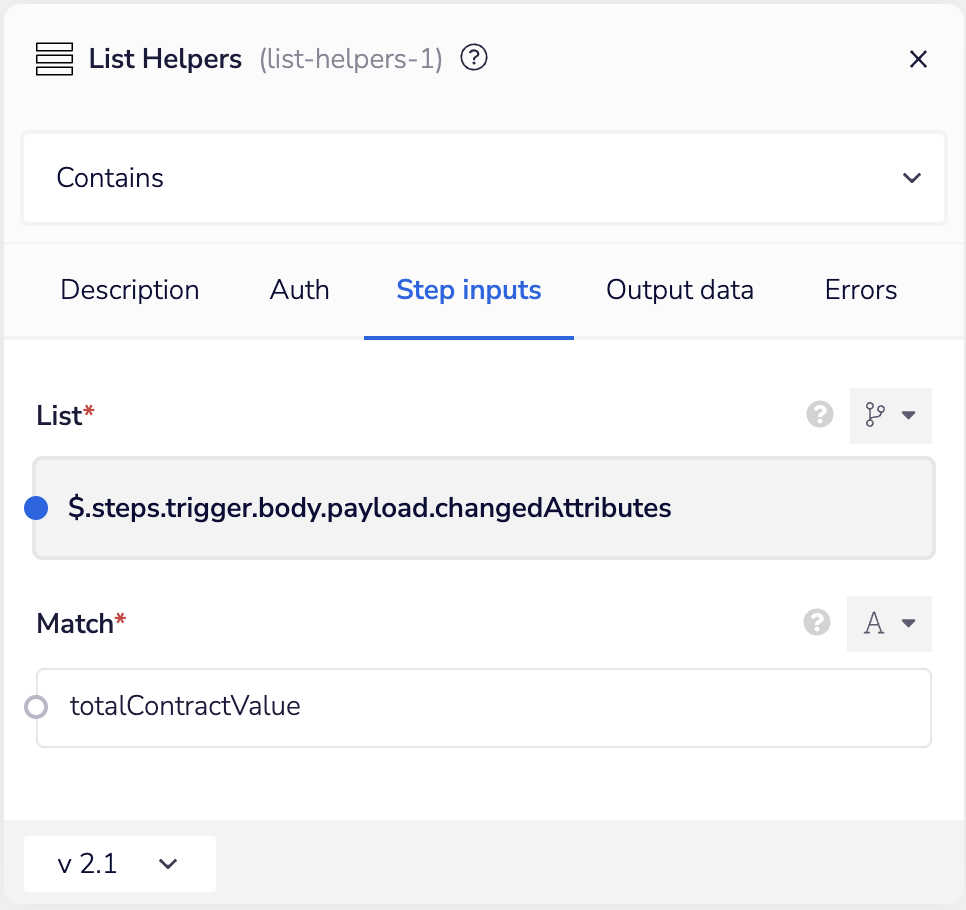
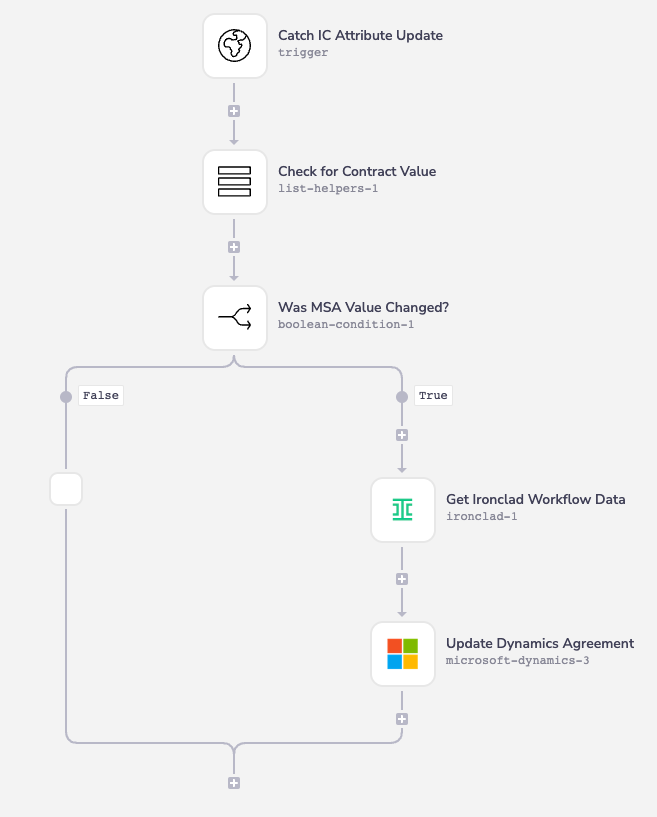
First, we check for the agreement data attribute in the event payload. The workflow_attribute_updated event from Ironclad includes an array of attribute names in its payload to indicate which attributes have been updated. We use a list helper step to check that array of attributes to see if it contains “totalContractValue”:
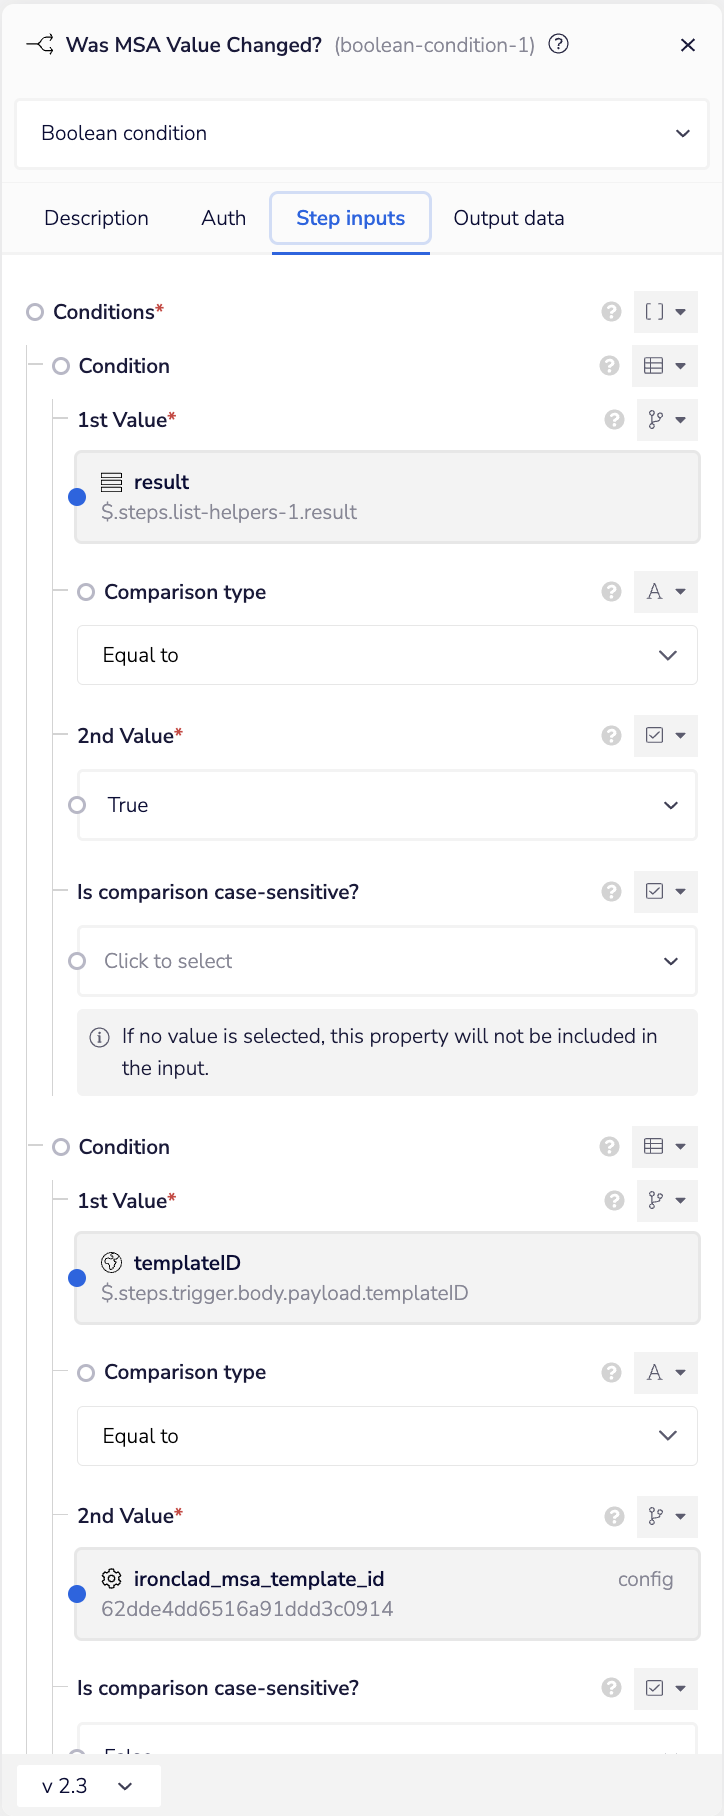
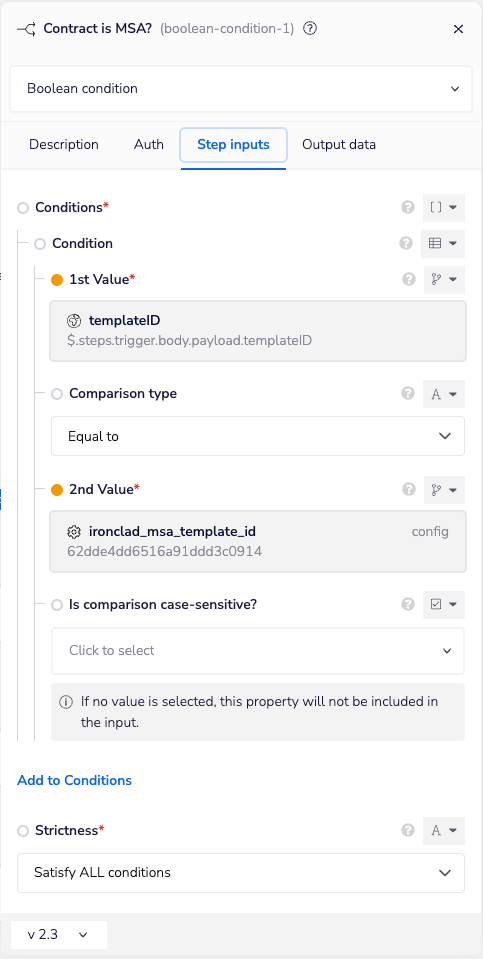
Following this step, we add a boolean condition step that checks that the value of the previous step is true (e.g., the totalContractValue attribute was changed in Ironclad), and that the workflow template is the MSA template and not some other workflow type in Ironclad.
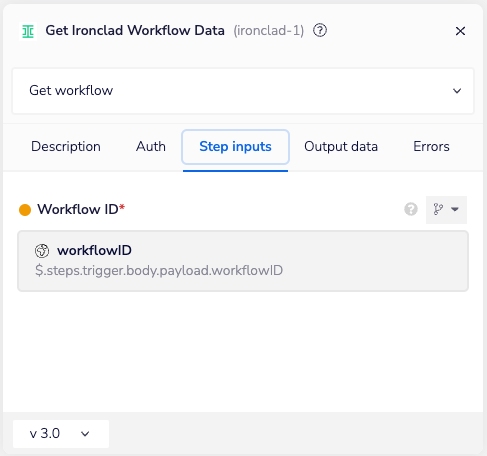
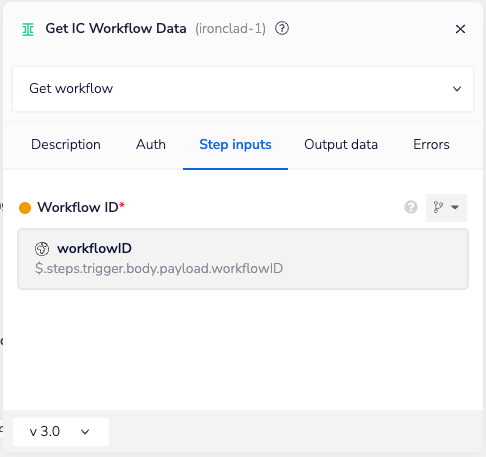
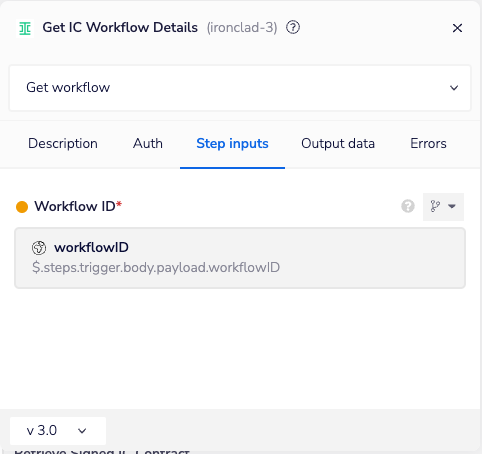
If the condition in the previous step is true, we then add an Ironclad connector step where we get the details of the workflow that was updated. We use the Ironclad authenticator we configured in Tray.io Setup, as we do with all Ironclad steps in our flow, set the action to “Get workflow”, and in the step inputs we specify the workflow ID from the event that triggered the flow.
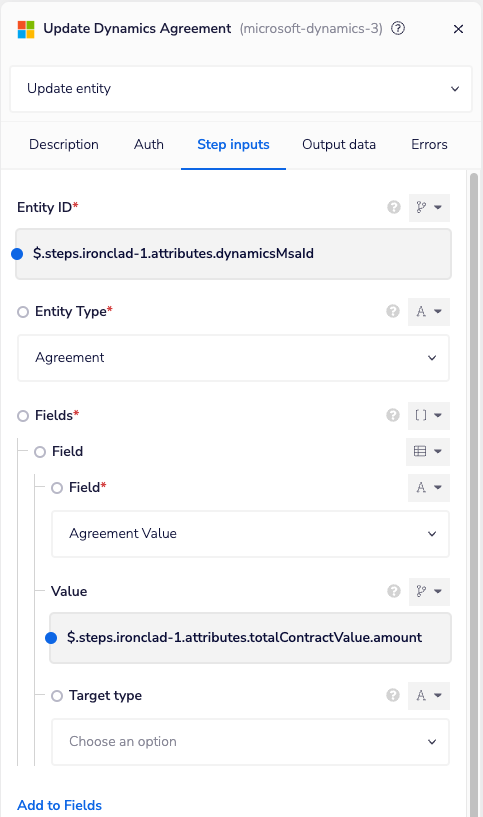
Next we add a Dynamics connector step with the action “Update entity”. In the step inputs we set the entity ID to the value of the dynamicsMsaId attribute from the Ironclad workflow, set the entity type to Agreement, and add the Field named Agreement Value, to be set to the value of the totalContractValue attribute from the workflow.
Here is the completed Tray.io flow once all of the steps above have been configured:
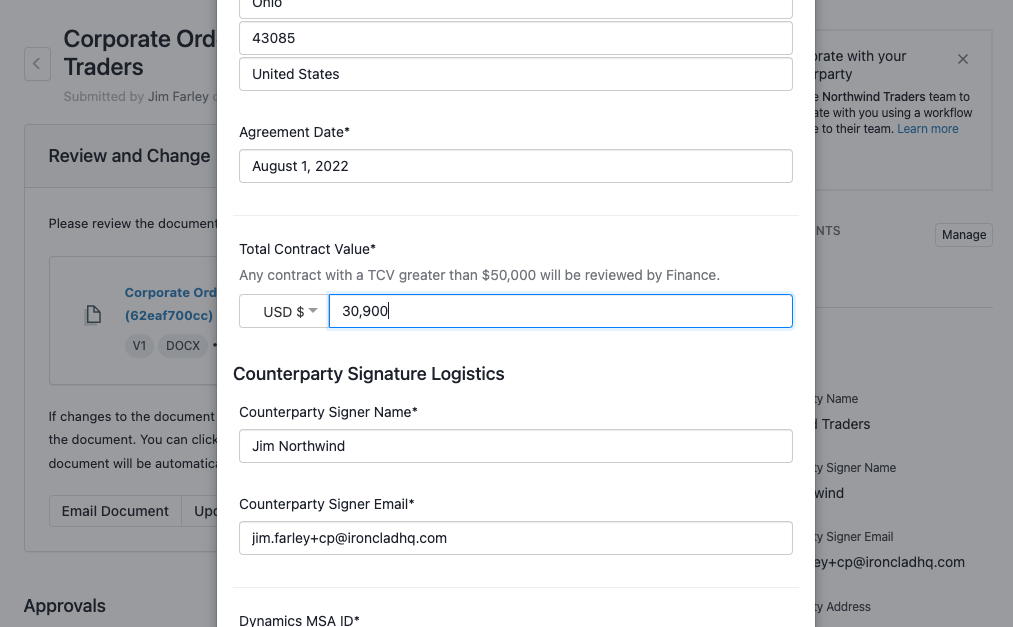
With this flow in place, we can now update attributes in the Ironclad workflow and have their value propagate to the corresponding values in Dynamics. Continuing from the example agreement we started earlier, suppose we adjust the total contract value in the linked Ironclad workflow:
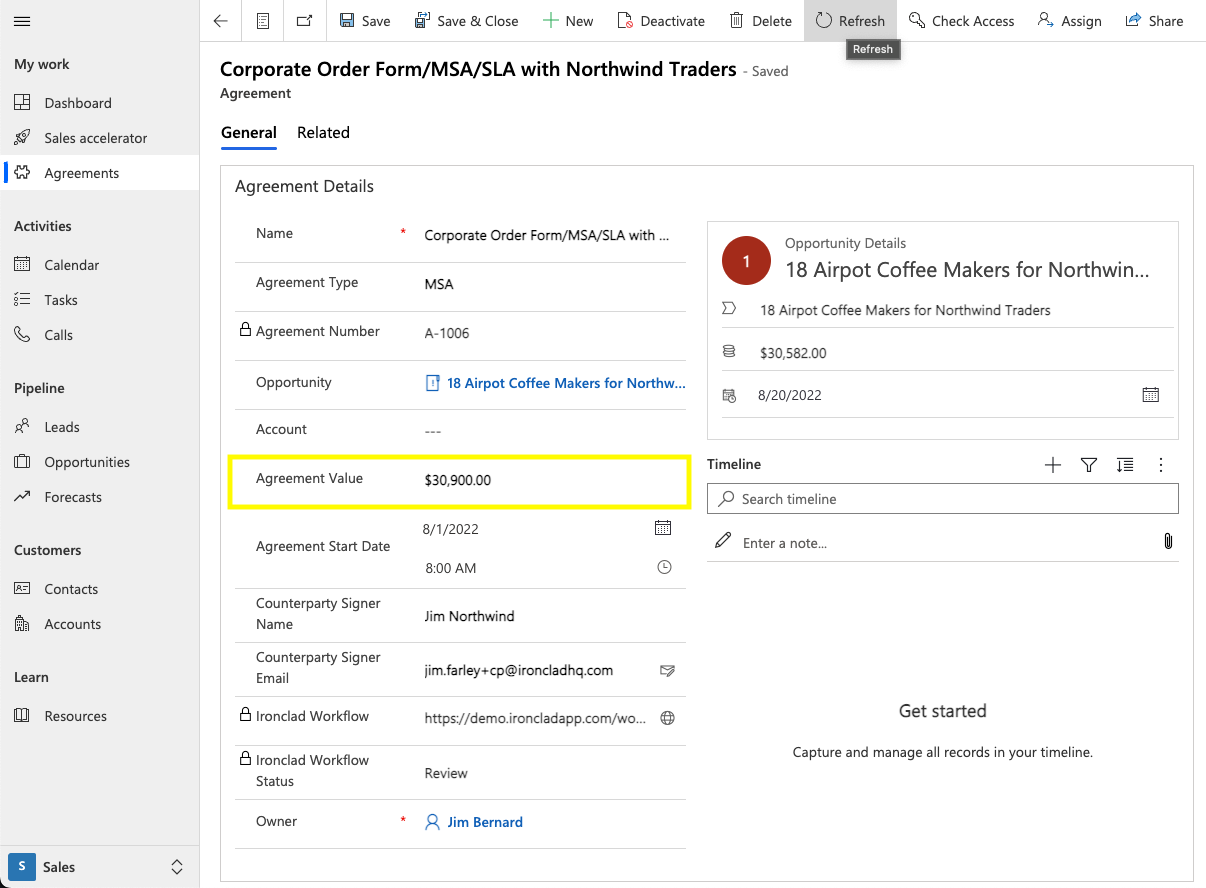
This will send a workflow_attribute_updated event to our Tray.io flow, the flow steps will match the template ID and the attribute name, and the flow steps will update the Agreement Value in the Agreement record with the same ID as the dynamicsMsaId attribute in the workflow:
Another useful synchronization we may want to establish between Ironclad and Dynamics is to give Dynamics users visibility on the approval process as it progresses in Ironclad. To do this, we can take a similar approach to our flow for updating Agreement fields with workflow attribute data, but instead of updating fields on the Agreement record, we’ll attach a note to the record with the details of the approval change.
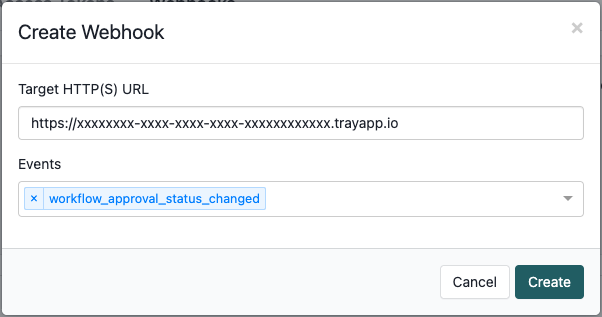
In this case, we want to trigger our flow based on workflow_approval_status_changed events from MSA-related workflows in Ironclad. As we did in the first step of our Launching an Ironclad Workflow flow, we create a trigger step in Tray.io and get its endpoint so that we can configure the webhook subscription in Ironclad:
After the flow trigger, we add an Ironclad connector step to get the Ironclad workflow details for the workflow that fired the event.
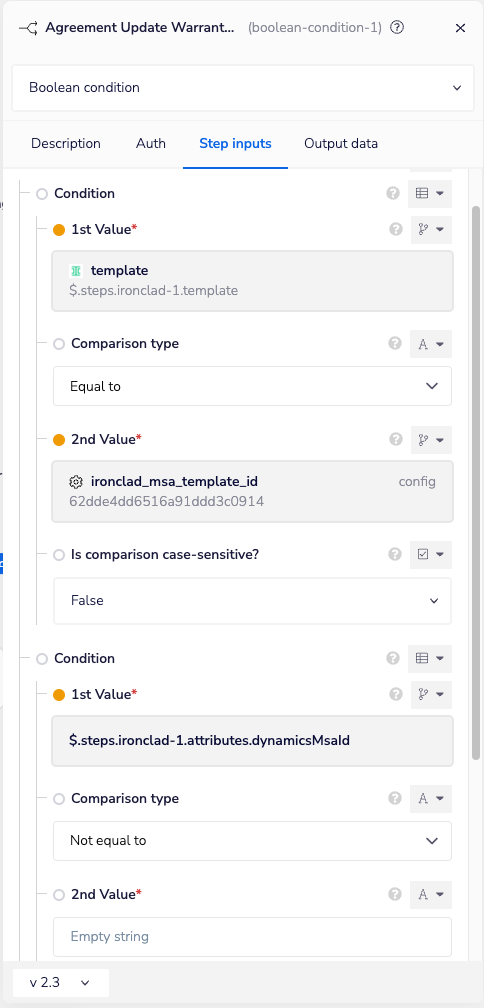
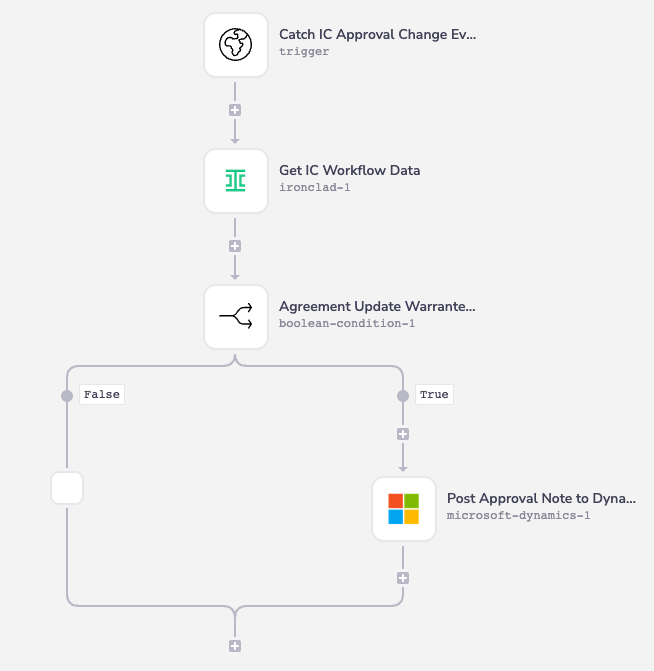
Before we try to update the agreement, we verify that the workflow that fired the event is an MSA workflow, and that it has an agreement ID set in its dynamicsMsaId attribute. We do this with a boolean condition step:
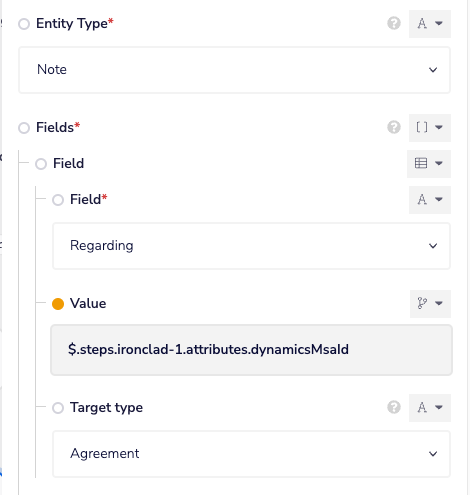
Finally, in the “true” branch coming out of the conditional step, we add a Dynamics connector step to create a new Note linked to the Agreement record in Dynamics. We use the “Create entity” action on the connector and specify the Note entity type in the step inputs. In the Fields portion of the step inputs, we set the Regarding field to be the agreement ID stored in the dynamicsMsaId attribute of the workflow:
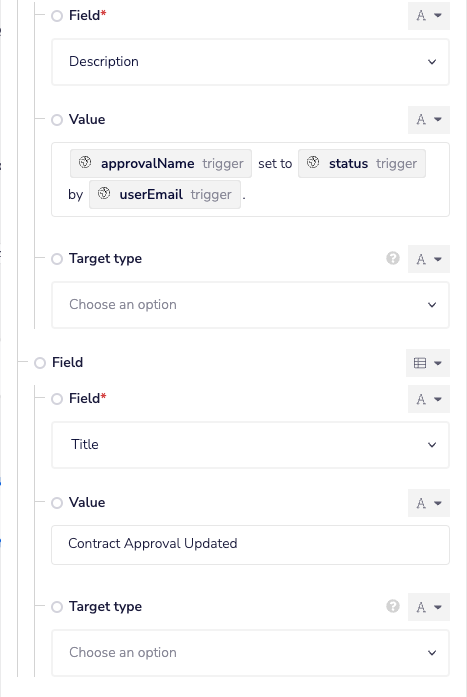
We also add Description and Title fields with various details provided in the approval event from Ironclad:
Here is the completed Tray.io flow once all of the steps above have been configured:
Continuing our running example from earlier, suppose the workflow owner approves the workflow in Ironclad:
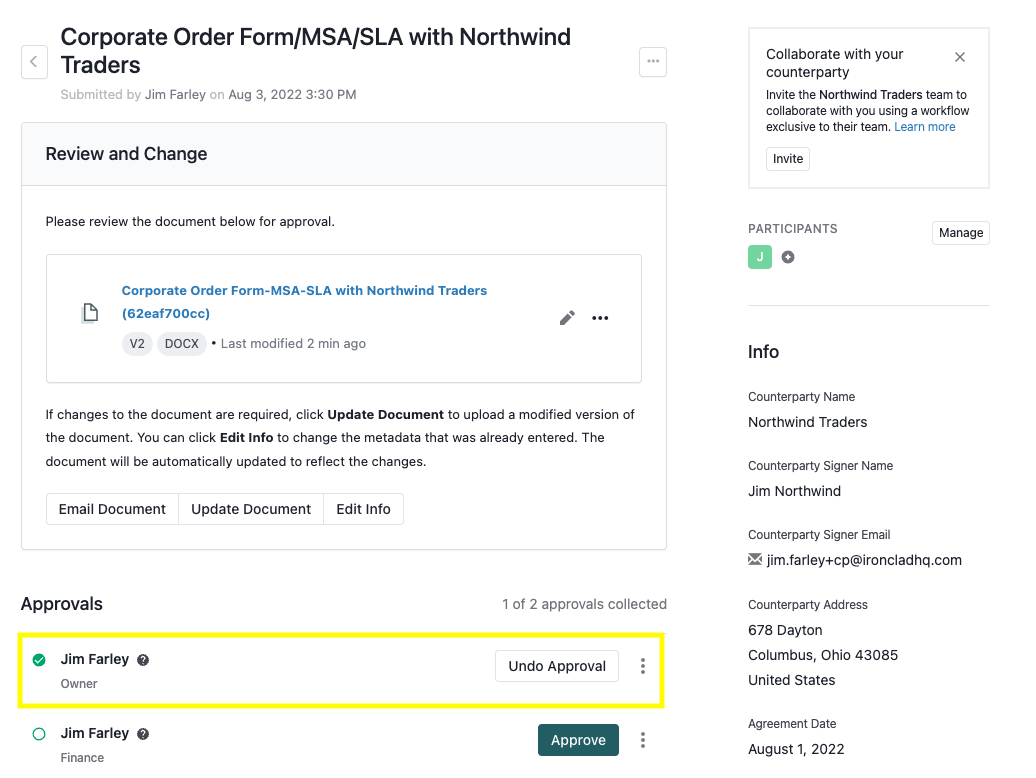
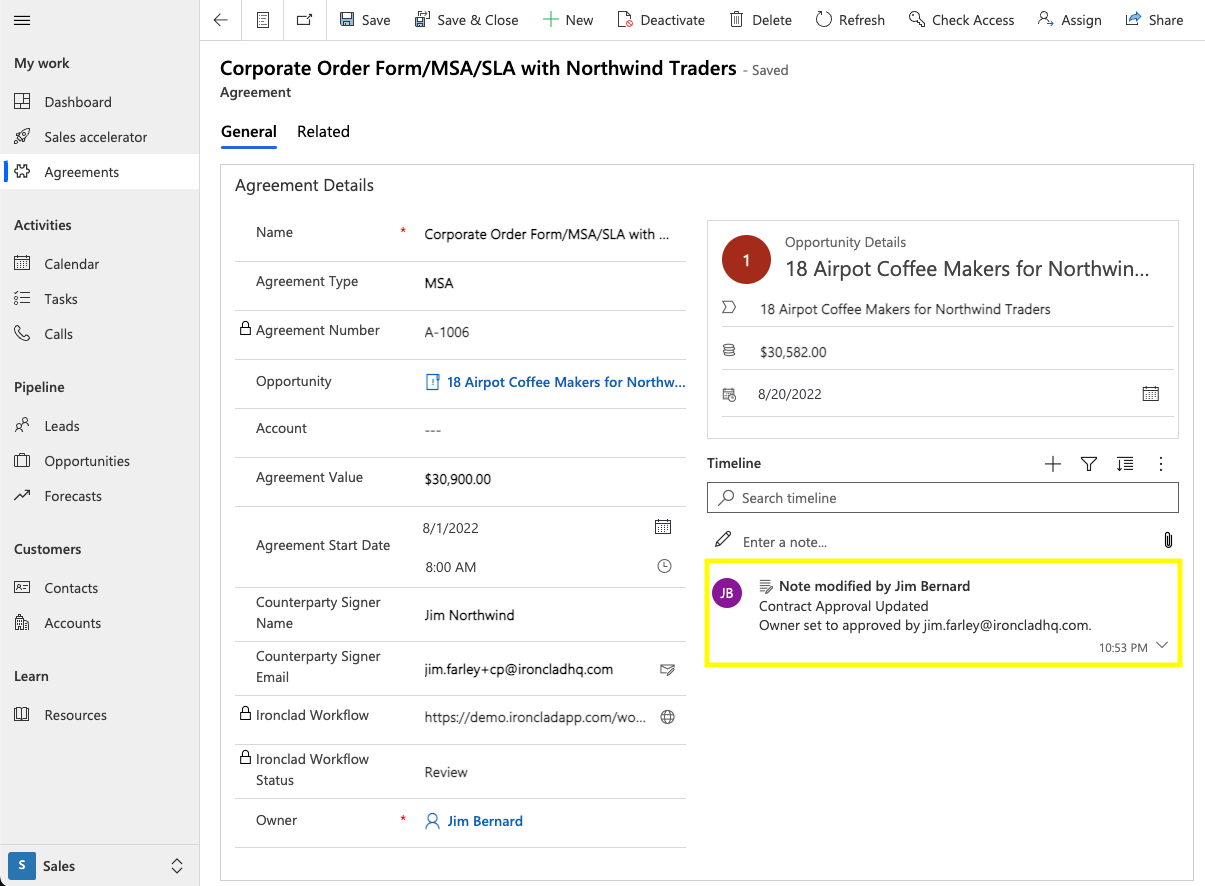
A workflow_approval_status_changed event will fire and trigger our Tray.io flow, the conditions will match (since our workflow is from the target workflow template and has a dynamicsMsaId attribute value), and the Agreement record in Dynamics will have a new note attached to it with the approval details:
In our last flow in this guide, we’ll show how to send the completed contract details from Ironclad to Dynamics when the workflow completes. In this case, when the workflow completes, we will pull the final contract document from Ironclad and attach it to the Agreement record in Dynamics as a note with an attachment, and also update the Ironclad Workflow Status on the Agreement.
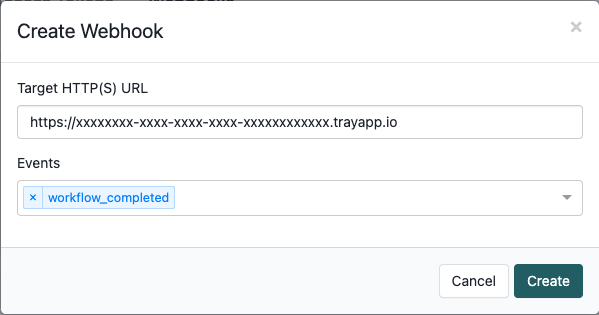
Similar to our previous flow, we will use a Tray.io trigger as the endpoint for a new webhook subscriber in Ironclad. In this case, we want to catch the workflow_completed event:
After the flow trigger, we use a boolean condition step to see if the workflow that triggered the event is our MSA workflow type:
In the “true” branch of our condition, we first use an Ironclad connector step to get the full details of the completed workflow:
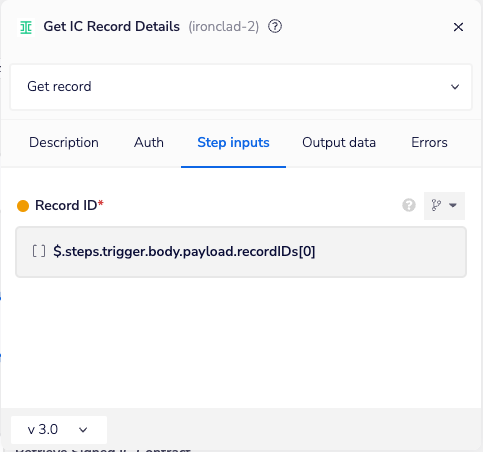
Next we use another Ironclad connector step to get the details of the new Ironclad repository record that was generated when the workflow completed:
Now we have to get the final contract document from Ironclad and convert it to the format expected for a note attachment in Dynamics. We use a series of file helper steps to do this.
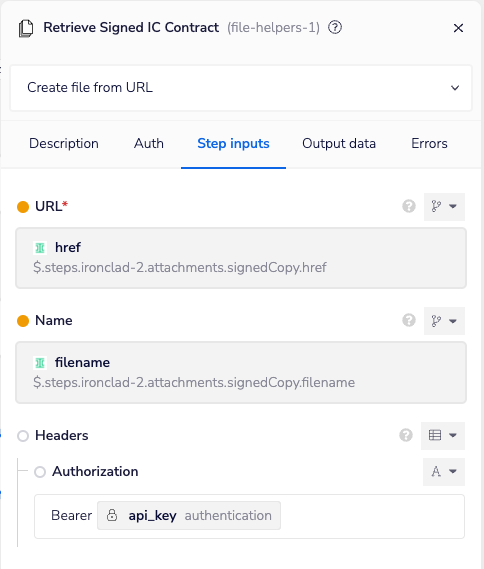
First, we add a file helper step with the action set to “Create file from URL”. This will download the final contract document using the document URL that is part of the record details we retrieved in the previous step. Ironclad requires that you authenticate when downloading contract documents from its document URLs, so we set the authenticator on the step to use the Ironclad authenticator we configured in Tray.io Setup, and add a “Bearer” authorization header to the step inputs using the API key from the authenticator. We have to do this extra setup of the header field because we are using a file helper step instead of an Ironclad connector step here, and the authorization header will not automatically be added to the request header by the file helper.
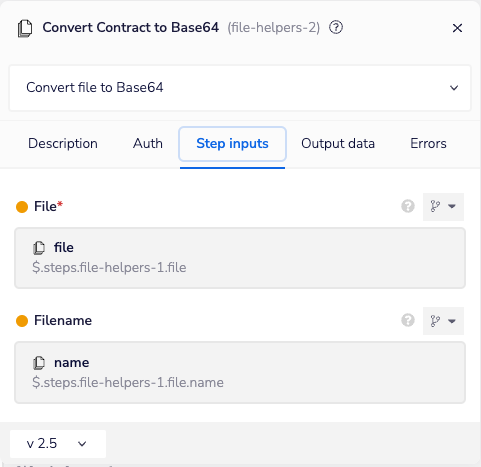
Next, we add another file helper step with the action set to “Convert file to Base64”. We set the file input to the file we downloaded in the previous step, and copy the filename forward as well:
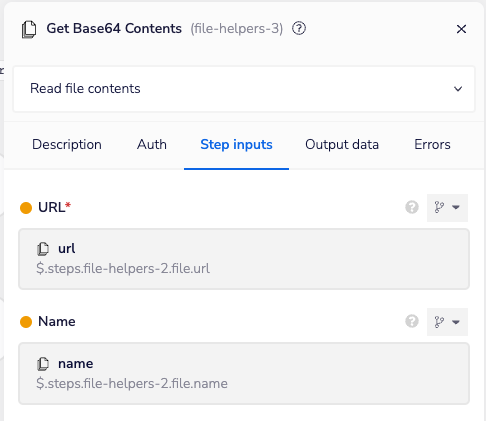
Finally, we get the raw base64 contents from the previous step using another file helper, with the action set to “Read file contents”. This last step allows us to send the actual content of the base64 file to Dynamics in the next step.
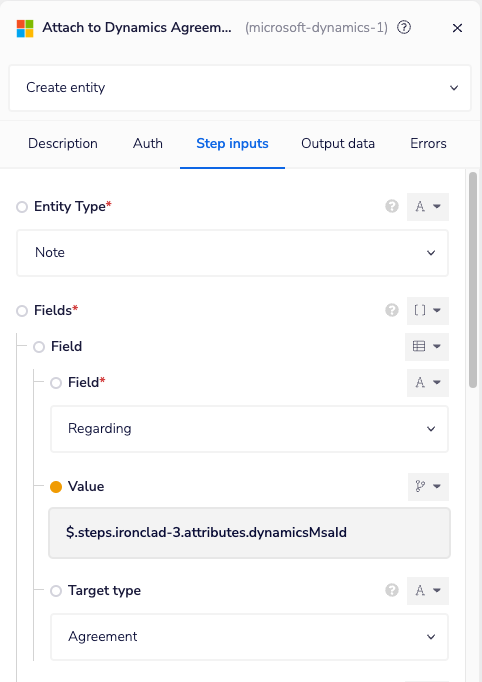
Now we have all of the workflow and record details for the completed contract, and we’ve converted the final contract to base64 format for a Dynamics attachment. We can now add a note to the Agreements record using a Dynamics connector step with the “Create entity” action. We set the Entity Type in step inputs to Note, and set the Regarding field to the agreement id in the record’s dynamicsMsaId field, in order to attach the note to the Agreement in Dynamics:
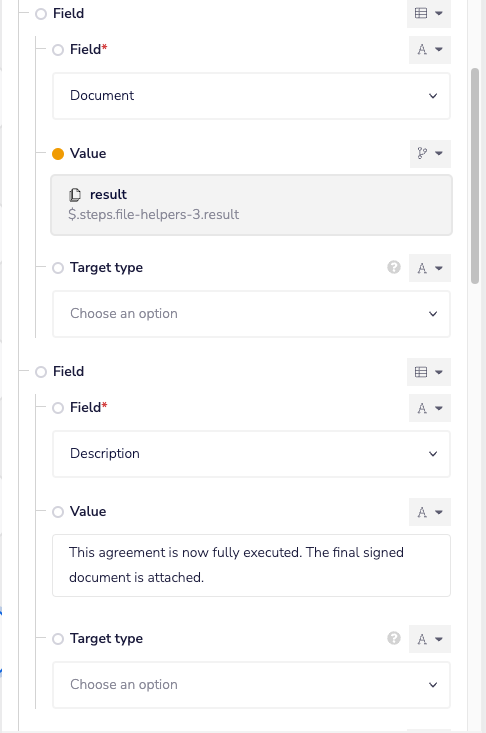
We add the document data to the note using the Document field, and add a Description to the note:
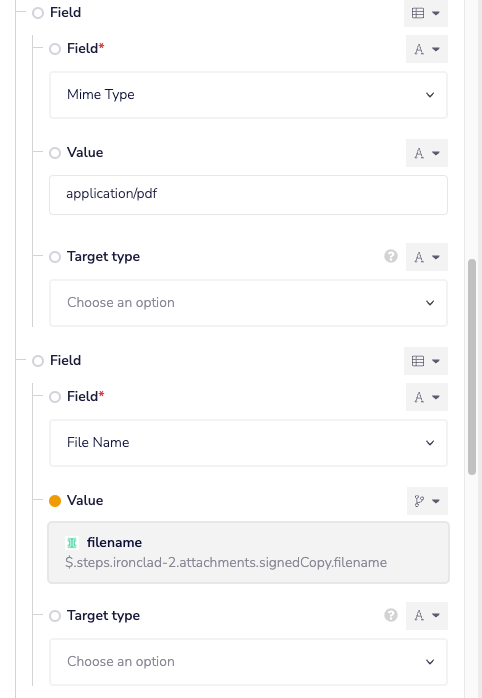
We set the Mime Type to be "application/pdf", to match the type of the document data that was encoded into base64, and set the file name to be the filename from the Ironclad record:
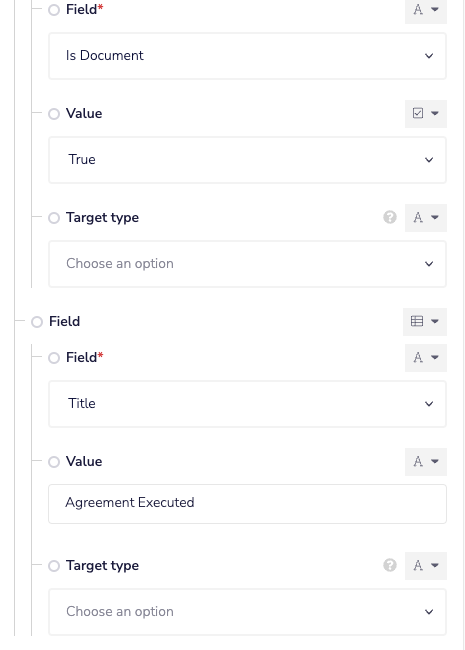
As the final set of fields on this step, we set the Is Document field on the note to true, and we give the note an appropriate Title:
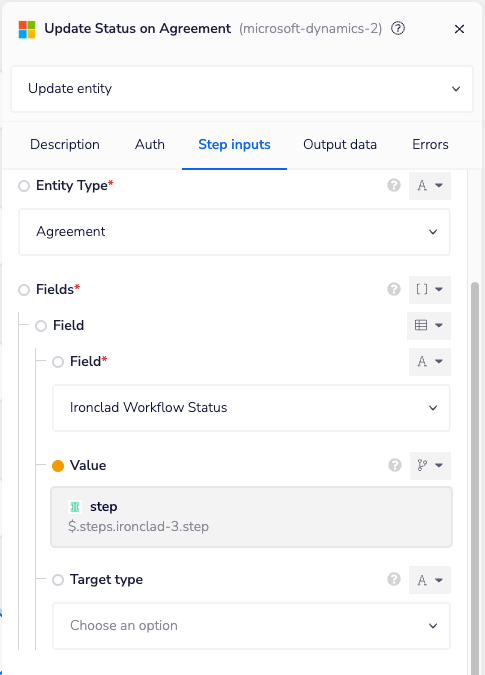
Finally, we use another Dynamics connector step to update the Ironclad Workflow Status field on the Agreement to indicate the new status of the workflow:
Here is the completed Tray.io flow once all of the steps above have been configured:
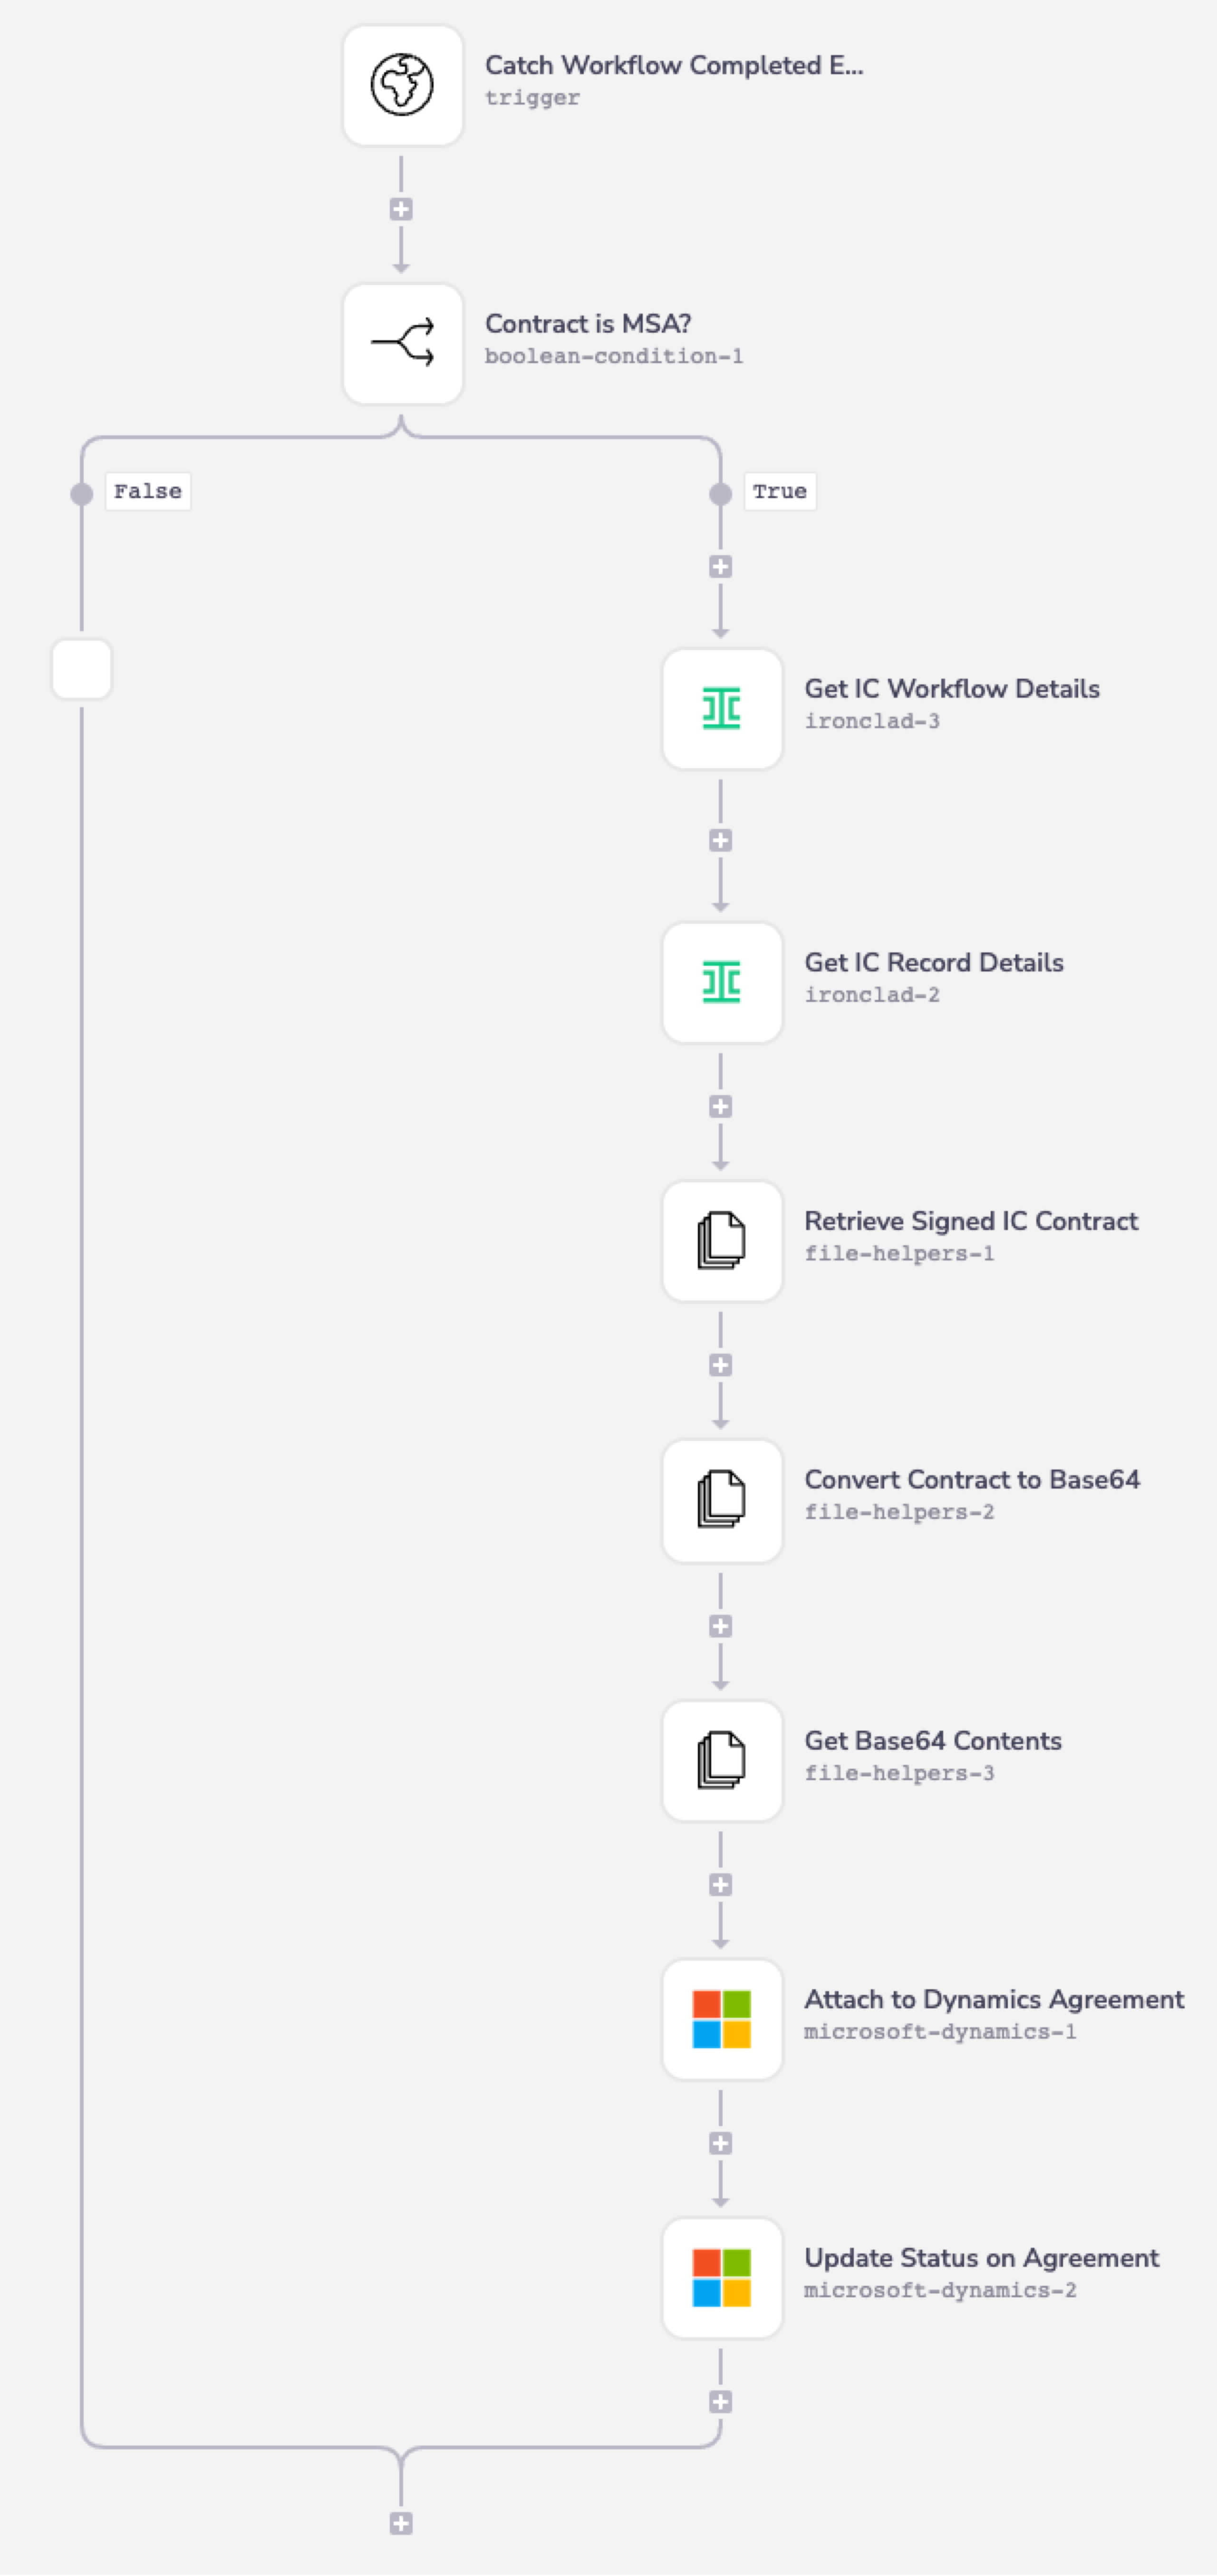
With our final flow in place, we can continue our previous example and see the Agreement being updated with final contract details. Once the Ironclad workflow is fully approved and all required signatures are collected, the contract is archived in the repository:
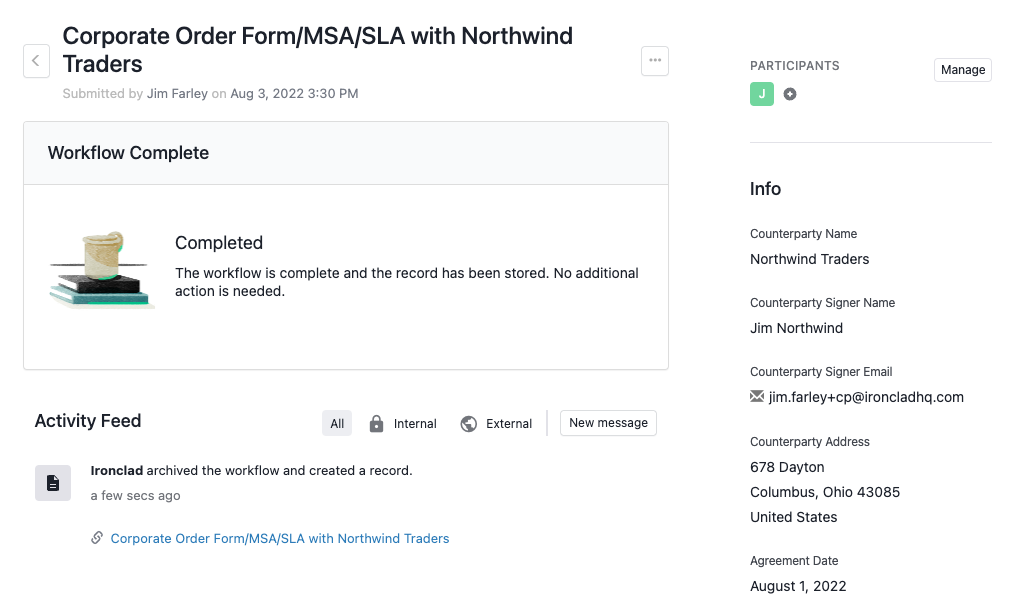
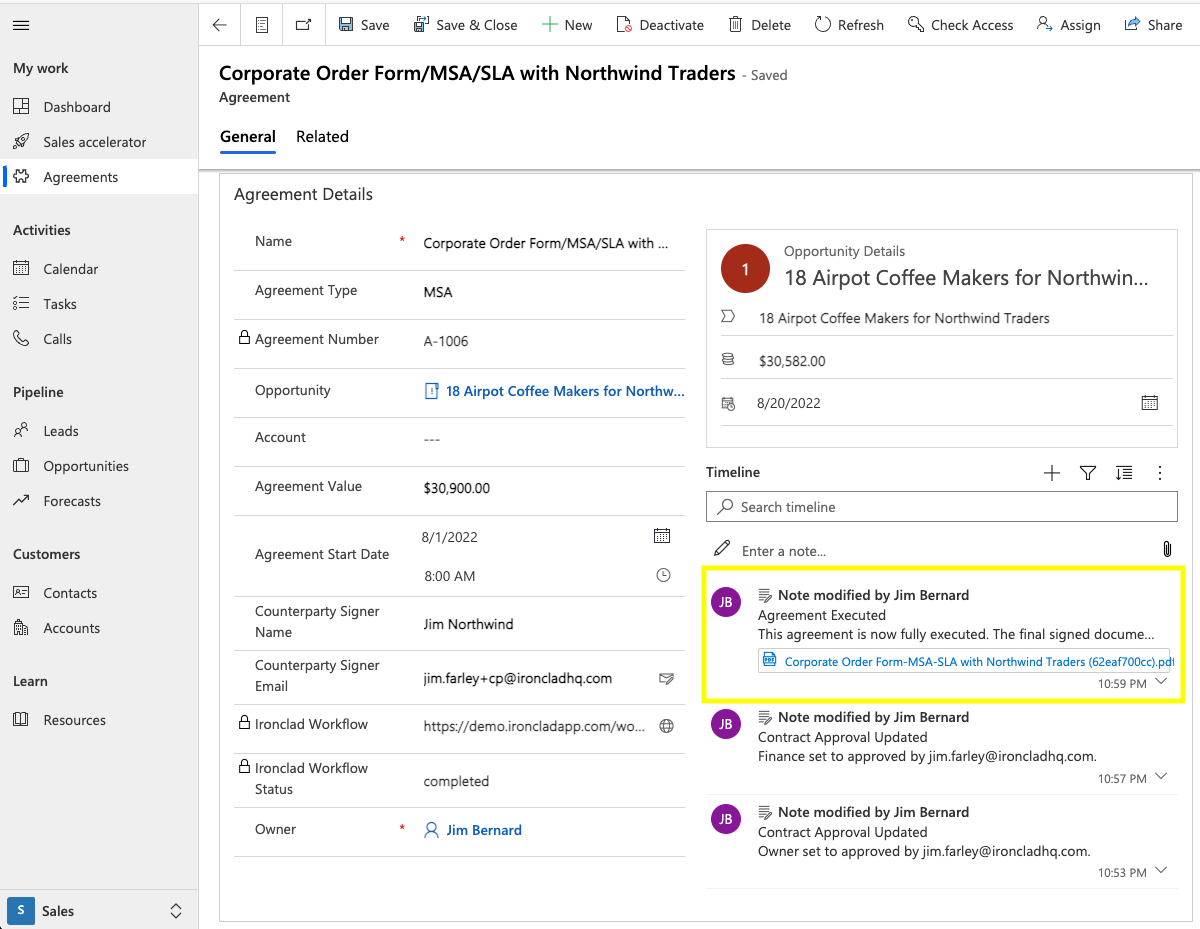
Ironclad will fire a workflow_completed event for the workflow, which will trigger our flow. The template ID of the workflow will match the target template, and the flow will progress to retrieve the workflow and record details, convert the signed document, and attach it to the Agreement record:
Updated 3 months ago
