Launch Ironclad Workflow from Jira
Goal
Allow users to submit an Ironclad workflow in Jira and associate the Ironclad workflow with the Jira issue.
Overview
This solution pattern (1) enables Jira users to launch Ironclad workflows and (2) associates the new Ironclad workflow with the Jira issue. Workflows are associated with Jira issues by updating the issue with the workflow’s URL and ID and by posting comments in Jira's and Ironclad's respective activity feeds.
Details
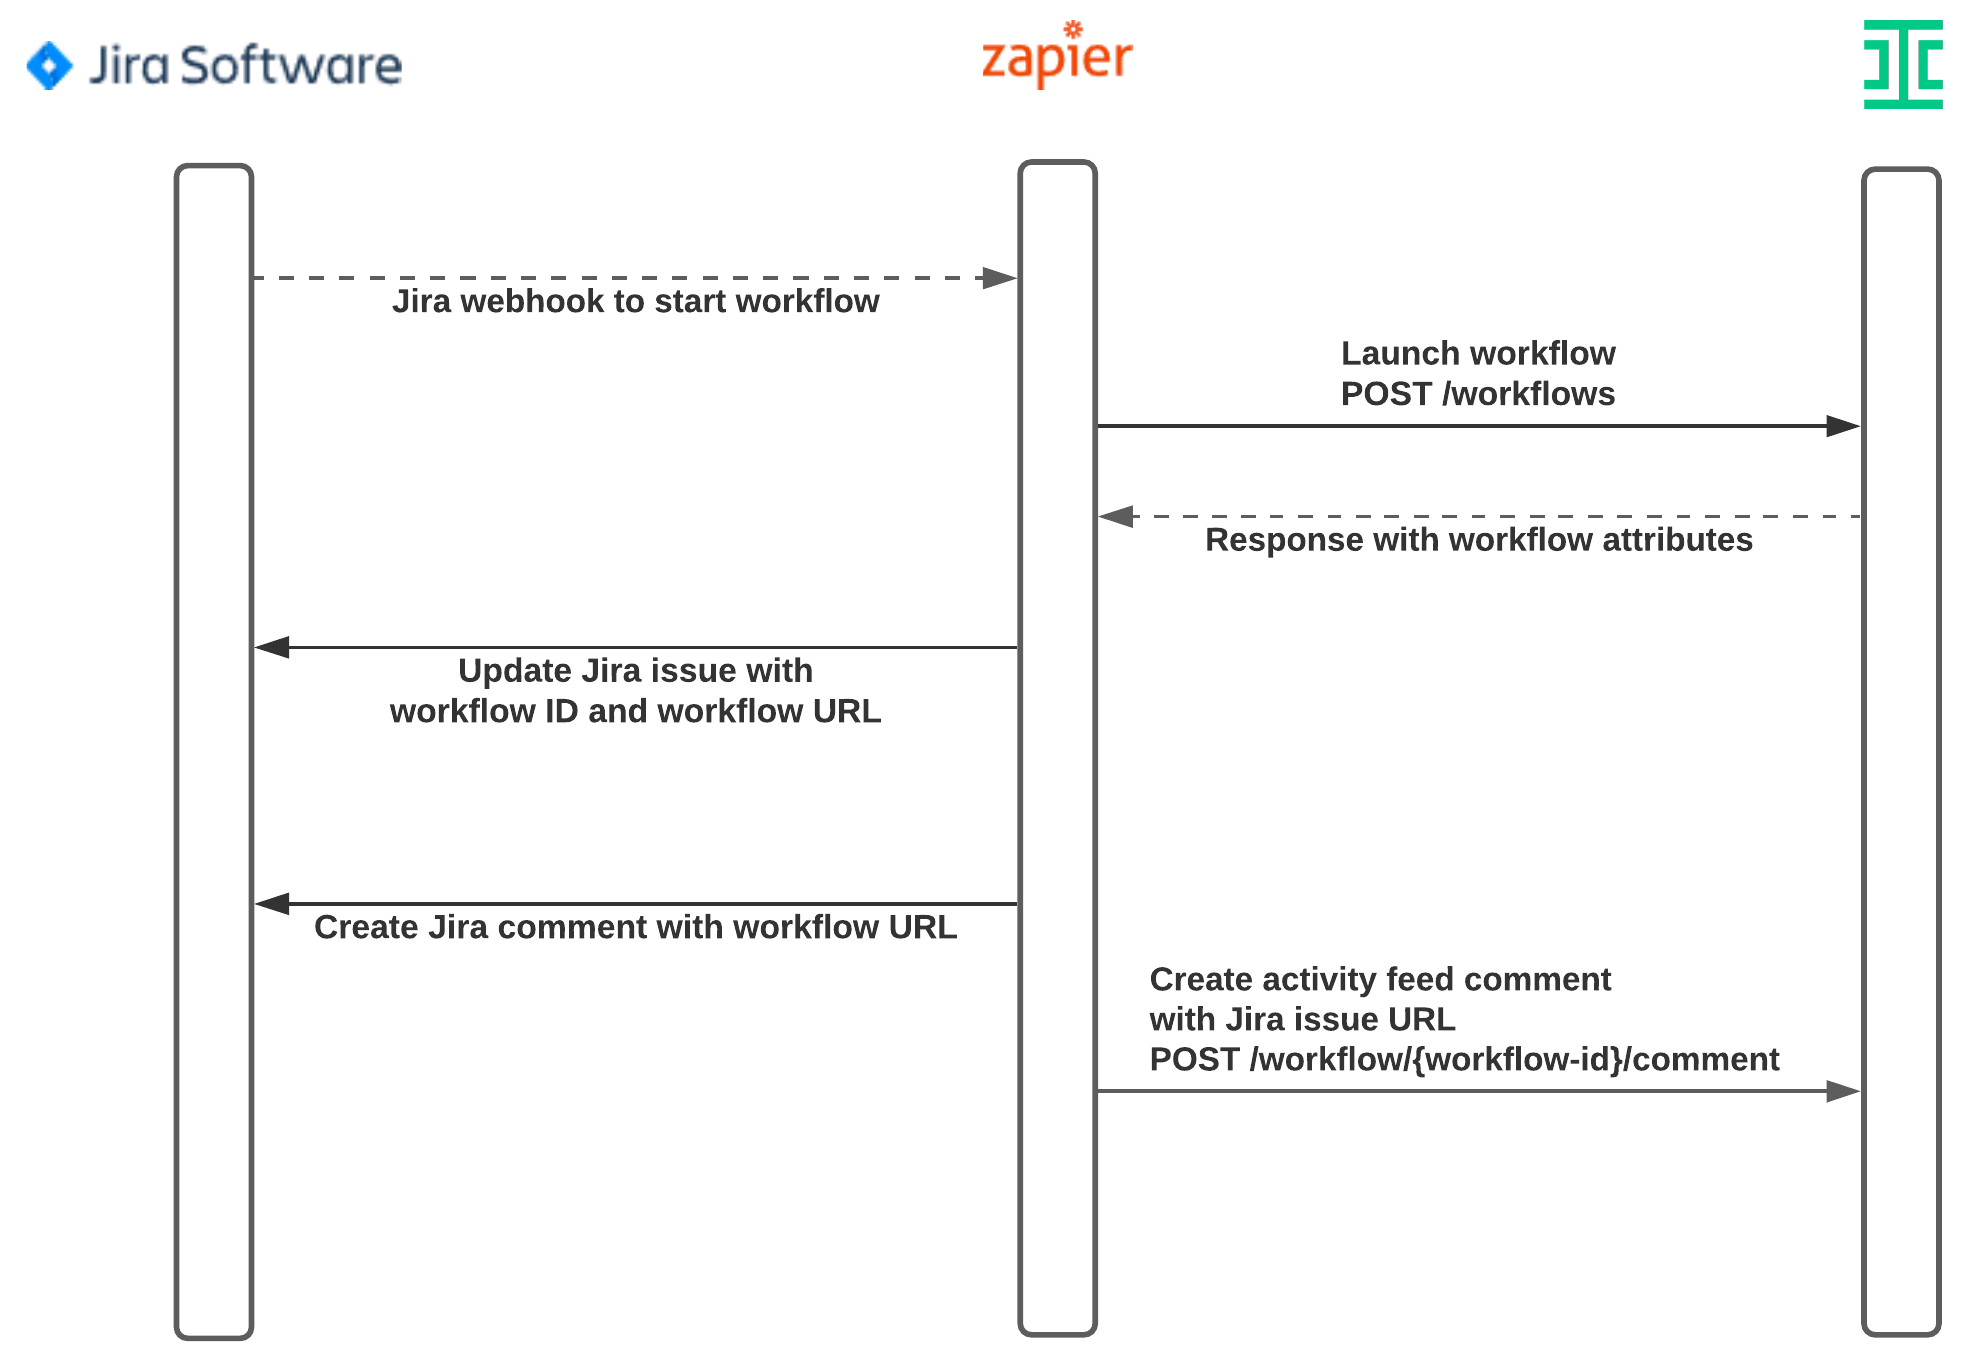
This solution pattern will show how to configure a custom webhook in Jira that triggers a Zapier process to then launch an Ironclad contract workflow. The Zapier process that receives the webhook follows a rule that runs through these steps:
-
Launching an Ironclad workflow using the underlying Create a Workflow Synchronously endpoint. For a more comprehensive walkthrough of the endpoint, including complex data payloads and limitations, see the Launch a Workflow guide.
-
Updating the Jira issue with the workflow’s information.
-
Posting a comment in the Jira issue to confirm successful launch for user awareness.
-
Posting a comment in the Ironclad workflow’s activity feed with a link to the Jira issue for user awareness.
The following figure shows the steps that will be part of the Zapier rule. We'll now walk through the steps to configure this rule and make the necessary configuration changes in Jira and Ironclad.
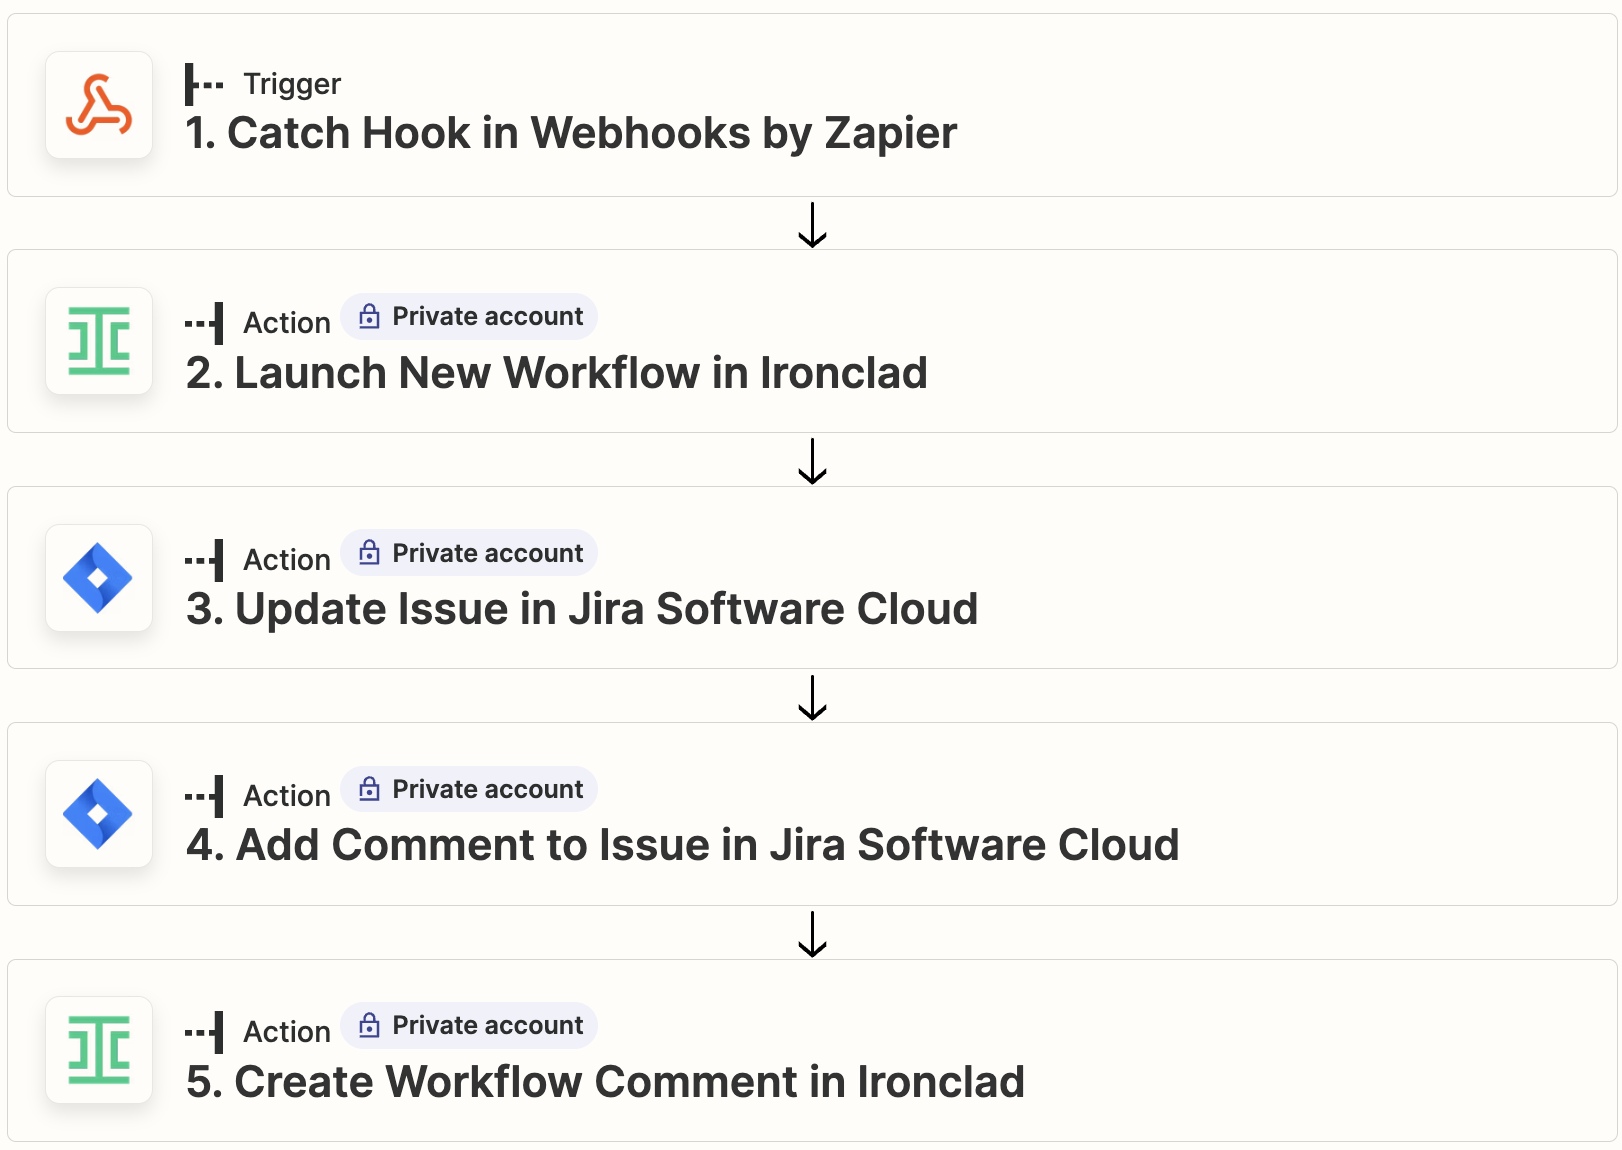
Zapier rule overview.
Configure Ironclad Workflow Fields
-
In Ironclad, prepare a workflow that includes three text fields in the launch form: (1)
Counterparty Name(included out-of-the-box), (2)Jira Issue ID, and (3)Cost Center; these fields will be used to demonstrate how to pass data from Jira to Ironclad and also store the Jira issue’s unique ID so it can be referenced for later use.You may add any other fields that you wish to populate with Jira information. For simplicity, we strongly recommend starting with the minimum number of fields (e.g.,
Counterparty Name,Jira Issue ID, andCost Centerfields) to verify that the integration works and adding additional fields afterwards.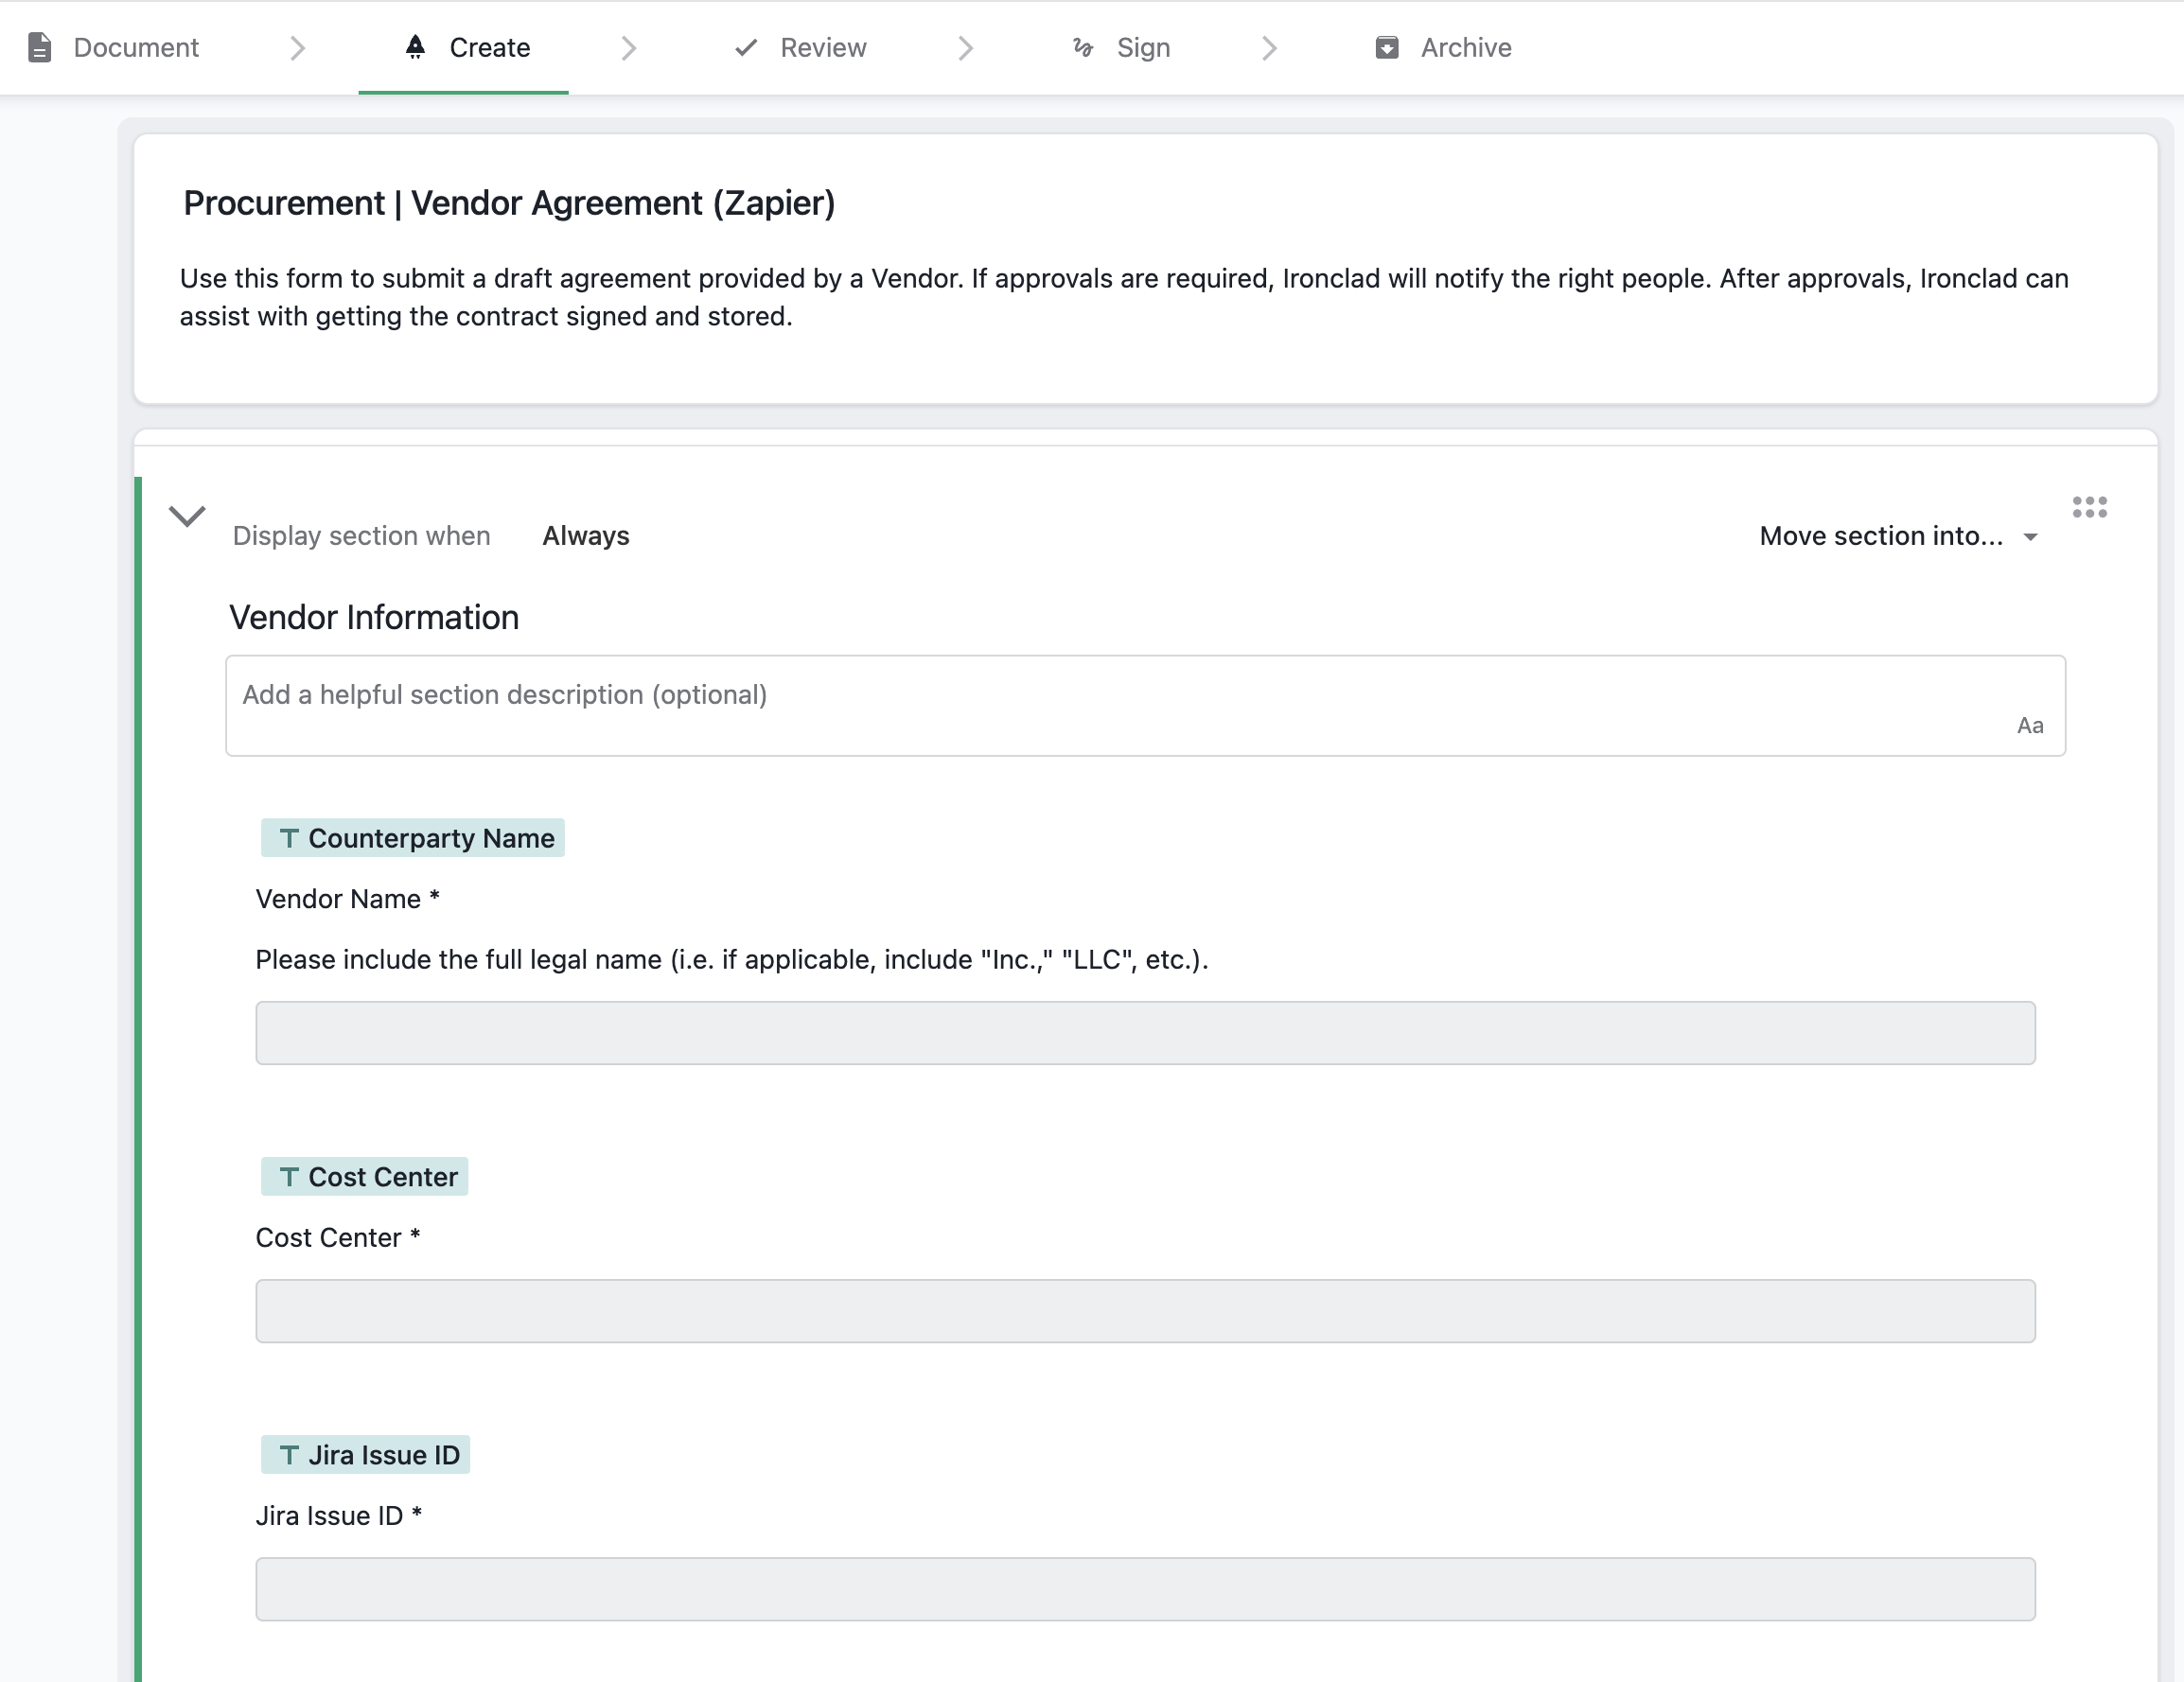
Ironclad workflow launch form.
- In Ironclad, review the launch form and identify any required fields whose data cannot be supplied by Jira.
- Workflows created via API are automatically submitted; users do not fill in the launch form. As a result, any required fields on the launch form must be included in the API request.
- Note that internal user dropdowns are not supported in the Launch API at this time. Consider either (1) configuring any internal signer fields to use a group with a default user and updating the signer during the sign step when necessary or (2) moving the field to an internal form. See the Launch a Workflow guide for a comprehensive walkthrough of the endpoint, including complex data payloads and limitations.
- Convert any required fields whose information cannot be supplied to (1) optional fields or (2) internal form fields . Note: The Ironclad connector's launch workflow action treats all launch form fields as required at this time (including optional fields). Ironclad's underlying API does not have this restriction; you may wish to use a raw Zapier webhook request if you need to support an optional field. 3. In Ironclad, publish the workflow after completing the preceding steps.
- Convert any required fields whose information cannot be supplied to (1) optional fields or (2) internal form fields . Note: The Ironclad connector's launch workflow action treats all launch form fields as required at this time (including optional fields). Ironclad's underlying API does not have this restriction; you may wish to use a raw Zapier webhook request if you need to support an optional field. 3. In Ironclad, publish the workflow after completing the preceding steps.
- Note that internal user dropdowns are not supported in the Launch API at this time. Consider either (1) configuring any internal signer fields to use a group with a default user and updating the signer during the sign step when necessary or (2) moving the field to an internal form. See the Launch a Workflow guide for a comprehensive walkthrough of the endpoint, including complex data payloads and limitations.
- Workflows created via API are automatically submitted; users do not fill in the launch form. As a result, any required fields on the launch form must be included in the API request.
- In Ironclad, review the launch form and identify any required fields whose data cannot be supplied by Jira.
Configure Jira Issue Fields
- In Jira, modify your issue to include the following text fields.
Vendor NameCost CenterContract Requestor EmailIronclad Workflow IDIronclad Workflow URLIronclad Record IDIronclad Record URLContract Requestor Emailwill be required to launch the Ironclad workflow and the remaining fields will be used to store Ironclad data.
- In Jira, create an automation rule to populate
Contract Requestor Emailusing the reporter's information.-
Click the Gear icon (
 ) > System Settings > Automation Rules.
 -
Click Create Rule and select Issue Created as the trigger.
- Name the rule
Add Contract Requestor Email. - Add an Edit Issue action. Select Contract Requestor Email as the Jira field to update and enter
{{issue.reporter.emailAddress}}as the value. - Enable and test the rule by creating a new issue to verify that
Contract Requestor Emailis populated.
Contract Requestor EmailPlease consider your company’s policy on allowing access to user email information. Jira limits availability of user information in its API. Creating a custom Jira field to populate it with the user’s email enables access to the information.
- Name the rule
-
Zapier - Configure Trigger
This section will configure a trigger to start our Zapier flow. We will create a webhook in Jira that will be sent after specific conditions are met in Jira. Our Zap will have a trigger that listens for the Jira webhook. This approach is used to illustrate the flexibility you have in determining when to launch an Ironclad workflow. If you have simple starting conditions, consider exploring the Jira triggers in Zapier which include triggers that start on issue creation.
-
In Zapier, create a new Zap. Add a Webhook trigger and select Catch Hook as the action event. Click Continue and copy the webhook URL generated by Zapier.
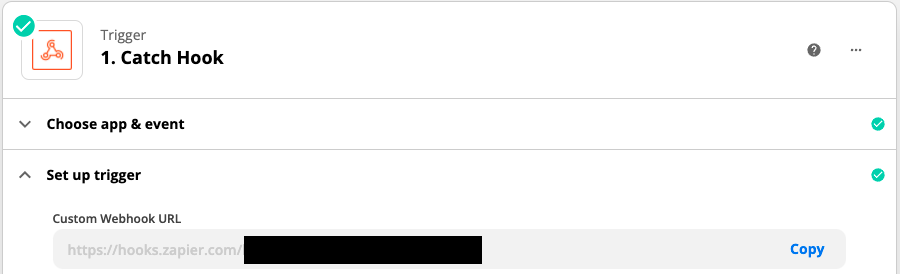
Zapier trigger for catching webhook.
-
In Jira, register a webhook that targets the Zapier URL from the preceding step.
-
Click the Gear icon > System Settings > Webhooks > Create a Webhook.
-
Customize the webhook to send only when the Jira issue moves to the right step in your process.
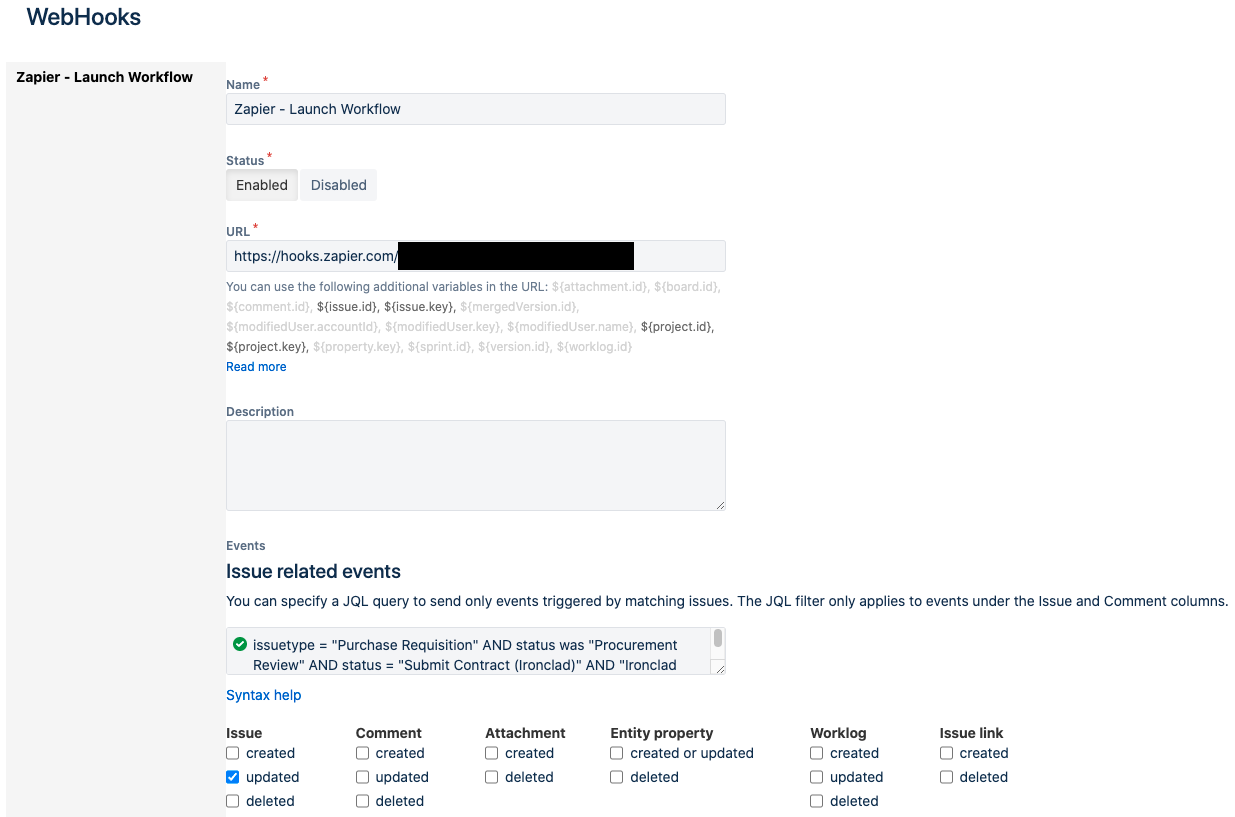
This example triggers a webhook when there is a Jira update involving (1) a particular issue type, (2) an appropriate issue status transition, and (3) empty key fields. Condition (3) mitigates the possibility of Jira issues cycling between statuses and continually triggering workflows.
-
-
In Jira & Zapier, test the webhook by triggering the webhook in Jira and clicking Test Trigger in Zapier to verify that the webhook has been received. Ensure that the Jira issue you use for your test includes data in the
Vendor Name,Cost Center, andContract Requestor Emailfields; they will be used in the next section to map Jira fields to Ironclad fields.
Zapier - Configure Workflow Launch
We are now ready to launch an Ironclad workflow with the Jira data we received from the section above.
- In Zapier, add an Ironclad action and select Launch New Workflow as the event. Link your Ironclad environment by following the instructions to create an OAuth 2.0 client application. This action will send a request to the Create a Workflow Synchronously endpoint to start a workflow.
- For Workflow Schema, select the workflow design that you wish to launch.
- Map Jira data to the Ironclad fields.
-
For Email, select the Jira field containing the
Contract Requestor Emaildata. Reminder: The contract requestor must have an Ironclad user account and the Start Workflow permission for the workflow you wish to launch on their behalf. -
For Vendor Name and Cost Center, select the
Vendor NameandCost CenterJira fields. -
For Jira Issue ID, select the
Issue Keyfield.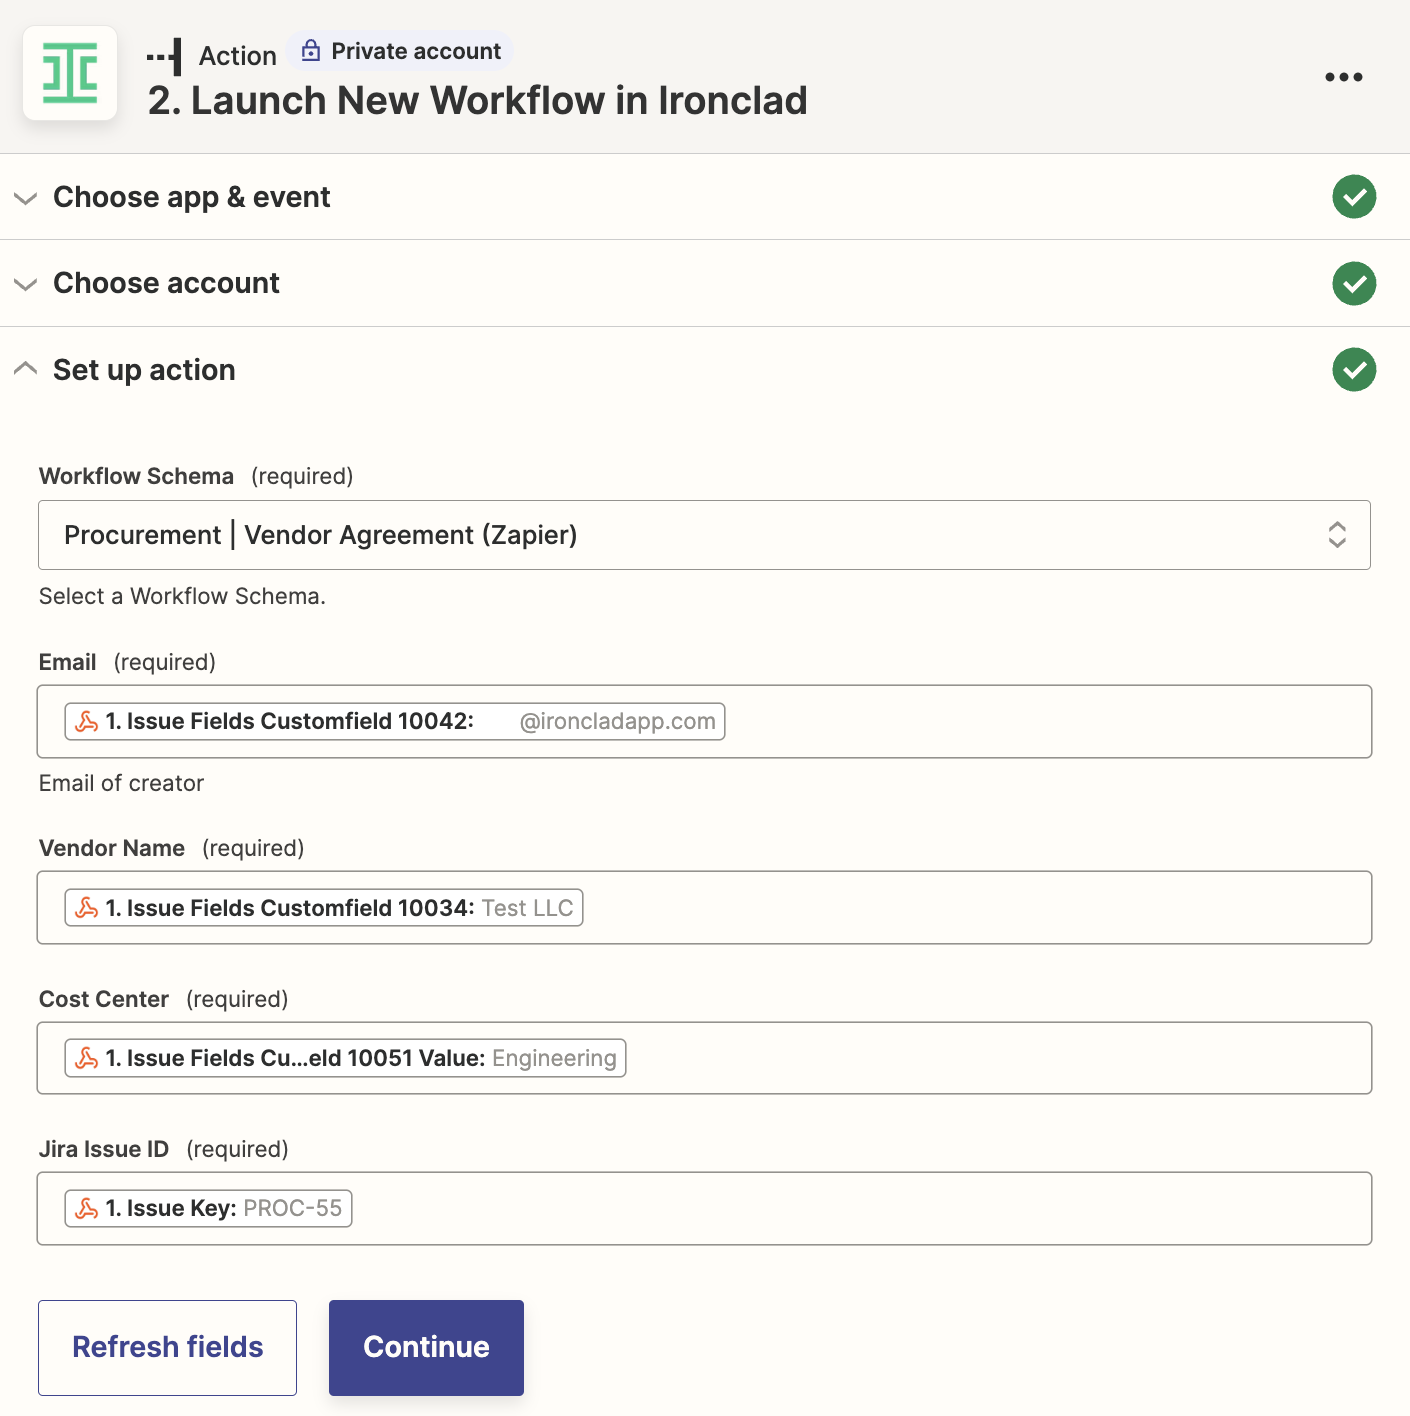
Launch Ironclad workflow configuration.
-
Zapier - Configure Jira Issue Update
It is important to store the Ironclad workflow ID after launch in Jira so it can be used by later integration steps and users. This step will update Jira with that information.
- In Zapier, add an Update Issue in Jira Software Cloud action.
-
Click Set Up Action > Issue (field) > Custom (tab). Select an issue.
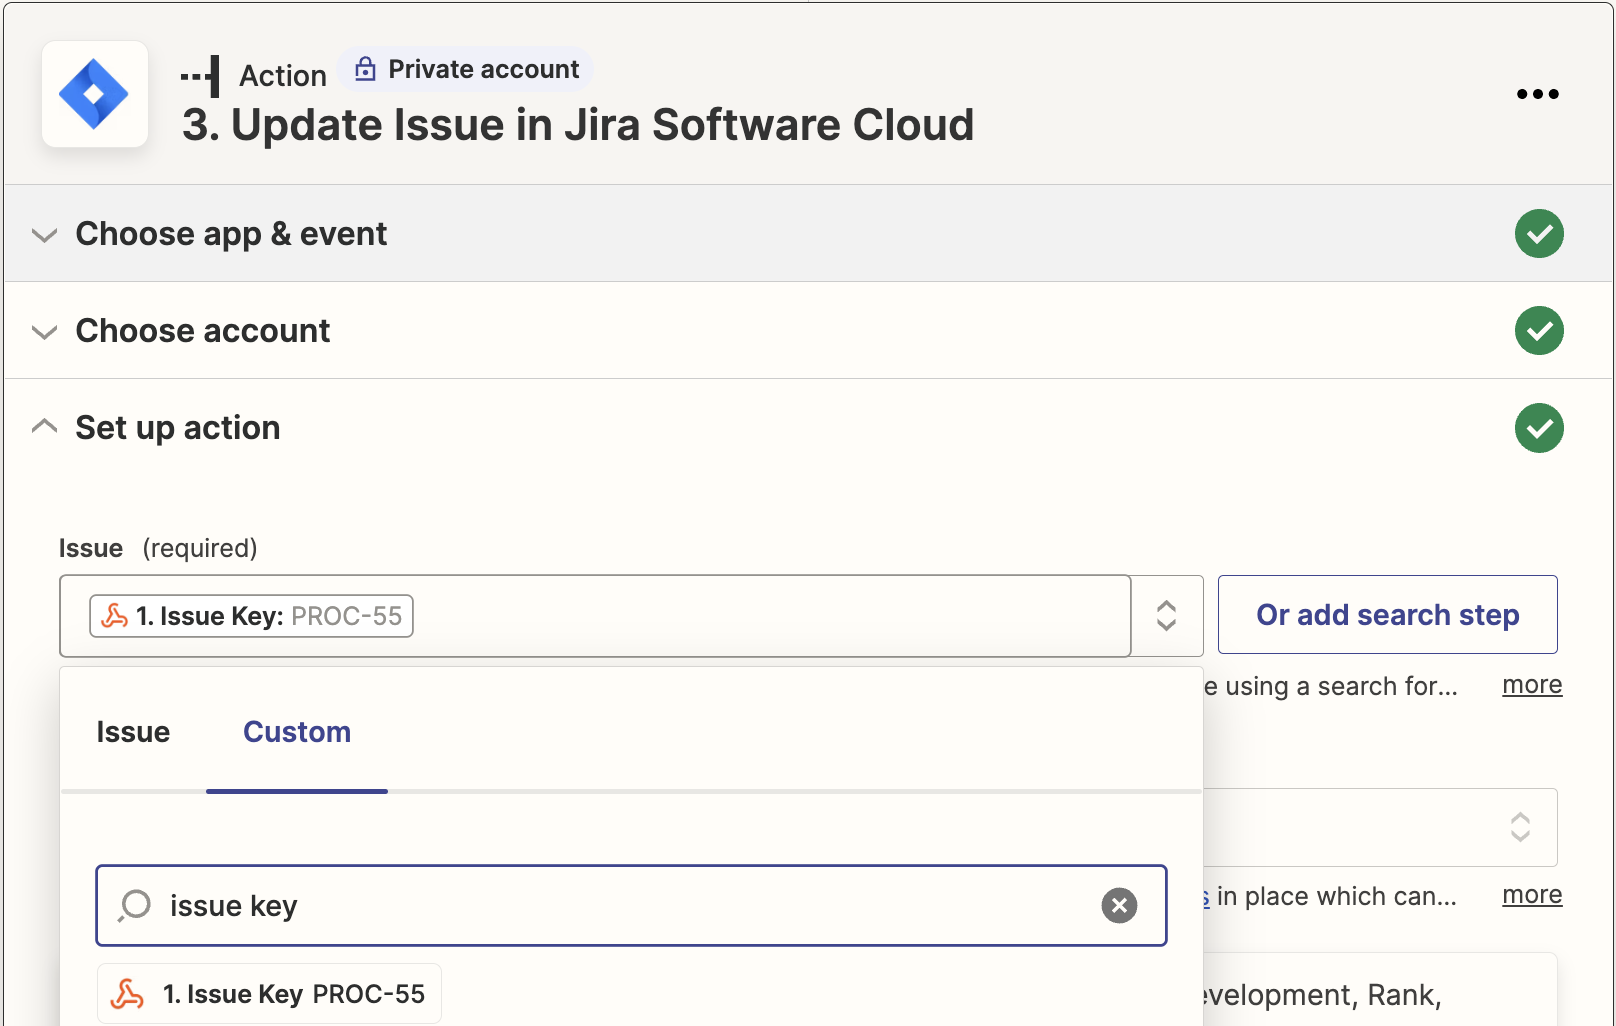
Select the attribute that holds the Jira issue ID.
-
Configure the Jira field updates.
-
For Ironclad Workflow URL and Ironclad Workflow Id, use the
IDfield from the response to the Launch New Workflow action. -
For Reporter, select the
Reporter Account Idfield from the trigger data. -
Update any other Jira fields as desired.
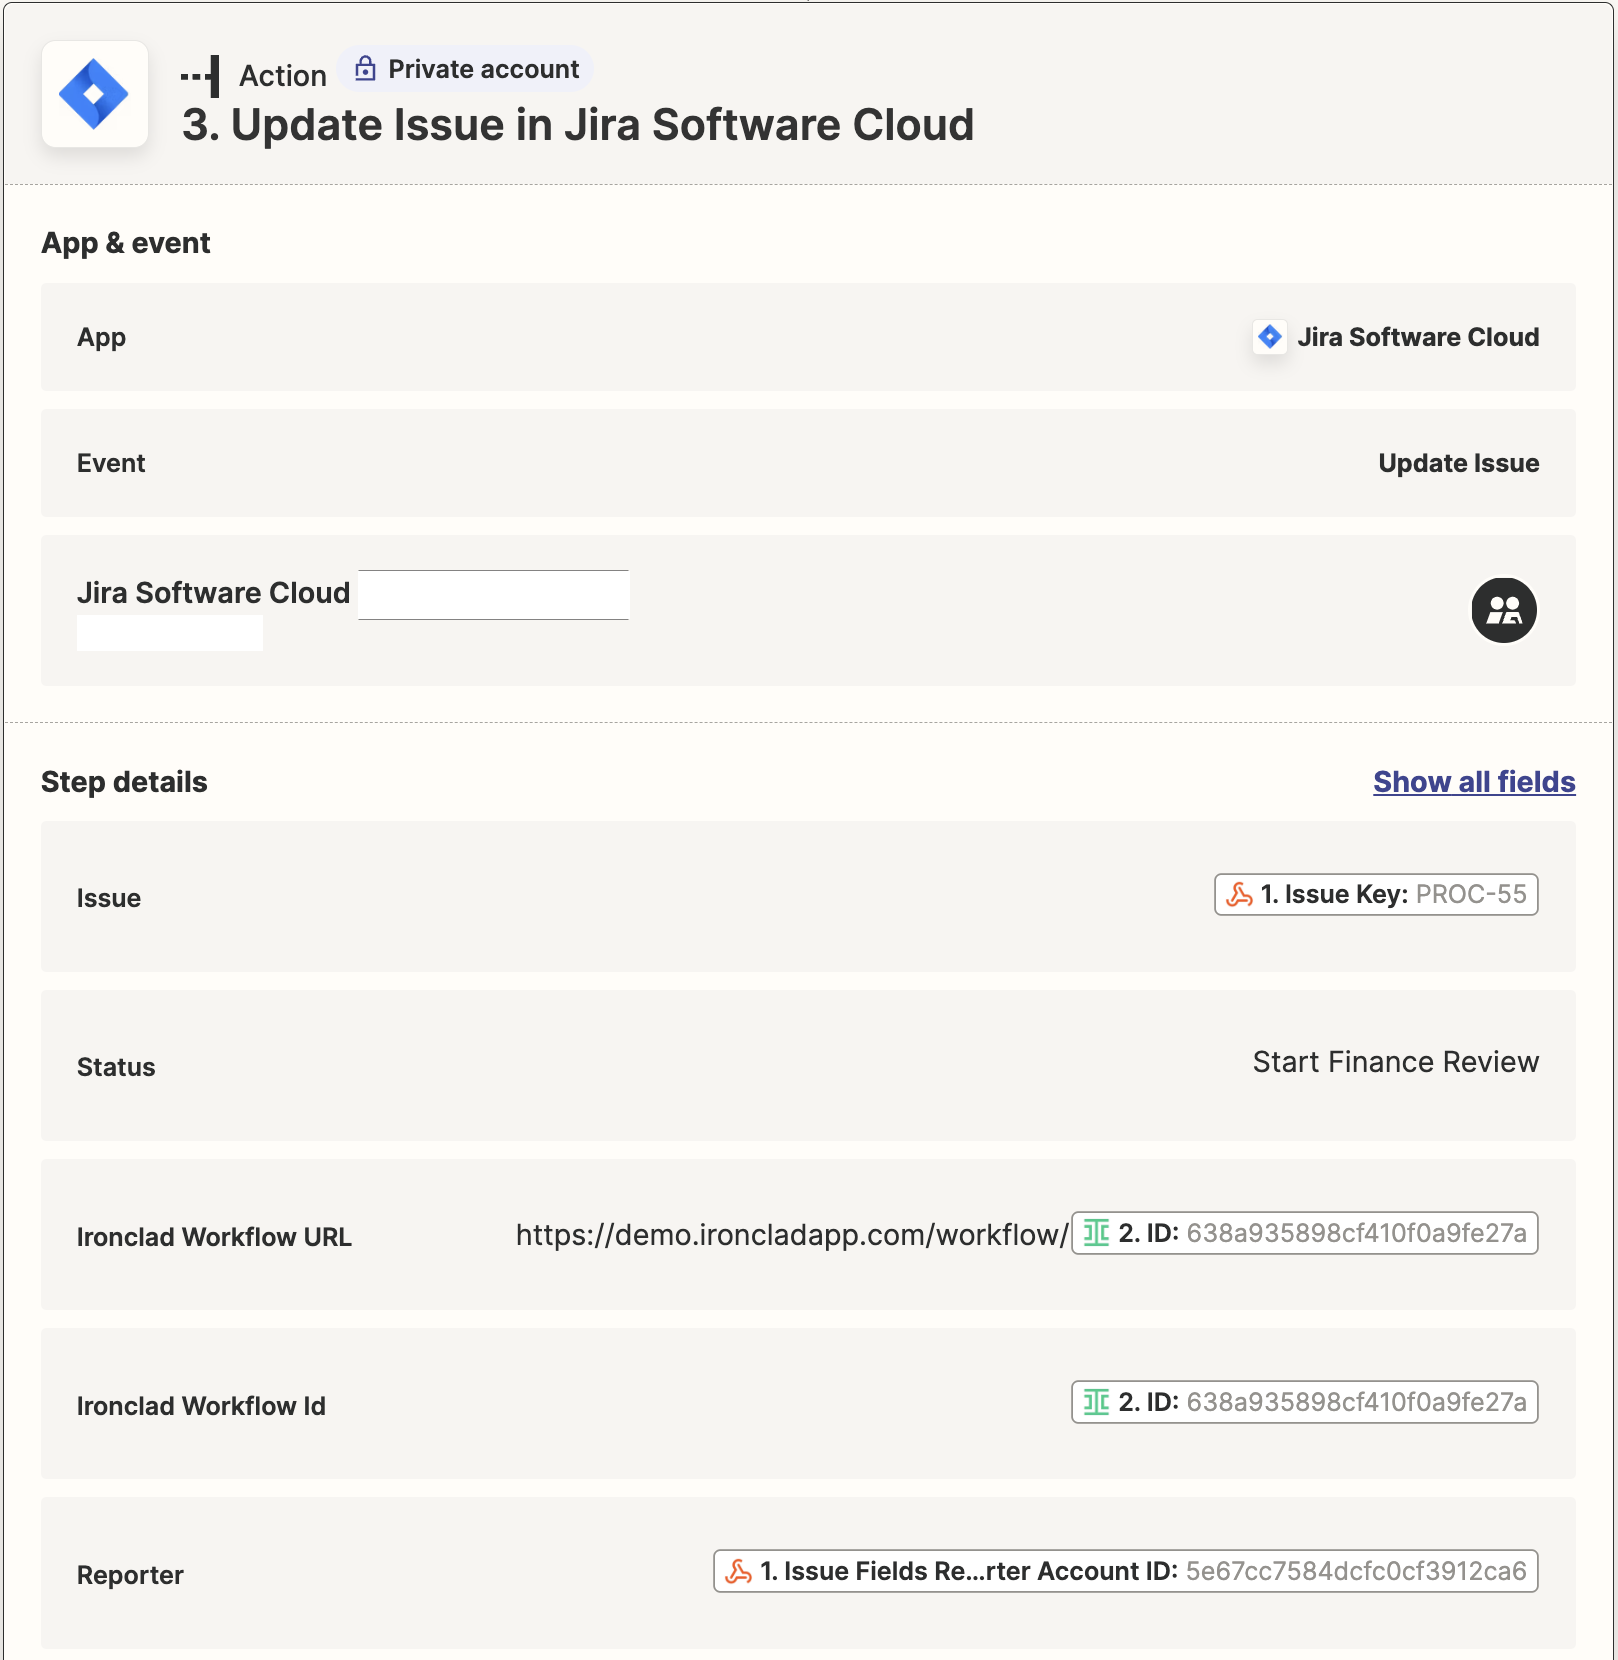
Add Jira field updates.
-
-
Click Continue to save the configuration.
-
Zapier - Configure Jira and Ironclad Comments
-
In Zapier, add an Add Comment to Jira Issue action to let users know that the Zapier automation has run. For Issue, select the
Issue Keyprovided by the trigger.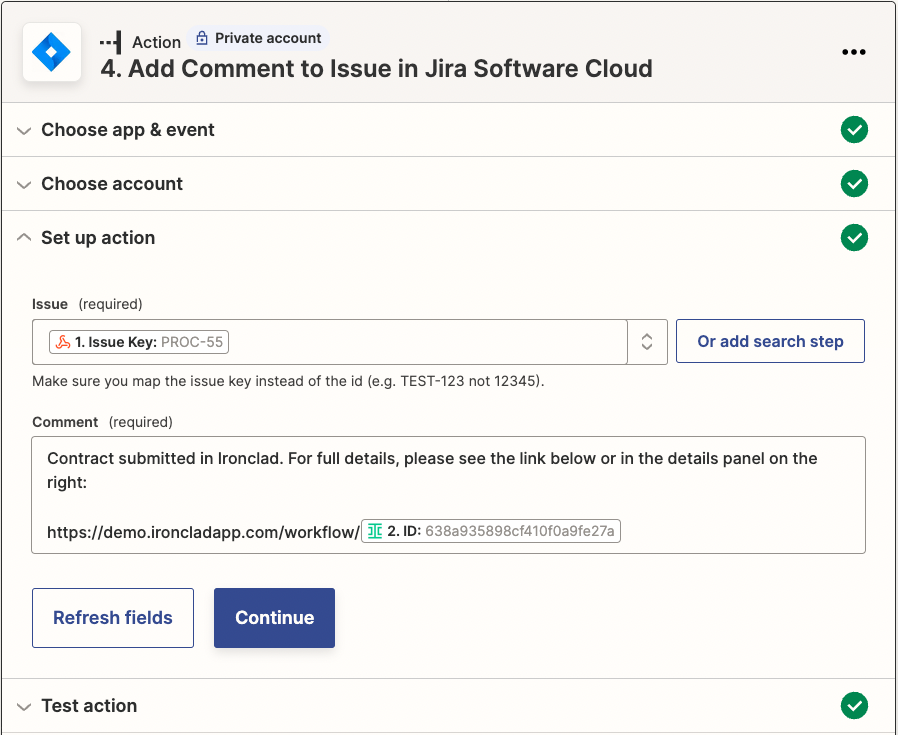
Add comment to Jira issue.
-
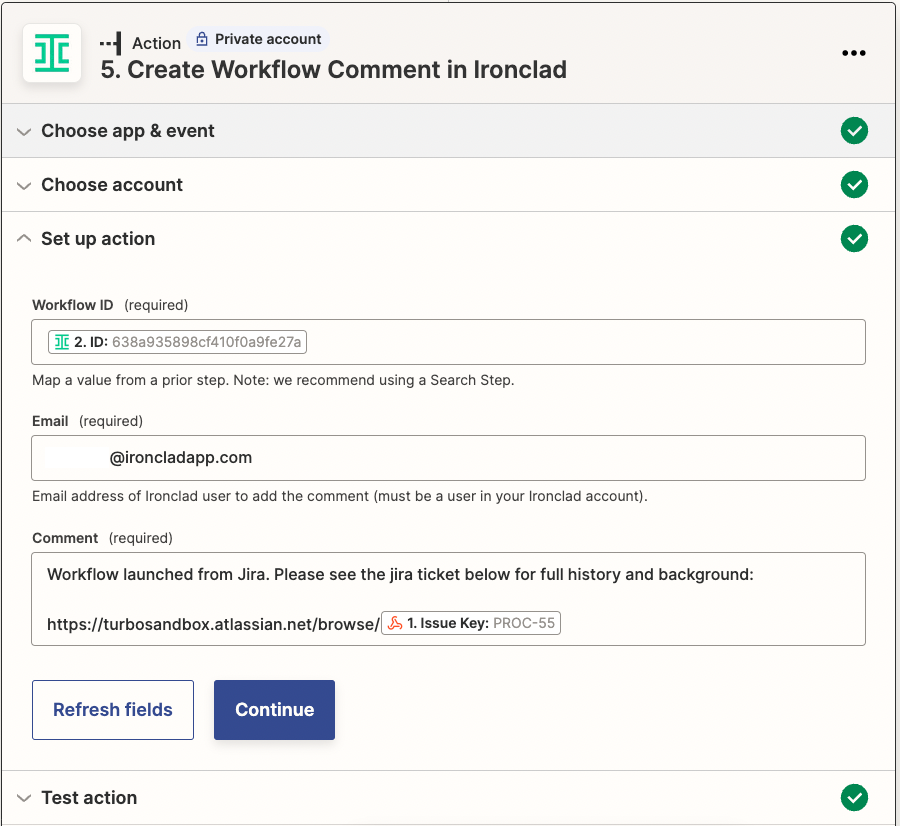
In Zapier, add an Ironclad action and select Create Workflow Comment in Ironclad as the action event. The action will target the Create a Comment on a Workflow endpoint to add an activity feed comment to the Ironclad workflow.
-
For Workflow ID, select the
IDproperty from the response to the Launch New Workflow action. -
For Email, add a valid Ironclad user's email. The user will be attributed as the activity feed commenter so consider using a generic system user in Ironclad.
-
For Comment, add your preferred message such as a link back to the Jira issue for convenience.
Add comment to Ironclad activity feed.
-
-
Publish your Zap. Congratulations, you have a Zap that lets Jira business users start Ironclad workflows!
Updated 24 days ago