Update Jira after Ironclad Approval (Automation Rule)
Goal
Update a Jira issue after an approval occurs in Ironclad.
Overview
This solution pattern provides a method for updating a Jira issue with approval information from Ironclad. In this example, a Legal team will work and provide its approval in Ironclad. This approval will be reflected in Jira by updating a field on the issue.
Ironclad’s workflow_approval_status_changed webhook will be used to notify Jira of approval events. Jira will filter the webhooks for relevant events, retrieve information from Ironclad, and update the Jira issue. The following figure shows the API request flow between Jira and Ironclad.
Prerequisite: The Launch Ironclad Workflow from Jira (Automation Rule) solution pattern must be completed before configuring this solution pattern. That solution pattern stored key Jira information (Jira Issue ID) in the Ironclad workflow and key Ironclad workflow data (Ironclad Workflow ID) in the Jira issue.
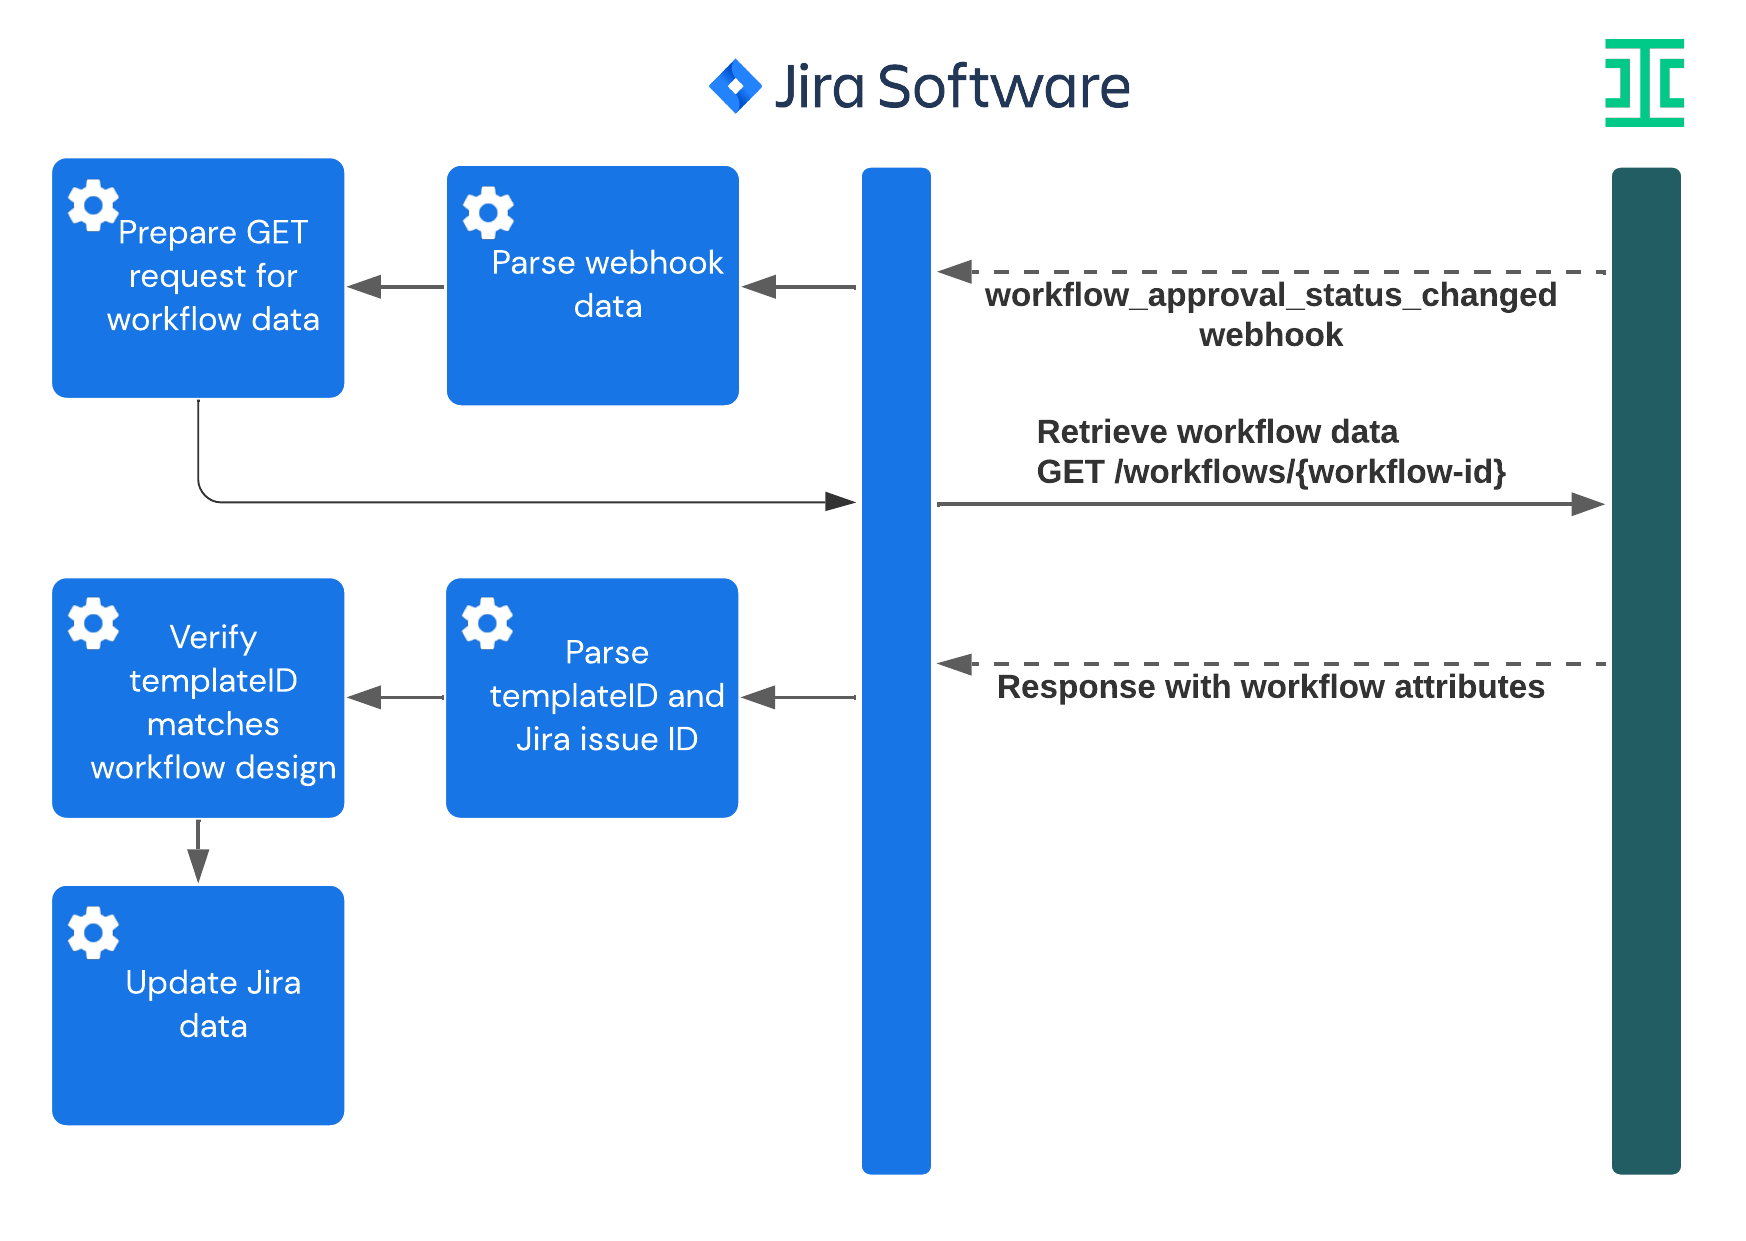
API Request Flow
Details
The following figure shows the components in the Jira automation rule:
- Listening for the Ironclad
workflow_approval_status_changedwebhook. - Sending a request to retrieve the Ironclad workflow's information.
- Updating the Jira issue.

Jira Automation Rule
Configure Ironclad Workflow
- In Ironclad, create an approver that represents the Legal approver if it does not already exist. Name the approver
Legal. Step five will filter for this value so it must be an exact match. If you rename it, be sure to rename the approver value that is filtered for in step five.- Click Workflow Designer > Review > Add approver or Add next approver.
- Enter
Legalas the approver name in place ofNew Approver. - Select a group that you wish to use as the approver.
- Click publish to save and deploy your changes.

Configure Jira Issue
- In Jira, add
Legal Approvalas a dropdown field with (1)pendingandapprovedas options and (2)pendingselected as the default. The Jira automation rule will update this field.

Jira Automation - Configure Trigger
- In Jira, create a new automation rule and configure the trigger.
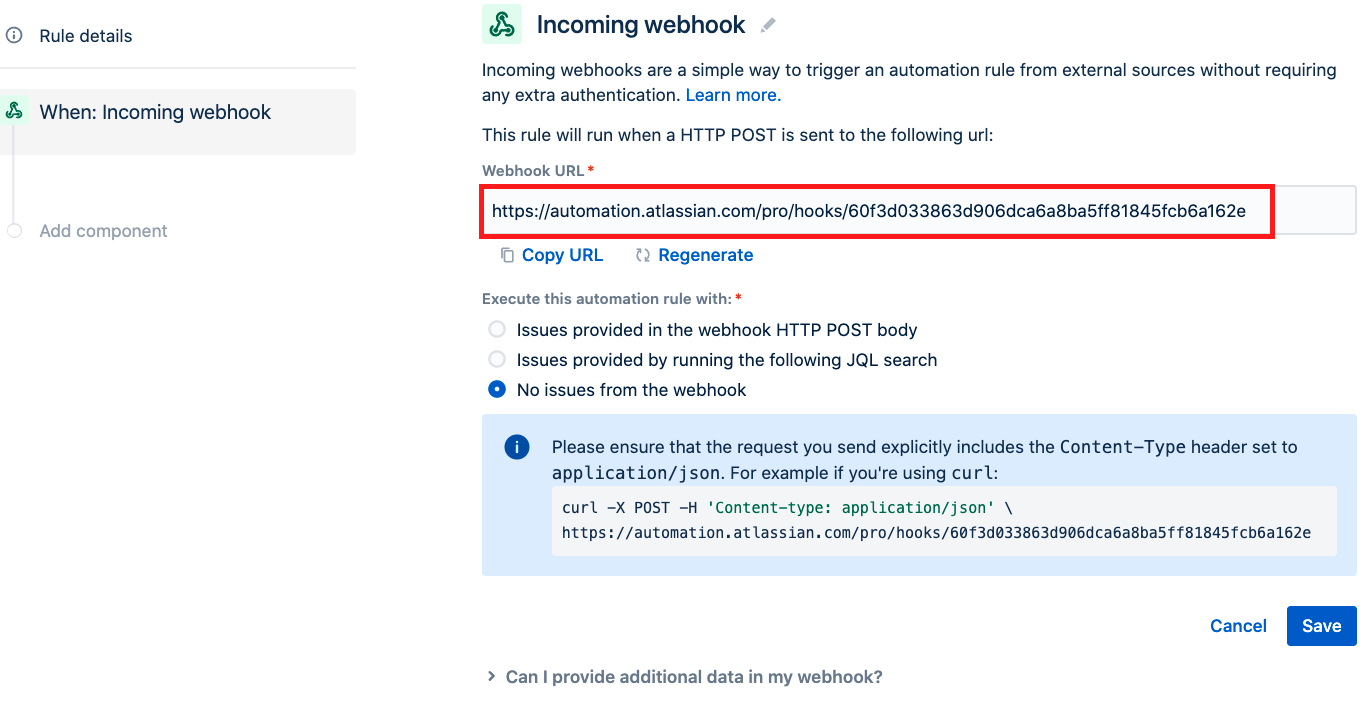
- Click Create Rule and select Incoming Webhook as the trigger. This component will receive the
workflow_approval_status_changedwebhooks from Ironclad. - Copy the Webhook URL for use in step four.
- Name the rule (e.g.,
3. Ironclad Workflow Approval (Legal) - Update Jira Data).
- Click Create Rule and select Incoming Webhook as the trigger. This component will receive the
Ironclad - Configure Webhook
- In Ironclad, create a
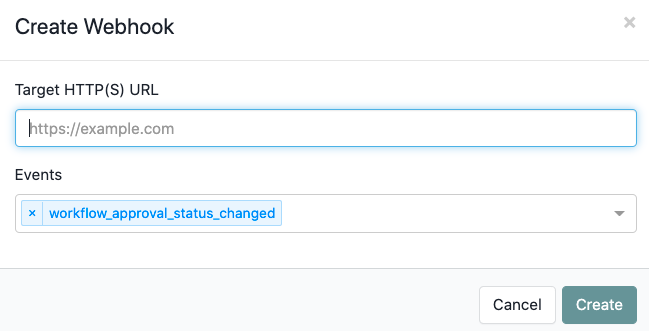
workflow_approval_status_changedwebhook using the Jira webhook URL.- Click ] > Company> Company Settings > API > Webhooks > Create Webhook.
- Paste in the Jira webhook URL from the Jira automation rule you just created, and select the
workflow_approval_status_changedwebhook. - Click Create to save and activate the webhook.
Additional Ironclad WebhooksThis solution pattern updates Jira after an Ironclad approval. Ironclad has other webhooks, including a
workflow_completedwebhook, that can be used to trigger update processes when workflows are completed.See Webhook Event Types for a list of webhooks or the Update Jira after Ironclad Workflow Completed guide for an example using Zapier.
Jira Automation - Filter for Relevant Webhooks
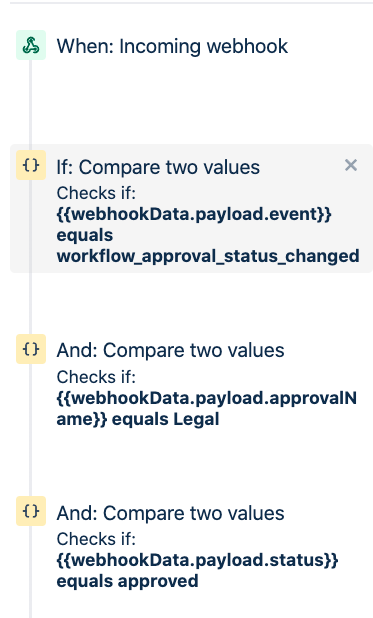
- In Jira, return to the Jira automation rule you started. Create the three conditions that follow to filter for webhooks from a relevant approval. For each condition, add a new component and select New Condition > Advanced compare condition.
- Create a condition to check that the webhook is for an approval status change. Enter
{{webhookData.payload.event}}as the first value, select equals as the condition, and enterworkflow_approval_status_changedas the second value for comparison. - Create a condition to check that the approval is from Legal. Enter
{{webhookData.payload.approvalName}}as the first value, select equals as the condition, and enterLegalas the second value for comparison. - Create a condition to check that the approval status has been updated to
approved. Enter{{webhookData.payload.status}}as the first value, select equals as the condition, and enterapprovedas the second value for comparison.
- Create a condition to check that the webhook is for an approval status change. Enter
Ironclad Webhook BehaviorIronclad webhooks are sent for all Ironclad workflows. Relevant webhooks are identified by filtering based on the event type and approval details.
A second level of filtering will be applied in step seven, after retrieving the workflow's template ID, to verify that the relevant workflow type is involved.
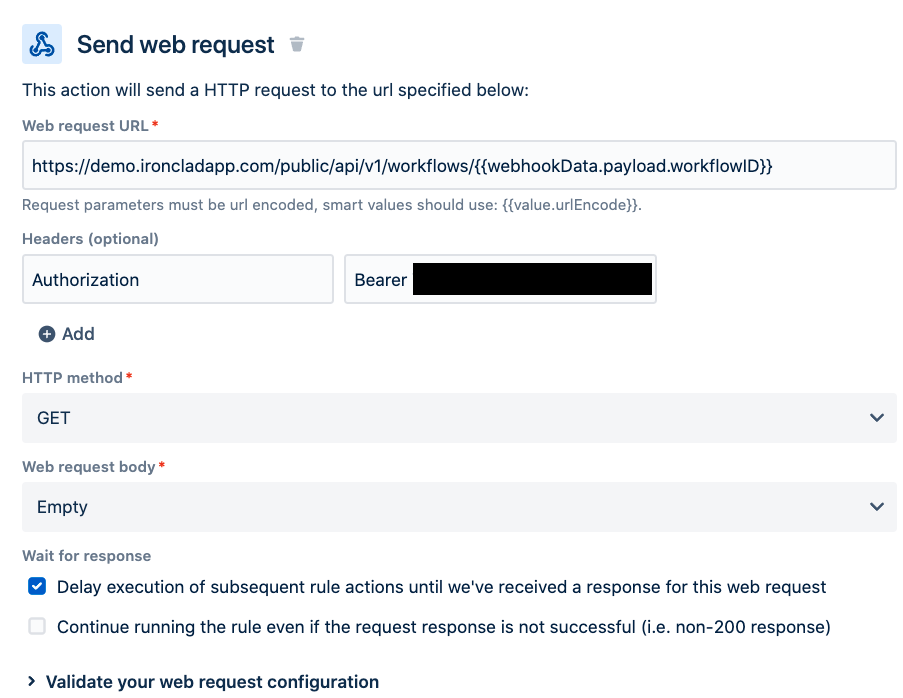
- In Jira, add a Send Web Request component. This component will be used to retrieve the workflow's data for further filtering and processing.
- For URL, enter
https://[YOUR_IRONCLAD_DOMAIN]/public/api/v1/workflows/{{[WORKFLOW_ID]}}to call the endpoint.- Replace AIN] with the domai*** with the domain where you are making the comment (e.g.,
preview.ironcladapp.com, demo.ironcladapp.com, na1.ironcladapp.com). - Replace ith the custo with the custom field ID you created in Jira to store the Ironclad Workflow ID.
- Replace AIN] with the domai*** with the domain where you are making the comment (e.g.,
- For Headers, add an
Authorizationheader. - For HTTP Method, select GET.
- For Web request body, select Empty.
- Check the Delay execution of subsequent rule actions. . . checkbox and click Save.
- For URL, enter
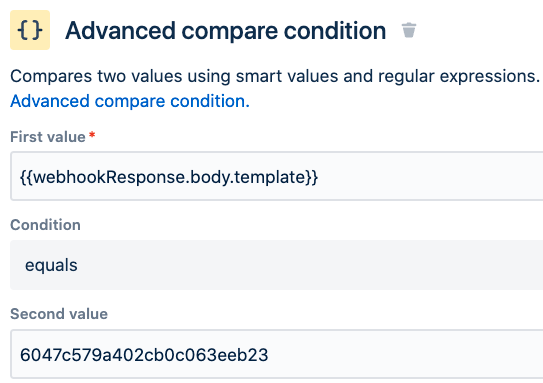
- In Jira, add an Advanced condition compare component. This component will perform one final filter to verify that the inbound event is related to a relevant workflow design.
- Retrieve the template ID of your workflow using the steps outlined in Getting Started - Unique Ids (Workflows).
- In the condition, enter
{{webhookResponse.body.template}}as the first value, select equals as the condition, and enter thetemplate IDyou retrieved as the second value for comparison.
Jira - Update Issue
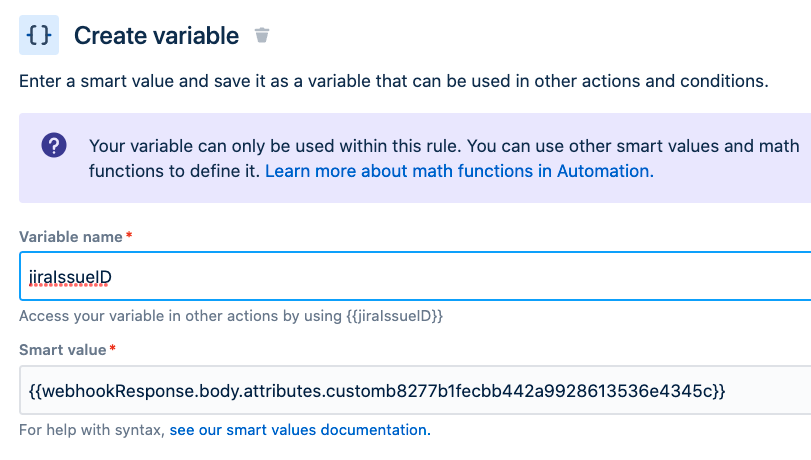
- In Jira, add a Create variable component. We will use this variable to store the Jira issue ID from the Ironclad workflow metadata; it will then be used to find the relevant Jira issue and edit it.
- Locate the Ironclad attribute ID you used to store the Jira issue ID when you launched the workflow. You should be able to retrieve it by looking back at the automation rule you created in the Launch Ironclad Workflow from Jira (Automation Rule) guide.
- Enter
jiraIssueIDas the variable name and{{webhookResponse.body.attributes.[YOUR_WORKFLOW_ATTRIBUTE_ID]}}as the smart value. - Note: Creating a separate variable is technically not required, but it creates a cleaner variable name for later use.
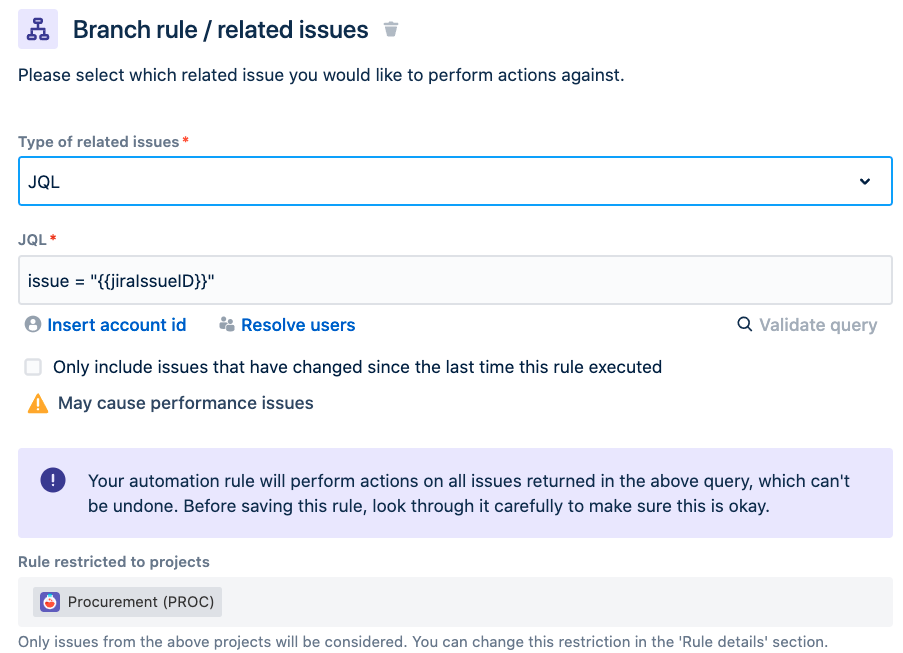
- In Jira, add a For JQL branch component to locate the Jira issue and edit it.
- Click New branch > Branch rule / related issues.
- For Type of related issues, select JQL.
- For JQL, enter the variable you created in the preceding step:
"{{jiraIssueID}}". - Uncheck the checkbox for Only include issues that have changed since the last time this rule executed.
- If relevant, restrict the rule to a specific project to minimize usage.
- Click Save.
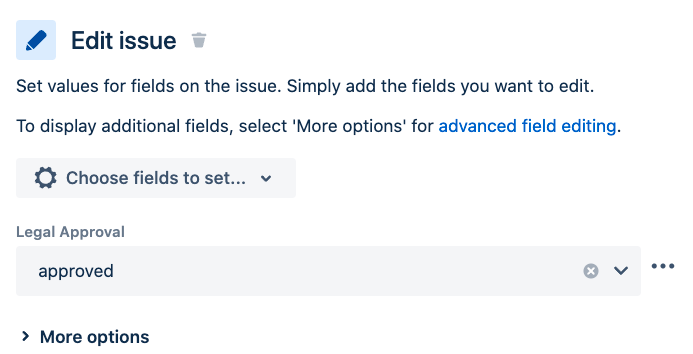
- In Jira, within the JQL component, add an Edit issue action component.
- In the Choose fields to set dropdown, check the Legal Approval field that we created and select
approvedas its value. - If desired, add any additional changes you wish to make to the issue.
- In the Choose fields to set dropdown, check the Legal Approval field that we created and select
- Publish your Jira automation. Congratulations, you have an automation rule that can update a Jira issue when a specific approval has occurred!
Updated 5 months ago
