OAuth 2.0 for Partners
Overview
The following details how an Ironclad partner would register an OAuth 2.0 client application and request authorization for customer resources using the 3rd party OAuth 2.0 authorization code grant framework.
Client Application Registration
Registering
The first step to setting up your application with Ironclad’s 3rd party OAuth implementation is to register your client application.
To register your client application, navigate to the registration page:
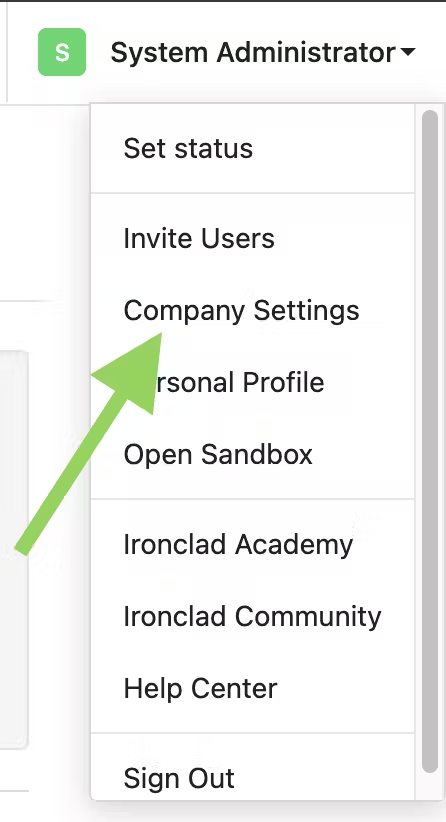
- Click on your user profile dropdown at the top right-hand corner > Select “Company Settings”.
- Select the “API” tab on the left sidebar > Select the “Applications” tab across the middle.
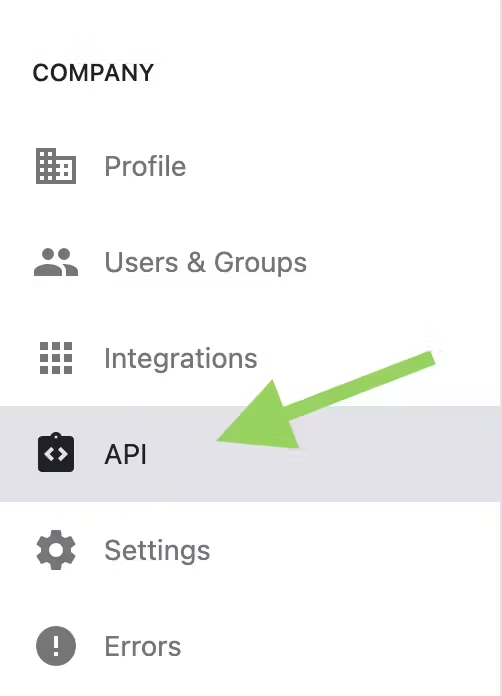

The “API” tab will only be visible if you have the API feature enabled for your instance. Additionally, the “Applications” tab will only be visible if you have the OAuth feature enabled for your instance.
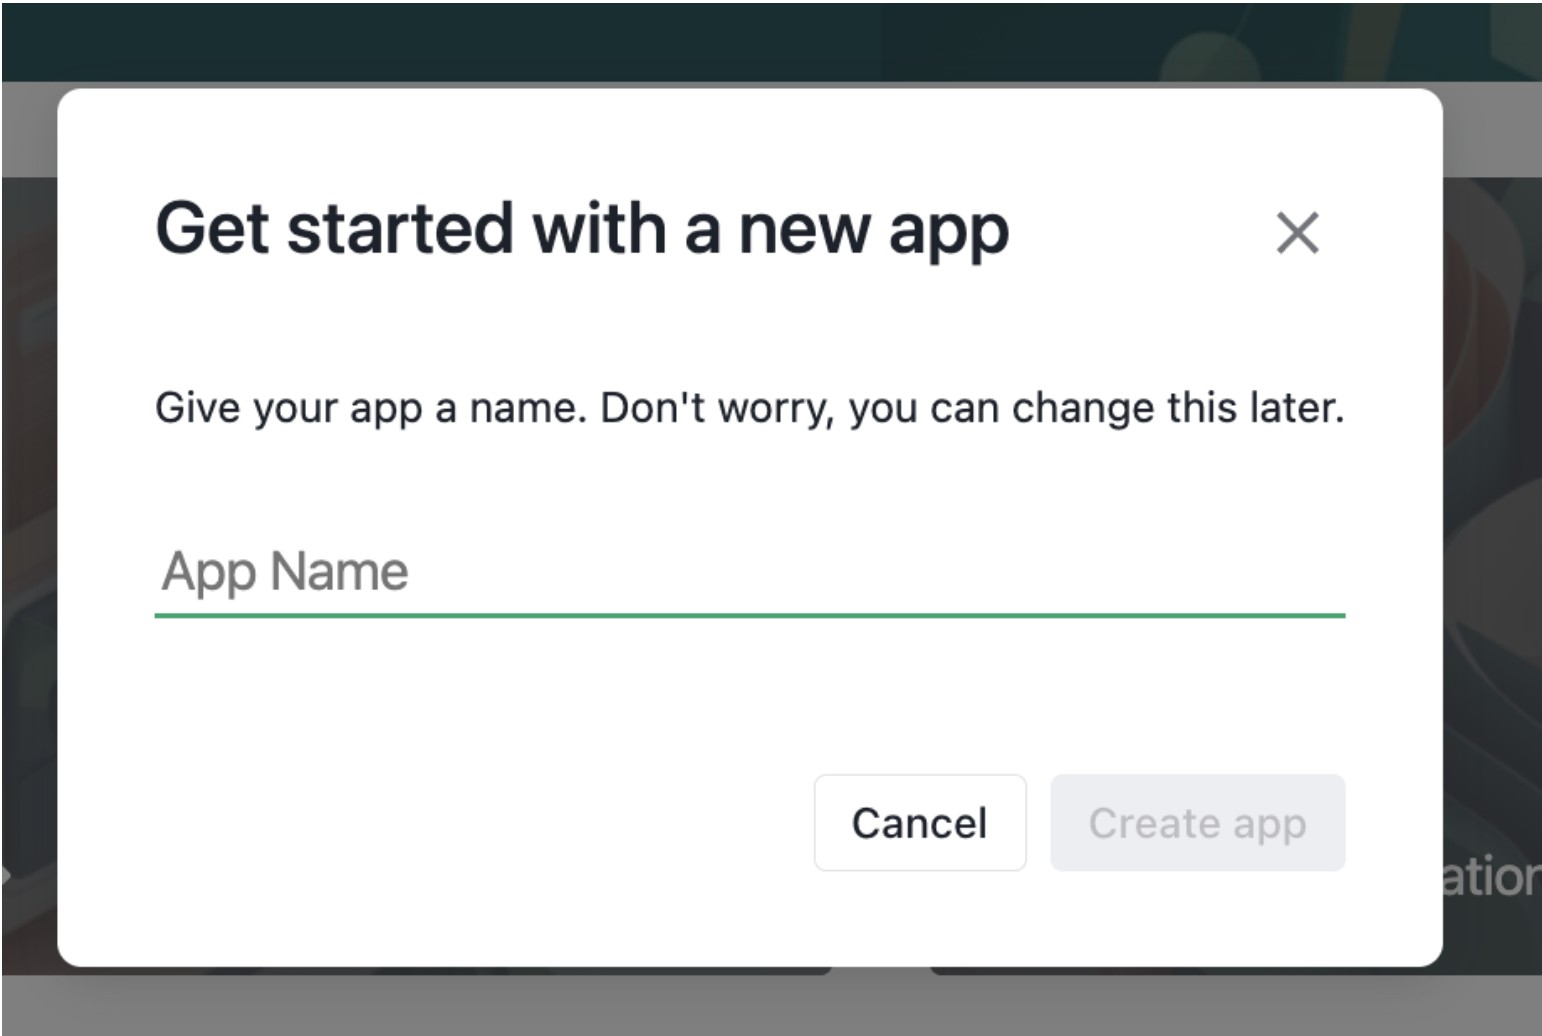
- After arriving there, you will click on the “Create new app” button.

- A popup will appear which will require a name to be entered for the OAuth application. Once the name is entered, click "Create app".
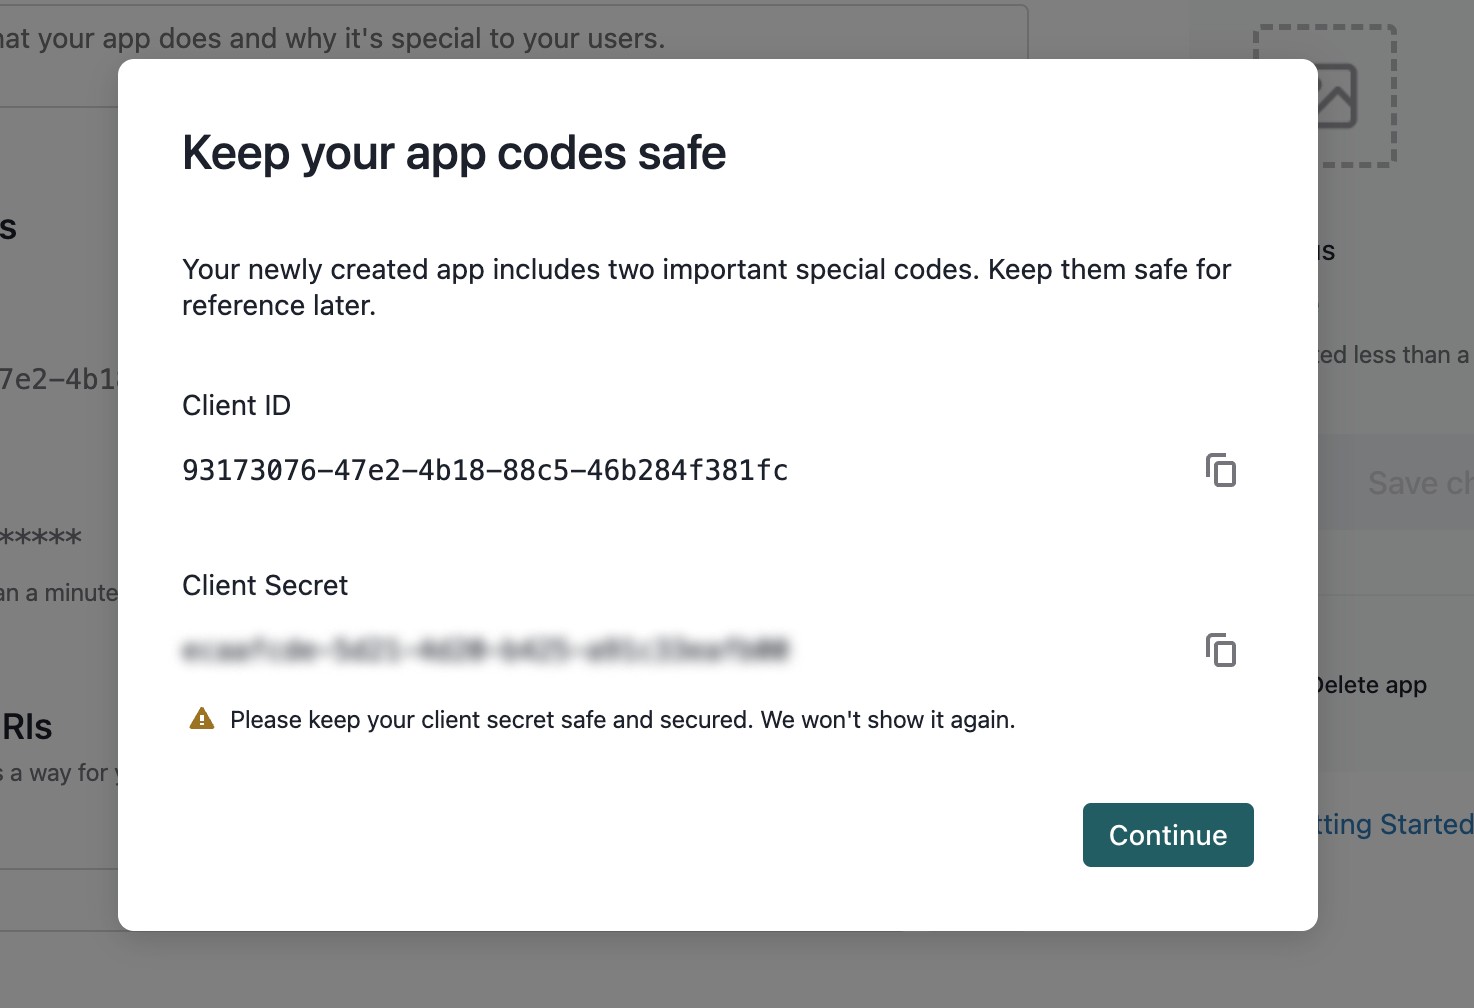
- This will generate a new client application and supply you with a client ID and secret. Save this secret, as you will not be able to access it again.
- After closing the modal, fill out the client application details and click “Save Changes”.
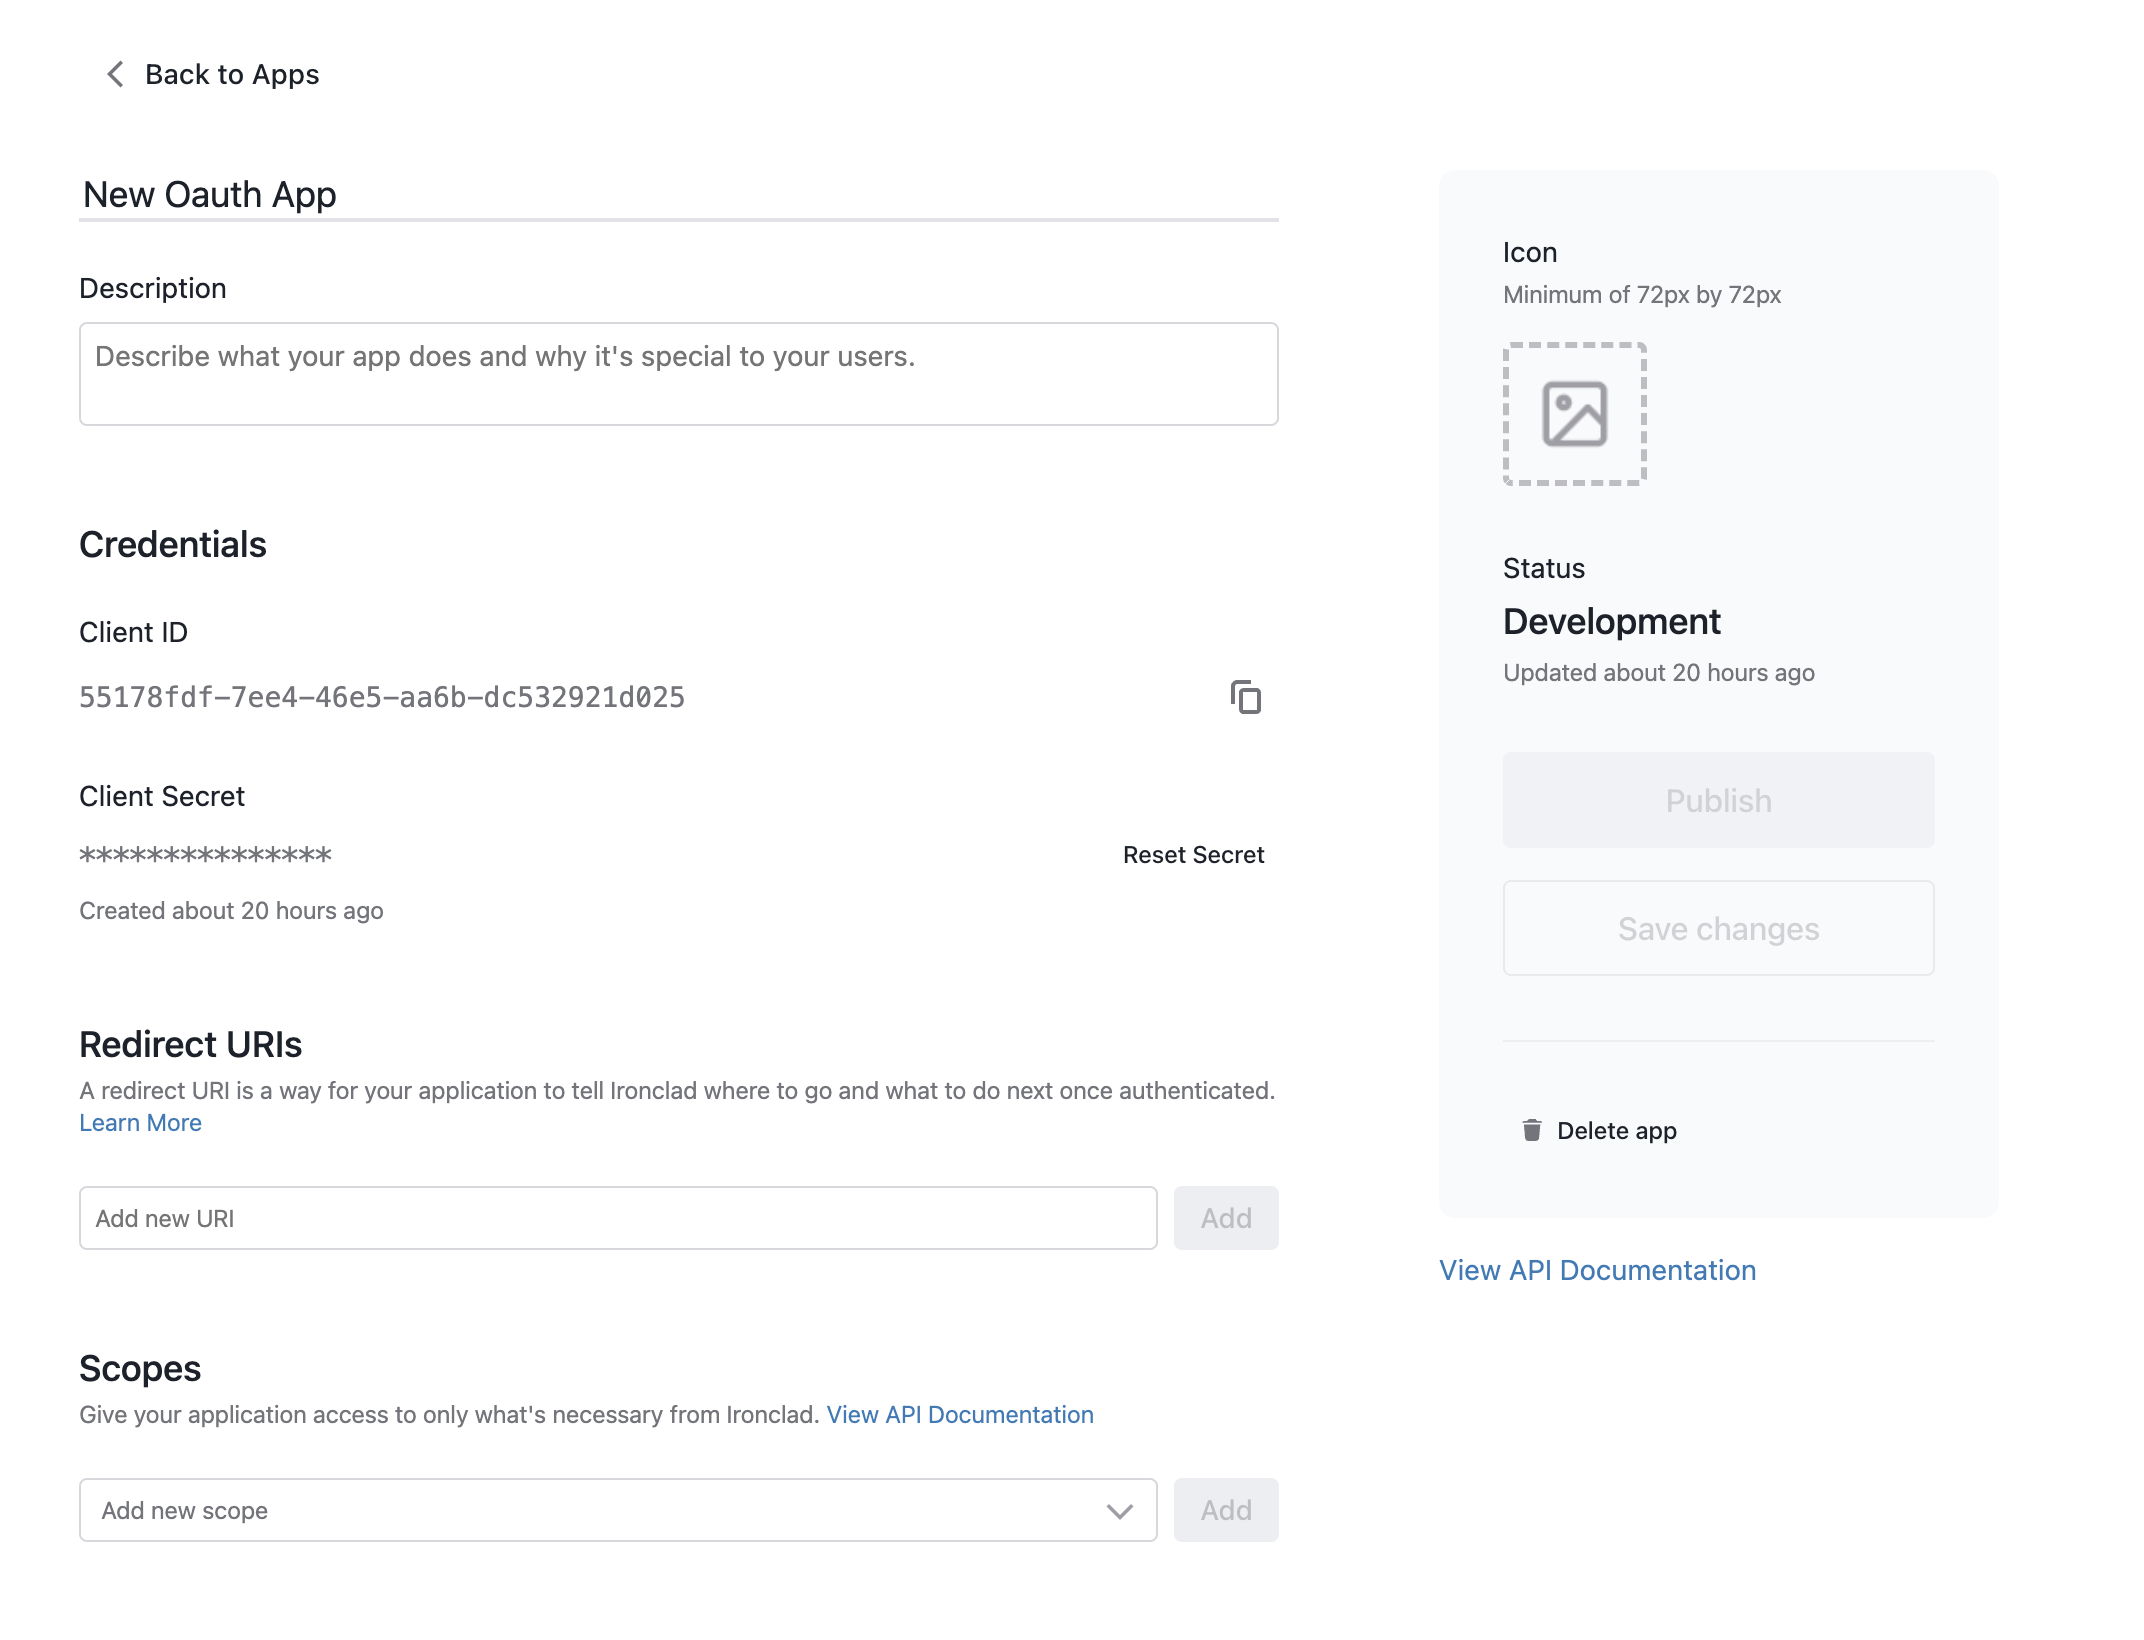
- Description
- Display Image
- This image will populate in the OAuth request dialog.
- Redirect URIs
- The URIs allowed in authorization requests to which the Ironclad Authorization Server will redirect the user's web browser after the user has authenticated and authorized the client application's access to protected resources.
- When developing, "localhost" is a valid redirect URI.
- Requested Resource Scopes
- The resource scopes allowed in authorization requests for this client application. Authorization requests can contain a subset of these allowable scopes if warranted.
Application Status
Client applications are generated in “Development” status. When the application is in development, authorization requests will only work for users in the client application’s company. Requests to acquire a token with a user from a different company will be rejected. This status is intended for testing or internal applications.
After the application is production-ready, email [email protected] to request a review of your application. Include your client application name and ID in your email. The team will review your application and approve it for production, or set up a call to gather more information prior to approval.
Once your application is in “Production” status, authorization requests from users in other companies are allowed.
Environments
Ironclad has multiple environments. The majority of our customers use the ironcladapp.com production environment and our EU customers use the eu1.ironcladapp.com production environment. We also have a demo.ironcladapp.com demo environment.
Each of these environments operates independently. So a client application generated on ironcladapp.com will only be able to authorize users on that same environment. Additionally, client applications cannot be transferred from one environment to another. You will need to recreate the client applications on each environment.
Your initial production environment has been provisioned on Ironclad’s North America instance (ironcladapp.com). Since an OAuth app must be published in the same instance as the customer intends to use it, you’ll eventually have to publish your app onto our EU and demo instances to allow EU and sandbox users to test and utilize the integration as well.
To publish your app onto other instances, you will have to make some targeted, non-functional updates to your code to reference the correct domain:
- Register an app in each additional production environment(s) we give you.
- Update your auth flow to use the production client ID and client secret.
- Tweak the hostname on your auth-related calls (e.g. ironcladapp.com to eu1.ironcladapp.com)
- Change the hostname on your other resource-related API calls (e.g.ironcladapp.com to eu1.ironcladapp.com)
Note: we suggest making all of these environment-related elements variables from the start as you will eventually need some sort of variable router to be able to support Ironclad’s different regional and sandbox instances in order to support our full customer base.
OAuth Authorization Code Flow
Requesting a Token
-
Construct the authorization request URL: The authorization request should be a GET request to the authorize endpoint URL. The authorization request URL should include several query parameters, including the response type, client ID, redirect URI, and scope. The format of the URL should be as follows:
GET https://ironcladapp.com/oauth/authorize? response_type=code &client_id=CLIENT_ID_HERE &redirect_uri=REDIRECT_URI_HERE &scope=SCOPE_HERE &state=STATE_HERE- The
response_typeparameter should always be set to "code" for the authorization code flow. - The
client_idparameter is the client identifier that identifies your application to the authorization server and can be found on the client application registration page. - The
redirect_uriparameter is the URI that the authorization server will redirect the user's browser to after authentication. Theredirect_urimust be one of the registered redirect URIs on the client application registration page. - The
scopeparameter specifies the level of access that your application is requesting. It should be a space-separated string of Ironclad resource scopes that can be found on the client application registration page. The scopes requested must be equal to or a subset of the client application’s registered scopes. - The optional
stateparameter is used to maintain state information between the client application and the authorization server during the OAuth authorization request and response exchange. By including a randomly generated and cryptographically secure value in the "state" parameter, the client can verify that the response from the authorization server corresponds to the original request.
- The
-
Redirect the user's browser to the authorization request URL: Once you have constructed the authorization request URL, you should redirect the user's browser to that URL. This can be done using a simple HTTP redirect response, or by rendering a link or button on a web page that the user can click on.
-
The user authenticates with the authorization server: Once the user is redirected to the Ironclad authorization endpoint, they will be prompted to log in and consent to your application's request for access to their resources.
-
The authorization server responds with an authorization code: If the user successfully authenticates and consents to the request, the authorization server will redirect the user's browser back to your application's redirect URI with a
codequery parameter with the authorization code in the URL. If astateparam was included in the authorization request, that will be included as well.REDIRECT_URI_HERE/?code=AUTHORIZATION_CODE_HERE&state=STATE_HERE- If the user denies the request, the authorization server will redirect the user's browser back to your application's redirect URI with an
errorquery parameter of “access_denied” in the URL
- If the user denies the request, the authorization server will redirect the user's browser back to your application's redirect URI with an
-
Construct the token request: The token request should be a POST request to the token endpoint URL. The request body should include several parameters in JSON format, including the authorization code, client ID, client secret, redirect URI, and grant type. The format of the request should be as follows:
POST https://ironcladapp.com/oauth/token grant_type=authorization_code code=AUTHORIZATION_CODE_HERE redirect_uri=REDIRECT_URI_HERE client_id=CLIENT_ID_HERE client_secret=CLIENT_SECRET_HERE- The
grant_typeparameter should always be set to "authorization_code" for the authorization code flow. - The
codeparameter is the authorization code that your application received from the authorization server. - The
redirect_uriparameter is the URI that the authorization server will redirect the user's browser to after authentication. Theredirect_urimust be one of the registered redirect URIs on the client application registration page and must be the same redirect URI included in the authorization request. - The
client_idparameter is the client identifier that identifies your application to the authorization server and can be found on the client application registration page. - The
client_secretparameter is a secret that is used to authenticate your application with the authorization server. The client secret is provided when you first register your application and is unretrievable afterward. If you need to rotate or reset your secret, this can be done from the client application registration page. - Note: The client ID and secret can be optionally included in an
Authorizationheader prepended with the “Base” keyword and base64 encoded with a colon separator between the client ID and secret.
- The
-
Send the token request: Once you have constructed the token request, you should send it to the token endpoint URL using a POST request. The authorization server will then validate the request and respond with an access token, a refresh token, the granted scopes, the token type, and the number of seconds until expiration.
{"access_token":"ACCESS_TOKEN_HERE", "refresh_token":"REFRESH_TOKEN_HERE", "scope":["public.workflows.readWorkflows"], "expiresIn":21600, "token_type":"Bearer"}
Requesting Resources
Once your application receives the access token, it can be used to access the user's resources by including the token in the Authorization header of subsequent requests to protected resources. The format of the authorization header should be as follows:
Authorization: Bearer ACCESS_TOKEN_HERERefreshing a Token
Issued access tokens expire after 6 hours. Refresh tokens do not expire, but are reissued upon a successful access token refresh. To get a new access token, send a refresh request to the token endpoint using the refresh token. Note that a successful refresh will issue BOTH a new access token and a new refresh token.
- Construct the token refresh request: The token refresh request should be a POST request to the token endpoint URL. The request body should include several parameters in JSON format, including the refresh token, client ID, client secret, and grant type. The format of the request should be as follows:
- The
grant_typeparameter should be set to "refresh_token" for the token refresh flow. - The
refresh_tokenparameter is the refresh token that was obtained during the initial authorization flow. - he
scopeThescopeparameter specifies the level of access that your application is requesting. It should be a space-separated string of Ironclad resource scopes that can be found on the client application registration page. The scopes requested must be equal to or a subset of the client application’s registered scopes and the previously granted scopes. - The
client_idparameter is the client identifier that identifies your application to the authorization server and can be found on the client application registration page. - The
client_secretparameter is a secret that is used to authenticate your application with the authorization server. The client secret is provided when you first register your application and is unretrievable afterward. If you need to rotate or reset your secret, this can be done from the client application registration page. - Note: The client ID and secret can be optionally included in an
Authorizationheader prepended with the “Base” keyword and base64 encoded with a colon separator between the client ID and secret.
- The
- Send the token refresh request: Once you have constructed the token refresh request, you should send it to the token endpoint URL with a POST request. The authorization server will then validate the request and respond with a new access token, a new refresh token, the token type, and the number of seconds until expiration.
Integration Design Considerations
User in Company Scope
The OAuth 2.0 flow will always generate a token associated with a user within a company and a client application. As such, requests made with that token will have the same permissions as that user within the company and the permissions and responses will match correspondingly. This differs from the previous company-scoped bearer token implementation which generates tokens that act as company admins, having full access to the product.
For example: When queried with an OAuth-generated token, the
GET /workflowsendpoint will return workflows that the user has permission to see at the corresponding company. Endpoints like thePOST /workflowsendpoint or thePATCH /workflows/:id/approvalsendpoints will act on behalf of the token’s user, launching workflows with the token user as the creator and approving workflows on behalf of the token user respectively. This differs from the company-scoped bearer tokens where a creator or approver was included in the request body to denote who the workflow should be launched or approved on behalf of.
Certain endpoints, like the /webhooks endpoints will only be accessible by OAuth tokens associated with users who would have permission to access those resources in the UI - company admins. So a token generated from an OAuth flow with a standard non-admin user would not be able to create, update, read, or delete webhooks.
Authorization Design Patterns
What this change means in practice is that new OAuth-authenticated integrations will need to be designed with a user-in-company-scoped OAuth token in mind, and existing integrations built off the company-scoped bearer tokens may need to be reworked to fit the user-in-company-scoped model.
There are generally three different designs that would work for authenticating your integration.
Company Admin or Service Account Connection
In this design, you would have a user or service account with company admin permissions in Ironclad go through the authorization flow to generate a user-in-company-scoped token that has company admin permissions in Ironclad.
Requests made with this token will be able to access all resources (e.g. all workflows returned by GET /workflows) and access all endpoints (e.g. be able to create webhooks via POST /webhooks). Note however that requests made with this token will have the associated user as a creator/approver/etc and permissions will be limited to that user (e.g. this token cannot approve on behalf of other users).
This design would be useful when you have a company-level integration that doesn’t need to take actions or scope resource requests by user, and so you can simplify the setup process by just having a company admin do the connection.
User Connections
In this design, you would have each user who was going to be accessing the integration go through the authorization flow, generating many user-in-company-scoped tokens specific to each Ironclad user.
Requests made with this token will be able to access all non-admin endpoints and the results and permissions for the request will be scoped to the user’s permissions (e.g. GET /workflows will return the workflows that the user connected to the token has access to see and PATCH /workflow/:id/approvals will only allow a token associated with the approval’s user, make the approval).
This design would be most useful when you want the integration to show users the resources that they have access to and allow users to take actions like creating and approving workflows on their behalf, but your integration does not need to access any admin-only endpoints.
Company Admin or Service Account and User Connections
In this design, you would have an Ironclad company admin or service account go through the authorization flow and then have individual users go through the authorization flow as well.
This is the recommended design when you want your integration to both respect user-in-company-scoping and permissioning while also being able to access admin-only endpoints like webhooks.
Updated 10 months ago
What’s Next
Now that you have acquired an access token via the OAuth 2.0 authorization code grant flow, use it to query the Ironclad API on the user's behalf.