---
updatedAt: 2026-08-27T18:44:47.000Z
---
Fetch the complete documentation index at: https://developer.ironcladapp.com/llms.txt. Use this file to discover all available pages before exploring further. Append .md to any documentation page URL to get its markdown version.
# Embed a Clickwrap
This is a simple example outlining how to embed a clickwrap within an iframe.
# Goal
Technical audiences will learn how to use [Ironclad's Clickwrap Workflow](https://support.ironcladapp.com/hc/en-us/articles/31799869113111-Clickwrap-Workflows-Overview) to implement embedded clickwrap in their own pages. Some examples of where this use case/flow could be used:
1. Accepting Terms of Service during account creation
2. Clicking "I agree" before starting a free trial
3. Privacy Policy acknowledgment
4. Cookie consent banners
## Overview
This guide will cover the steps for embedding a clickwrap in your own page, once you have created and published a Clickwrap Workflow.
## Prerequisites
1. Clickwrap Workflows must be purchased and enabled for your company.
2. A Clickwrap Workflow must be [created and published](https://support.ironcladapp.com/hc/en-us/articles/31799869113111-Clickwrap-Workflows-Overview).
3. The hostname of the page you are embedding clickwrap within must be listed as an allowed domain in the published Clickwrap Workflow.
Public API access is helpful, but not strictly required to use and embed Clickwrap Workflows.
Note: This guide and any software contained in it should be used at your own risk by individuals qualified to evaluate its effectiveness. IT IS PROVIDED “AS IS”, WITHOUT WARRANTY OF ANY KIND, EXPRESS OR IMPLIED, INCLUDING BUT NOT LIMITED TO THE WARRANTIES OF MERCHANTABILITY, FITNESS FOR A PARTICULAR PURPOSE AND NONINFRINGEMENT. IN NO EVENT SHALL IRONCLAD BE LIABLE FOR ANY CLAIM, DAMAGES OR OTHER LIABILITY, WHETHER IN AN ACTION OF CONTRACT, TORT OR OTHERWISE, ARISING FROM, OUT OF OR IN CONNECTION WITH YOUR USE OF THIS GUIDE OR ANY SOFTWARE IT CONTAINS.Your use of the Ironclad API must comply with Ironclad’s API Terms of Use (available at ) and the terms of the Enterprise Services Agreement (or equivalent) entered into between you and Ironclad.
# Details
## Data Schema
Just as with launching workflows via the public API, launching a Clickwrap Workflow requires knowledge of the data schema of the workflow configuration, to correctly format the launch payload.
If you have access to the public API, you can use the [Retrieve a Workflow Schema endpoint](https://developer.ironcladapp.com/reference/retrieve-a-workflow-schema) to retrieve the schema for your Clickwrap Workflow.
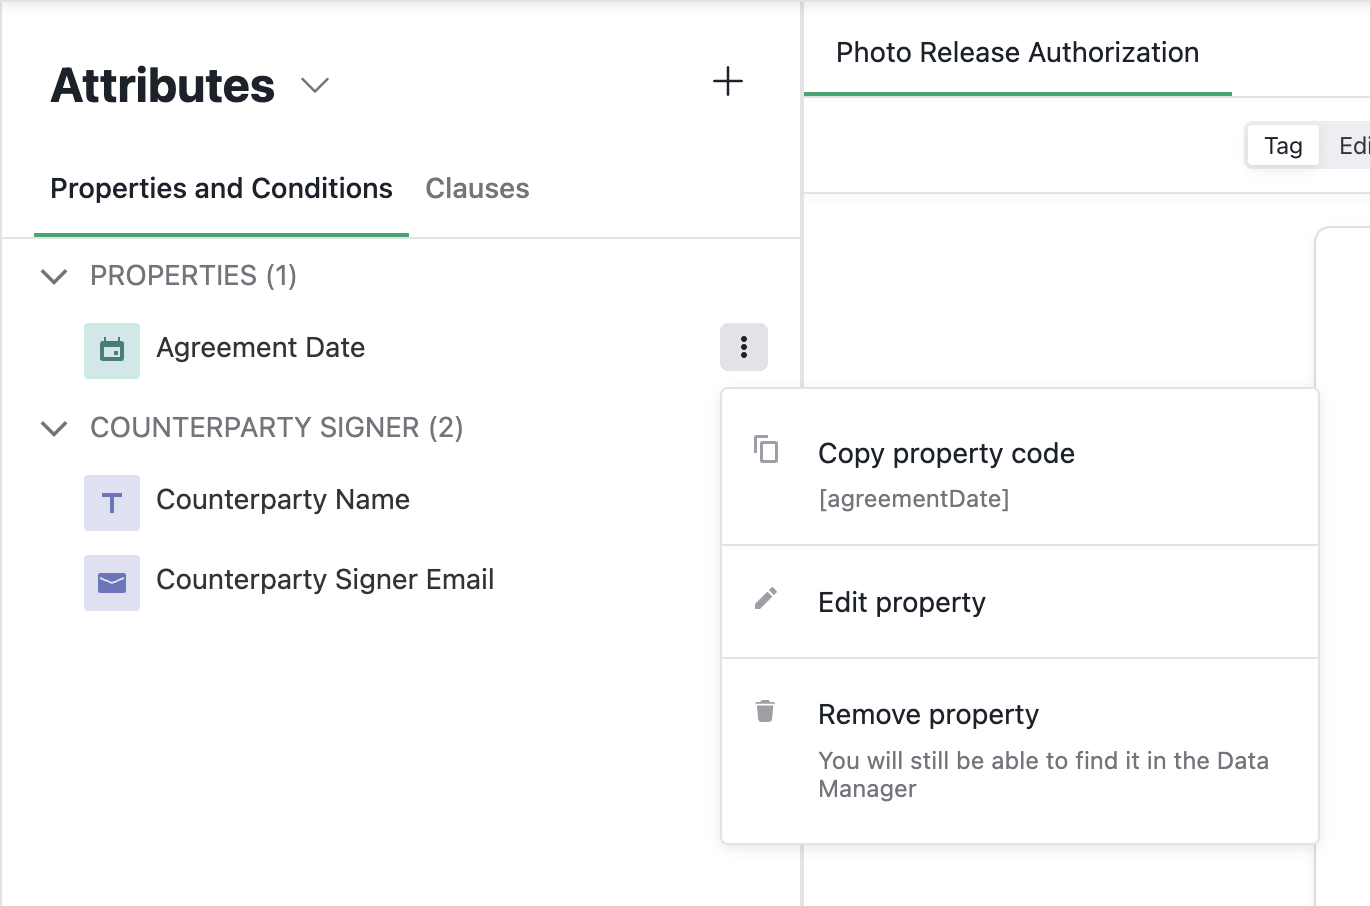
If you do not have access to the public API, you can check the properties panel in Workflow Designer for data types and property keys for each property. The property key is the same as the property code, except without the enclosing `[]` brackets (e.g. if `[counterpartyName]` is the property code copied from Workflow Designer, `counterpartyName` is the property key).
Copy Property Code in Workflow Designer
Example values for each data type can be found in the [Launch a Workflow guide](https://developer.ironcladapp.com/docs/launch-a-workflow).
## Iframe Element URL
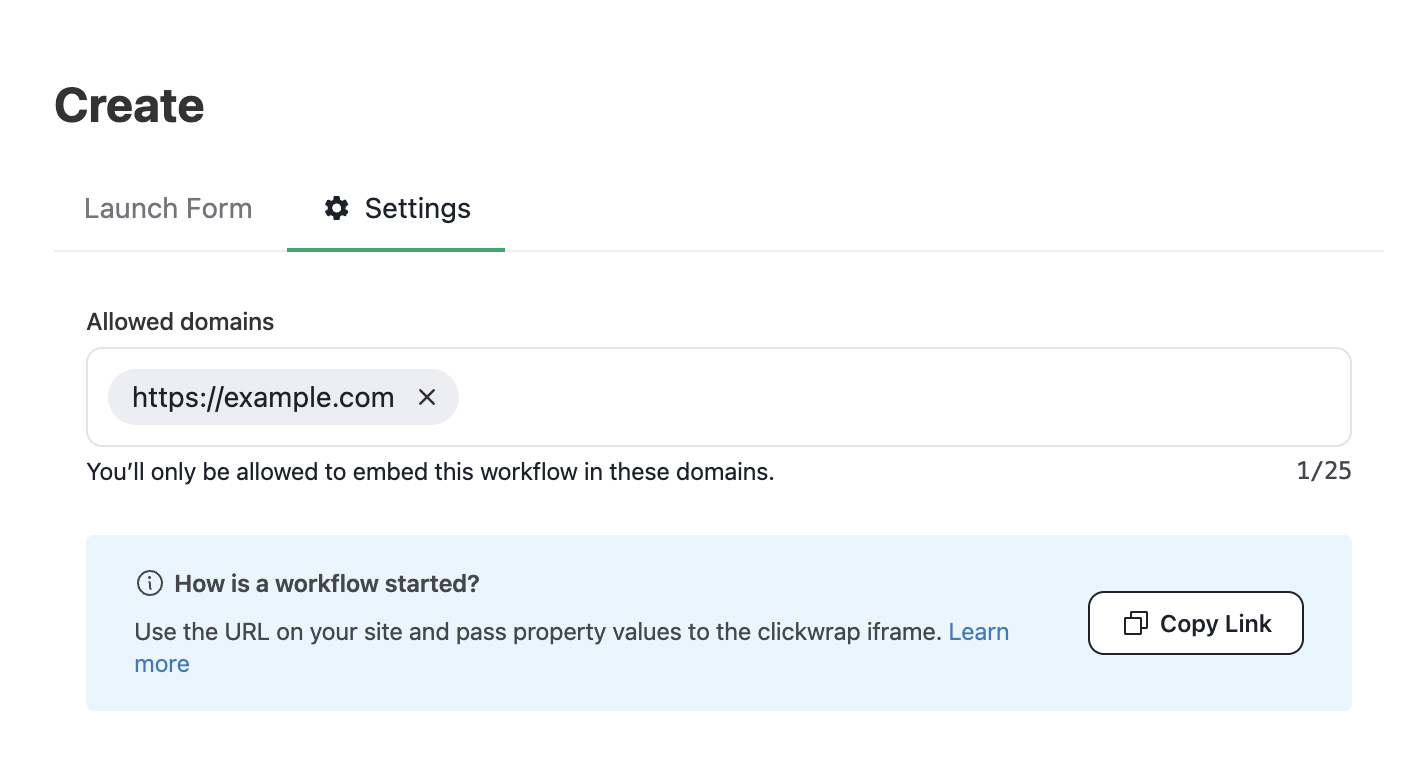
Once you have the minimum requirements, you will need to have a clickwrap workflow created. Before publishing, please make sure that on the Create tab, under Settings, that you have added the domain URL of the page where you will be embedding. Then, you can publish the workflow and click “Copy Link”. The link that is copied to your clipboard is the link you will use for the iframe URL.
Copy Clickwrap Link in Workflow Designer
The URL provided is of the format `https://ironcladapp.com/clickwrap/:workflowTemplateId?jwt=...` (e.g. `https://ironcladapp.com/clickwrap/683774e21040896675e566f8?jwt=ey12345...`). You will need the workflow template ID to send messages to the iframe. The workflow template ID remains constant, so you do not need to re-copy the link when you publish updates to your workflow configuration.
> **Note:** If you migrate your workflow to a different environment (e.g., demo to production), you *will* need to copy the link from the new environment after publishing, as the workflow template ID will have changed.
For your iframe element, there is one special detail parameter that you will also need to add to the URL you just copied. You will need to add a query parameter `parent` where the value is the domain of what you entered when configuring your allowed origins. For example, you may add to the end of the copied iframe a value like `&parent=https://www.example.com`.
Once you have that full URL (i.e. copied URL + `parent` parameter), you can add an iframe element to the page with the full URL as the `src`.
```html
// client-side
// style this via classnames/CSS stylesheets to set height/width
```
**Important:** To prevent the iframe from showing a white background while loading, set `visibility: hidden`. Then, be sure to set the `style.visibility` of the iframe to `visible` once the `clickwrap_load_succeeded` event fires.
## Loading Embedded Clickwrap
To load the checkbox and acceptance language, you must post a `set_data` message to the iframe. The iframe will not load and display the checkbox and acceptance language without receiving this message.
Here is an example of sending the `set_data` message:
```typescript
const CLICKWRAP_IFRAME_ORIGIN = 'https://ironcladapp.com';
// template ID, which is the ID in the iframe URL
const WORKFLOW_TEMPLATE_ID = '64c069ba71c24ecfff394e3a';
type ParentToIframeMessageData = (
| { type: 'send_acceptance' }
| { type: 'set_data'; data: { formValues: Record } }
) & { workflowTemplateId: string };
function sendIframeMessage(messageData: ParentToIframeMessageData) {
const iframeInPage = document.getElementById('my-iframe');
if (iframeInPage == null) {
console.error('Unable to find iframe in page');
return;
}
iframeInPage.contentWindow.postMessage(messageData, CLICKWRAP_IFRAME_ORIGIN);
};
sendIframeMessage({
type: 'set_data',
data: {
// same payload shape as launching a workflow via public API
formValues: {
counterpartyName: 'Example Counterparty',
counterpartySignerEmail: 'counterparty@example.com'
}
},
workflowTemplateId: WORKFLOW_TEMPLATE_ID
});
```
Once the data has been set in the iframe, the checkbox and acceptance language should show, as long as the data and set of default values set in Workflow Designer includes all required properties (signer name and email) and adheres to the schema described in the first section.
### Customize Clickwrap Styling
You can customize the appearance of the embedded clickwrap by including an optional `styles` object within `data` in the `set_data` message. This allows you to control the visual appearance of the checkbox, acceptance language text, document link text, and iframe background color.
Here is an example of the `set_data` message with the optional `styles` object:
```typescript
sendIframeMessage({
type: "set_data",
data: {
// Same payload shape as launching a workflow via public API
formValues: {
counterpartyName: 'Example Counterparty',
counterpartySignerEmail: 'counterparty@example.com'
},
// Optional styles object:
styles: {
checkbox: {
uncheckedBorderColor: "#007490",
uncheckedBackgroundColor: "#F8F8F7",
checkedBackgroundColor: "#00A66F",
checkmarkColor: "lavender",
},
backgroundColor: "transparent", // default value - shown for structure
acceptanceLanguageText: {
fontSize: "16px",
color: "#00a66f",
fontWeight: "500",
fontFamily: {
type: "common",
fontFamilyName: "Helvetica",
},
fontStyle: "normal", // default value - shown for structure
textDecoration: undefined, // default value - shown for structure
},
documentLink: {
color: "#006c47",
fontWeight: "600",
fontFamily: {
type: "google",
fontFamilyName: "Borel",
},
fontStyle: "normal", // default value - shown for structure
fontSize: "16px" // value inherited from acceptanceLanguageText.fontSize - shown for structure
},
},
},
workflowTemplateId: WORKFLOW_TEMPLATE_ID,
});
```
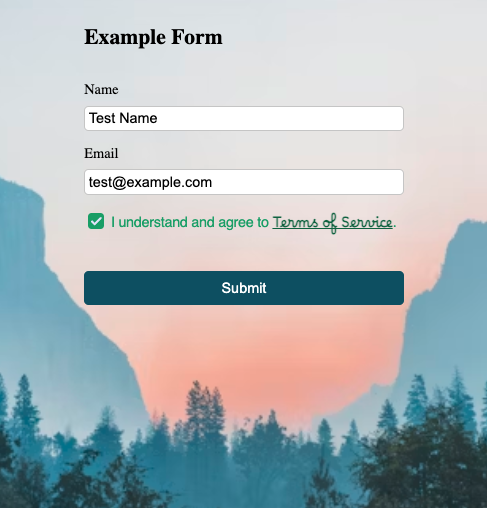
The `styles` object defined above would render as follows *(note that in this example, the iframe has a height of 60px, a border of 0, a max-width of 450px, and a width of 100%)*:
Example of Embedded Clickwrap with Custom Styling
#### Supported Style Properties
The following sections detail the style customizations available for the different elements within the embedded clickwrap iframe.
##### Checkbox Styling
The table below details the properties you can customize within `styles.checkbox`. If no value for a given property is provided, the default value is used.
| Property | Description | Valid Input | Default Value |
| -------------------------- | ----------------------------------------------- | -------------------------------------------------------------------------------------- | ------------- |
| `uncheckedBorderColor` | Border color of the checkbox when unchecked | Any valid [CSS color property](https://developer.mozilla.org/en-US/docs/Web/CSS/color) | `#1c212b` |
| `uncheckedBackgroundColor` | Background color of the checkbox when unchecked | Any valid [CSS color property](https://developer.mozilla.org/en-US/docs/Web/CSS/color) | `white` |
| `checkedBackgroundColor` | Background color of the checkbox when checked | Any valid [CSS color property](https://developer.mozilla.org/en-US/docs/Web/CSS/color) | `#1c212b` |
| `checkmarkColor` | Color of the checkmark icon when checked | Any valid [CSS color property](https://developer.mozilla.org/en-US/docs/Web/CSS/color) | `white` |
***
##### Background Styling
The table below shows the property you can use to customize the background color for the iframe within `styles`. If no value is provided, the default value is used.\
| Property | Description | Valid Input | Default Value |
| ----------------- | ------------------------------ | -------------------------------------------------------------------------------------- | ------------- |
| `backgroundColor` | Background color of the iframe | Any valid [CSS color property](https://developer.mozilla.org/en-US/docs/Web/CSS/color) | `transparent` |
***
##### Acceptance Language Text Styling
The table below details the properties you can customize within `styles.acceptanceLanguageText`. Document links will inherit these styles unless `documentLink` styling is provided. If no value for a given property is provided, the default value is used.\
| Property | Description | Valid Input | Default Value |
| ---------------- | -------------------------------------------- | -------------------------------------------------------------------------------------------------- | -------------------------- |
| `fontFamily` | Font family for acceptance language text | Details for valid font family inputs [here](#font-family-options) | `Arial` |
| `fontSize` | Font size for acceptance language text | Any valid [CSS font-size property](https://developer.mozilla.org/en-US/docs/Web/CSS/font-size) | `14px` |
| `color` | Text color for acceptance language text | Any valid [CSS color property](https://developer.mozilla.org/en-US/docs/Web/CSS/color) | `#333` |
| `fontWeight` | Font weight for acceptance language text | Any valid [CSS font-weight property](https://developer.mozilla.org/en-US/docs/Web/CSS/font-weight) | `400` |
| `fontStyle` | Font style for acceptance language text | Any valid [CSS font-style property](https://developer.mozilla.org/en-US/docs/Web/CSS/font-style) | `normal` |
| `textDecoration` | Text decoration for acceptance language text | Only supports `"underline"` | `undefined` (no underline) |
***
##### Document Link Styling
The table below details the properties you can customize within `styles.documentLink`. Document link styles take precedence over any inherited styles from `acceptanceLanguageText`. If no value for a given property is provided for the document link or the acceptance language text, the default value is used. Note: Document links are always underlined.\
| Property | Description | Valid Input | Default Value |
| ------------ | ---------------------------------- | -------------------------------------------------------------------------------------------------- | ------------- |
| `fontFamily` | Font family for document link text | Details for valid font family inputs [here](#font-family-options) | `Arial` |
| `fontSize` | Font size for document link text | Any valid [CSS font-size property](https://developer.mozilla.org/en-US/docs/Web/CSS/font-size) | `14px` |
| `color` | Text color for document link text | Any valid [CSS color property](https://developer.mozilla.org/en-US/docs/Web/CSS/color) | `#333` |
| `fontWeight` | Font weight for document link text | Any valid [CSS font-weight property](https://developer.mozilla.org/en-US/docs/Web/CSS/font-weight) | `400` |
| `fontStyle` | Font style for document link text | Any valid [CSS font-style property](https://developer.mozilla.org/en-US/docs/Web/CSS/font-style) | `normal` |
Text Styling Precedence Example:
```typescript
styles: {
acceptanceLanguageText: {
color: "SteelBlue",
fontSize: "16px",
/* The following default values will render since not otherwise provided:
- font family: Arial,
- font weight: 400,
*/
},
documentLink: {
color: "MidnightBlue", // Document links use MidnightBlue, rest of text uses SteelBlue
// fontSize is not specified, so document links inherit "16px" from acceptanceLanguageText
// inherit default font family and font weight
}
}
```
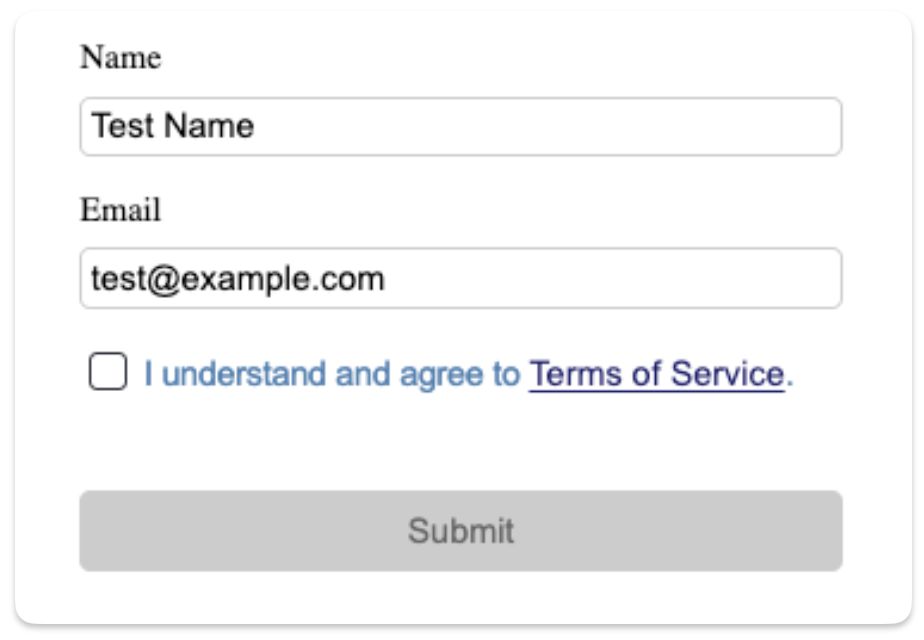
Rendering of text styling precedence example.
#### Font Family Options
You can customize the font for both the acceptance language text as well as the document link text. The `fontFamily` property accepts an object with the following structure in which you can use a supported common font, or you can use a Google Font.
```typescript
{
type: "common" | "google",
fontFamilyName: string
}
```
##### Common Fonts
When using `type: "common"`, the `fontFamilyName` must be one of the following supported fonts:
* Courier New
* Lucida Console
* Times New Roman
* Garamond
* Georgia
* Arial
* Arial Narrow
* Calibri
* Helvetica
* Tahoma
* Verdana
Here is an example of how to style the acceptance language text with a common font:
```typescript
styles: {
acceptanceLanguageText: {
fontFamily: {
type: "common",
fontFamilyName: "Lucida Console",
},
},
},
```
##### Google Fonts
When using `type: "google"`, the `fontFamilyName` must match the **exact** casing and spacing as provided in the [Google Fonts library](https://fonts.google.com/). Examples below:
* Google Font [Instrument Sans](https://fonts.google.com/specimen/Instrument+Sans?query=Instrument+Sans):
✅ Correct Usage:
```typescript
fontFamily: {
type: "google",
fontFamilyName: "Instrument Sans"
}
```
❌ Incorrect Usage:
```typescript
fontFamily: {
type: 'google',
fontFamilyName: 'instrument sans' // casing does not match casing used in Google Fonts
}
```
* Google Font [UnifrakturMaguntia](https://fonts.google.com/specimen/UnifrakturMaguntia?query=UnifrakturMaguntia) (includes no spaces in its name in Google Fonts):
✅ Correct Usage:
```typescript
fontFamily: {
type: "google",
fontFamilyName: "UnifrakturMaguntia"
}
```
❌ Incorrect Usage:
```typescript
fontFamily: {
type: "google",
fontFamilyName: "Unifraktur Maguntia" // incorrectly includes a space
}
```
* Google Font [IBM Plex Mono](https://fonts.google.com/specimen/IBM+Plex+Mono?query=IBM+Plex+Mono):
✅ Correct Usage:
```typescript
fontFamily: {
type: "google",
fontFamilyName: "IBM Plex Mono"
}
```
❌ Incorrect Usage:
```typescript
fontFamily: {
type: "google",
fontFamilyName: "IBMPlexMono" // incorrectly removes spaces
}
```
Please note that if an invalid Google Font name is provided, the embedded clickwrap iframe will still load, but the browser's fallback font will be used. To debug:
* Inspect the iframe elements and search for `https://fonts.googleapis.com/css2?family=Your+Font+Name` to find the url that includes that font name you provided.
* Copy and paste the full URL into your browser to see any error messages provided from the Google Font API.
#### Troubleshooting Custom Styling
If any invalid styling property is provided, the iframe will post a `clickwrap_load_failed` event. You can handle styling errors in your message listener (additional details on listening for events can be found here):
```typescript
function handleMessageFromIframe(message: MessageEvent) {
if (message.origin !== CLICKWRAP_IFRAME_ORIGIN) {
return;
}
if (message.data.type === 'clickwrap_load_failed') {
console.log("clickwrap_load_failed");
if (message.data.data.err) {
console.error("Clickwrap load failed with error:", message.data.data.err);
// Example of an invalid styling error: "Invalid color: purpel. Please use a valid CSS color value."
}
}
}
```
### Loading Clickwrap Right Away
To get the acceptance language and checkbox(es) in the iframe to display right away when you have not yet collected all the data for the acceptance, you can set default data values in the iframe as soon as the page loads — so immediately after receiving the `clickwrap_initialized` event — instead of waiting for the user to populate all the form values. This can also be done by posting a subset of form values — or even an empty object as form values — if default values are set for all form values in WFD.
```typescript
function handleMessage(message: MessageEvent) {
if (message.origin !== CLICKWRAP_IFRAME_ORIGIN) {
return;
}
if (message.data.type === "clickwrap_initialized") {
sendIframeMessage({
type: "set_data",
data: {
formValues: {}, // use default values from Workflow Designer
},
workflowTemplateId: WORKFLOW_TEMPLATE_ID,
});
}
}
```
However, you should still send an updated `set_data` message with the final values before sending the `send_acceptance` message to capture acceptance, to ensure that the correct metadata is included with the acceptance.
## Listening For Events
In turn, the embedded clickwrap page also sends events to the parent page.
There are various events that you can listen to using an event listener. Once you have attached an event listener to the iframe, you may see the following events:
```typescript
type IframeToParentMessageData =
/*
* Triggered when the application has loaded and is ready to accept events (e.g. `set_data`).
*/
| { type: 'clickwrap_initialized' }
/*
* Triggered when the application receives the `set_data` calls and is in the process of retrieving additional data.
*/
| { type: 'clickwrap_is_loading' }
/*
* Triggered when the application successfully retrieved data after `set_data` was called.
* This is typically the time where the checkbox(es) and acceptance language will show.
* Check `areAllRequiredTemplatesAccepted` on each load to control submission state since changes
to form questions may impact which templates are required.
* If you set the iframe visibility to "hidden" initially to avoid a white background flash, set it to "visible" now.
*/
| { type: 'clickwrap_load_succeeded'; data: { areAllRequiredTemplatesAccepted: boolean } }
/*
* Triggered when the application was not able to retrieve data after `set_data` was called.
*/
| { type: 'clickwrap_load_failed'; data: { err: unknown } }
/*
* Triggered when a user clicks on a link in the acceptance language.
* The template is the ID of the template clicked, and the URL is the link used to download the document.
*/
| { type: 'clickwrap_link_clicked'; data: { template: string; url: string } }
/*
* Triggered when the user checks a checkbox.
* Check `areAllRequiredTemplatesAccepted` to determine if all required templates are accepted
and update app state accordingly (e.g. enable submit button).
*/
| { type: 'clickwrap_checkbox_checked'; data: { areAllRequiredTemplatesAccepted: boolean } }
/*
* Triggered when the user unchecks a checkbox.
* Check `areAllRequiredTemplatesAccepted` to determine if all required templates are accepted
and update app state accordingly (e.g. disable submit button).
*/
| { type: 'clickwrap_checkbox_unchecked'; data: { areAllRequiredTemplatesAccepted: boolean } }
/*
* Triggered when the `send_acceptance` event successfully sends acceptance.
*/
| { type: 'clickwrap_acceptance_succeeded' }
/*
* Triggered when the `send_acceptance` event was unable to successfully send acceptance.
*/
| { type: 'clickwrap_acceptance_failed'; data: { err: unknown } };
```
### Example Skeleton Listener
```typescript
function handleMessage(message: MessageEvent) {
if (message.origin !== CLICKWRAP_IFRAME_ORIGIN) {
return;
}
switch (message.data.type) {
case 'clickwrap_initialized':
// Loaded, can now set data
case 'clickwrap_is_loading':
// Data has been set, clickwrap is loading within iframe
case 'clickwrap_load_succeeded':
/* Clickwrap is loaded and interactable.
* Check `areAllRequiredTemplatesAccepted` on each load since form value changes may alter required templates.
* Update app state accordingly (e.g. enable/disable submit button).
*/
case 'clickwrap_load_failed':
/* Clickwrap loading failed, check data and try setting data again
* Clickwrap loading failed will post if any invalid style property is provided
*/
case 'clickwrap_link_clicked':
// Notification that the user has downloaded a clickwrap document
case 'clickwrap_checkbox_checked':
/* The user has checked the checkbox for acceptance.
* Check `areAllRequiredTemplatesAccepted` to determine if all required templates are accepted and update
app state accordingly (e.g. enable submit button).
*/
case 'clickwrap_checkbox_unchecked':
/* The user has previously checked the checkbox, but has now unchecked the box.
* Check `areAllRequiredTemplatesAccepted` to determine if all required templates are accepted and update
app state accordingly (e.g. disable submit button).
*/
case 'clickwrap_acceptance_succeeded':
// The acceptance has been successfully sent and recorded.
case 'clickwrap_acceptance_failed':
// The acceptance was not successfully sent and recorded.
default:
console.error('invalid message', { message });
}
}
const iframe = document.getElementById('my-iframe');
iframe.addEventListener("load", () => {
window.addEventListener("message", handleMessage);
});
```
## Sending Acceptance
To trigger acceptance, post a message to the iframe:
```typescript
sendIframeMessage({
type: "send_acceptance",
workflowTemplateId: WORKFLOW_TEMPLATE_ID,
});
```
Only send when `areAllRequiredTemplatesAccepted` is `true`. This boolean is included in `clickwrap_load_succeeded`, `clickwrap_checkbox_checked`, and `clickwrap_checkbox_unchecked` events. The call fails with `clickwrap_acceptance_failed` if data is not set, the clickwrap is not loaded, or `areAllRequiredTemplatesAccepted` is `false`.
**Tip:** Use the `areAllRequiredTemplatesAccepted` boolean to enable/disable your submit button, as form changes can alter which templates are required.